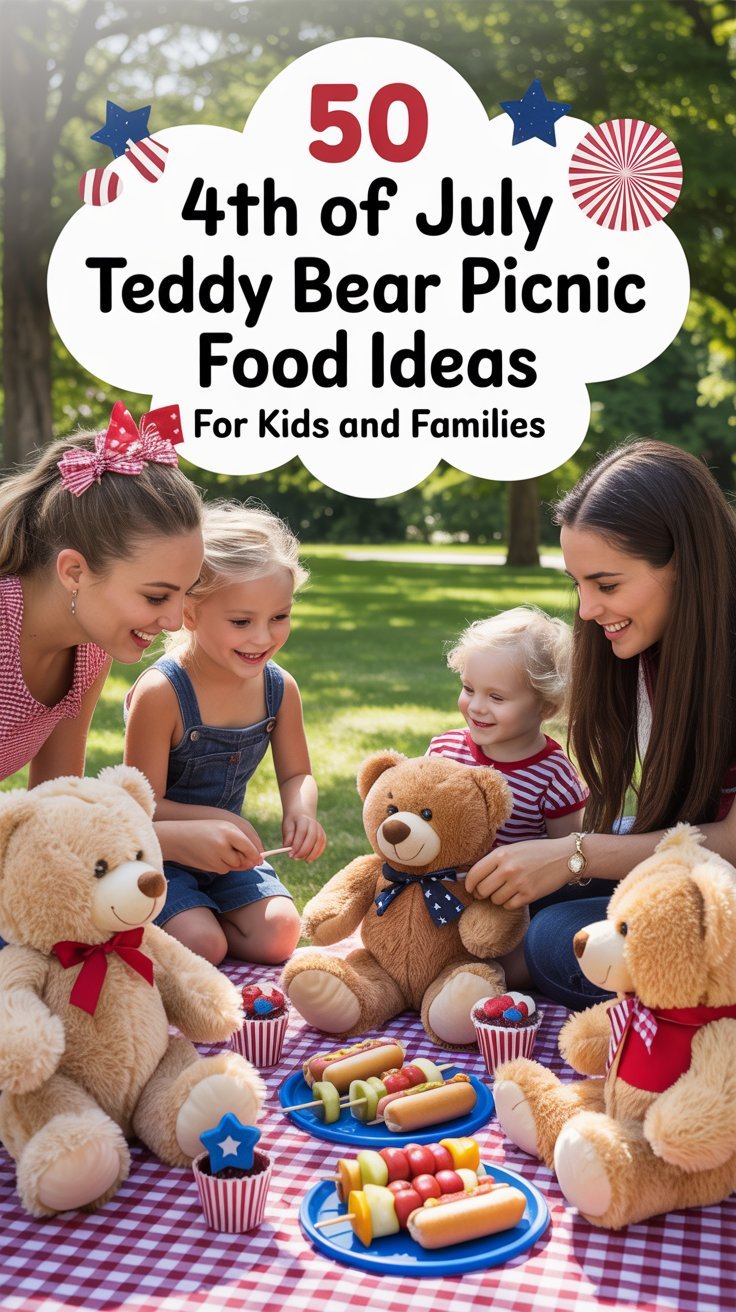
Spice up your 4th of July celebrations with a delightful teddy bear picnic feast! This collection of 50 food ideas is perfect for kids and families, featuring everything from breakfast treats to tasty lunches and scrumptious desserts. Get ready to enjoy a fun, festive picnic that your little ones and their furry friends will love!
Star-Spangled Teddy Pancakes

Star-Spangled Teddy Pancakes are a fun and festive breakfast option for the 4th of July! With their adorable teddy bear shape and vibrant toppings, these pancakes are sure to delight kids and adults alike. They have a light, fluffy texture and can be dressed up with fresh fruit and sweet syrups, making them a delicious way to start the day.
This recipe is simple to make, perfect for busy mornings or a family brunch. Gather the kids to help decorate their teddy bears with strawberries, blueberries, and whipped cream to create a colorful and tasty treat that celebrates the holiday spirit.
Tools and Supplies Needed
- Mixing bowl
- Whisk
- Non-stick skillet or griddle
- Spatula
- Measuring cups and spoons
- Cookie cutter (optional, for shaping)
Ingredients
- 1 cup all-purpose flour
- 2 tablespoons sugar
- 1 teaspoon baking powder
- 1/2 teaspoon baking soda
- 1/4 teaspoon salt
- 1 cup buttermilk
- 1 large egg
- 2 tablespoons melted butter
- Chocolate syrup (for decoration)
- Fresh strawberries and blueberries (for topping)
- Whipped cream (for serving)
Instructions
- Mix the Dry Ingredients: In a mixing bowl, whisk together the flour, sugar, baking powder, baking soda, and salt.
- Add Wet Ingredients: In another bowl, combine the buttermilk, egg, and melted butter. Pour this mixture into the dry ingredients and stir until just combined.
- Heat the Skillet: Preheat a non-stick skillet or griddle over medium heat. Lightly grease if necessary.
- Pour the Batter: Pour about 1/4 cup of batter onto the skillet for each pancake, shaping them into bear faces (you can use a cookie cutter for more defined shapes).
- Cook the Pancakes: Cook until bubbles form on the surface, about 2-3 minutes, then flip and cook for another 1-2 minutes until golden brown.
- Decorate: Once cooked, place the pancakes on plates and use chocolate syrup for the eyes and nose, and fresh fruit to create the ears and mouth.
- Serve: Add a dollop of whipped cream for a fluffy finish and enjoy!
Red White & Blue Bear French Toast

Kick off your 4th of July celebration with a fun twist on traditional French toast! Red White & Blue Bear French Toast is not just a breakfast dish; it’s a playful and delicious way to start the day. With layers of fluffy bread, sweet berries, and a touch of creaminess, it’s sure to be a hit with kids and adults alike. Plus, it’s simple to whip up, making it perfect for festive morning gatherings.
This recipe brings together the classic taste of French toast with a fun bear shape, adding a whimsical touch that makes breakfast feel like a celebration. Using easy-to-find ingredients, you can create a colorful and tasty meal that captures the spirit of the holiday.
Tools and Supplies Needed
- Whisk
- Large bowl
- Non-stick skillet or griddle
- Cookie cutter (bear-shaped)
- Spatula
- Serving plates
Ingredients
- 4 slices of thick white bread
- 2 large eggs
- 1/2 cup milk
- 1 teaspoon vanilla extract
- 1 tablespoon cinnamon
- Butter for cooking
- Fresh strawberries, sliced
- Fresh blueberries
- Chocolate chips (for eyes)
- Maple syrup (for serving)
Instructions
- In a large bowl, whisk together eggs, milk, vanilla extract, and cinnamon until well combined.
- Preheat your non-stick skillet or griddle over medium heat and add a little butter to coat the surface.
- Use a bear-shaped cookie cutter to cut out bear shapes from each slice of bread.
- Dip each bread bear into the egg mixture, ensuring both sides are coated.
- Place the coated bear bread onto the skillet, cooking for about 2-3 minutes on each side or until golden brown.
- Once cooked, transfer the bear French toast to serving plates and decorate with sliced strawberries and blueberries to create a red, white, and blue theme.
- Add chocolate chips for eyes and drizzle with maple syrup before serving.
Teddy’S Independence Day Yogurt Parfaits

Teddy’s Independence Day Yogurt Parfaits are a fun and festive treat that kids and families will love. Layered with creamy yogurt, fresh berries, and a touch of sweetness, these parfaits are perfect for breakfast, snacks, or dessert. They offer a delightful mix of flavors and textures, making them both tasty and visually appealing.
Not only are they simple to prepare, but they also allow for creativity with the ingredients. You can personalize them using your favorite fruits and yogurt flavors. Plus, they make for a colorful display at any 4th of July picnic!
Tools and Supplies Needed
- Clear cups or glasses
- Mixing spoon
- Cutting board
- Knife
Ingredients
- 2 cups Greek yogurt
- 1 cup strawberries, sliced
- 1 cup blueberries
- 1 cup raspberries
- 2 tablespoons honey or maple syrup (optional)
- Mini teddy bear cookies for decoration
- Mini American flags (for decoration)
Instructions
- Prepare the Fruit: Wash all the berries. Slice the strawberries into thin pieces.
- Create Layers: In a clear cup, start with a layer of yogurt, then add a layer of strawberries, followed by a layer of blueberries. Repeat until the cup is filled.
- Sweeten: Drizzle honey or maple syrup between the layers if you like a touch of sweetness.
- Decorate: Top the parfait with a few raspberries, a teddy bear cookie, and mini flags for a festive look.
- Serve: Enjoy immediately, or chill in the refrigerator until ready to serve. These parfaits can be made a few hours ahead of time.
Patriotic Bear Breakfast Pizzas

These Patriotic Bear Breakfast Pizzas are a fun and creative way to kick off your 4th of July celebrations! With a delightful blend of sweet flavors and bright colors, these mini pizzas are sure to be a hit with kids and adults alike. Using simple ingredients, you can whip up these yummy treats in no time, making them perfect for breakfast or brunch.
The combination of creamy yogurt, fresh fruits, and soft bread creates a delightful taste that’s both wholesome and appealing. Plus, the bear shape adds an element of playfulness that kids will love. Gather your family and enjoy making these together!
Tools and Supplies Needed
- Cookie cutter (bear-shaped)
- Cutting board
- Knife
- Plate for serving
Ingredients
- 4 slices of whole grain bread
- 1 cup plain Greek yogurt
- 1 banana, sliced
- 1 cup mixed berries (strawberries, blueberries, raspberries)
- Chocolate chips (for eyes)
- Honey (optional, for sweetness)
Instructions
- Prepare the Bear Shape: Use a bear-shaped cookie cutter to cut out shapes from the slices of bread. You can also create smaller shapes for the ears using leftover bread pieces.
- Spread the Yogurt: Take the cut-out bear shapes and spread a generous amount of plain Greek yogurt on top.
- Add the Fruit: Arrange banana slices and mixed berries to create the bear’s face, using the banana for the snout and the berries for the ears and mouth. Place chocolate chips for the eyes.
- Drizzle with Honey: If desired, drizzle a little honey over the top for added sweetness.
- Serve and Enjoy: Place the bear breakfast pizzas on a plate and serve immediately, letting everyone enjoy their delicious creations!
Teddy’S 4Th Of July Oatmeal

Teddy’s 4th of July Oatmeal is a fun and festive breakfast that kids will love. This simple dish combines hearty oats with fresh berries and bananas, making it not only tasty but also nutritious. Perfect for a family brunch, it’s a delightful way to celebrate the holiday.
With minimal prep and cook time, this oatmeal is a great option for busy mornings. The vibrant colors from the fruits create a cheerful presentation, making breakfast feel like a special treat. Whether you’re serving it for breakfast or brunch, it’s guaranteed to be a hit!
Tools and Supplies Needed
- Medium saucepan
- Measuring cups and spoons
- Spoon for stirring
- Bowls for serving
- Cutting board and knife
Ingredients
- 1 cup rolled oats
- 2 cups milk (or water)
- 1 tablespoon honey (or maple syrup)
- 1/2 teaspoon cinnamon
- 1 banana, sliced
- 1/2 cup strawberries, halved
- 1/2 cup blueberries
- Optional: yogurt for topping
Instructions
- Cook the Oats: In a medium saucepan, bring the milk (or water) to a boil. Add the rolled oats, reduce the heat, and let it simmer for about 5 minutes, stirring occasionally.
- Sweeten and Spice: Once the oats are cooked, stir in the honey and cinnamon. Mix well and remove from heat.
- Assemble the Bowls: Divide the oatmeal into bowls and top with sliced bananas, strawberries, and blueberries. You can add a dollop of yogurt on top if desired.
- Serve: Enjoy your festive Teddy’s 4th of July Oatmeal warm and celebrate the holiday with a smile!
Liberty Bell Teddy Toast

Liberty Bell Teddy Toast is a fun and delightful breakfast option that kids and families can enjoy together. It’s simple to make and brings a touch of creativity to the table, making breakfast less of a chore and more of a joy. The sweet flavors of cream cheese, fresh fruits, and a bit of crunch create a tasty combination that will please even the pickiest eaters!
This teddy bear-shaped toast is not only adorable but also healthy, making it a great choice for breakfast, brunch, or even a snack. It’s a playful way to celebrate the 4th of July while enjoying delicious flavors together as a family.
Tools and Supplies Needed
- Bear-shaped cookie cutter
- Toaster
- Spreading knife
- Cutting board
Ingredients
- 2 slices of whole-grain bread
- 1/4 cup cream cheese, softened
- 1/4 cup strawberries, sliced
- 2 blueberries
- Some fruit leather or gummy candy for decoration
Instructions
- Toast the Bread: Start by toasting the slices of whole-grain bread until they are golden brown.
- Cut the Shape: Use a bear-shaped cookie cutter to create teddy bear shapes from the toasted bread.
- Spread the Cream Cheese: Using a spreading knife, generously spread the softened cream cheese over the teddy bear toast.
- Decorate: Place sliced strawberries on the toast for the bear’s face and ears, using blueberries for the eyes and small pieces of fruit leather for the mouth and nose.
- Serve: Enjoy your Liberty Bell Teddy Toast as a fun and festive breakfast treat!
Firecracker Bear Breakfast Skewers

Firecracker Bear Breakfast Skewers are a fun and festive way to start the day! These colorful and healthy skewers are packed with fresh fruits and a sweet treat, making them appealing to both kids and adults alike. With just a few simple ingredients, you can whip these up in no time, making them a perfect choice for a busy morning or a special brunch!
The combination of juicy strawberries, bananas, and blueberries not only tastes delicious but also adds a burst of color to your breakfast table. A layer of graham cracker introduces a crispy texture that kids will love. These skewers are not just a meal; they’re an interactive way to enjoy breakfast!
Tools and Supplies Needed
- Wooden skewers
- Cutting board
- Knife
- Plates for serving
Ingredients
- 1 cup strawberries, hulled
- 1 cup blueberries
- 2 ripe bananas, sliced
- 4 graham crackers, cut into squares
- Honey or yogurt (optional, for dipping)
Instructions
- Prepare the Ingredients: Wash the strawberries and blueberries thoroughly. Slice the bananas into rounds and break the graham crackers into squares.
- Assemble the Skewers: Take a wooden skewer and start by threading a strawberry onto it. Follow with a banana slice, a blueberry, and then another banana slice. Repeat this pattern until the skewer is filled, leaving space at the end for handling.
- Add the Grahams: Insert a square of graham cracker at the top of the skewer to resemble a little flag. This adds a fun touch to the skewers!
- Serve: Arrange the skewers on a plate and serve with honey or yogurt for dipping, if desired. Enjoy these delightful treats for breakfast or as a fun snack!
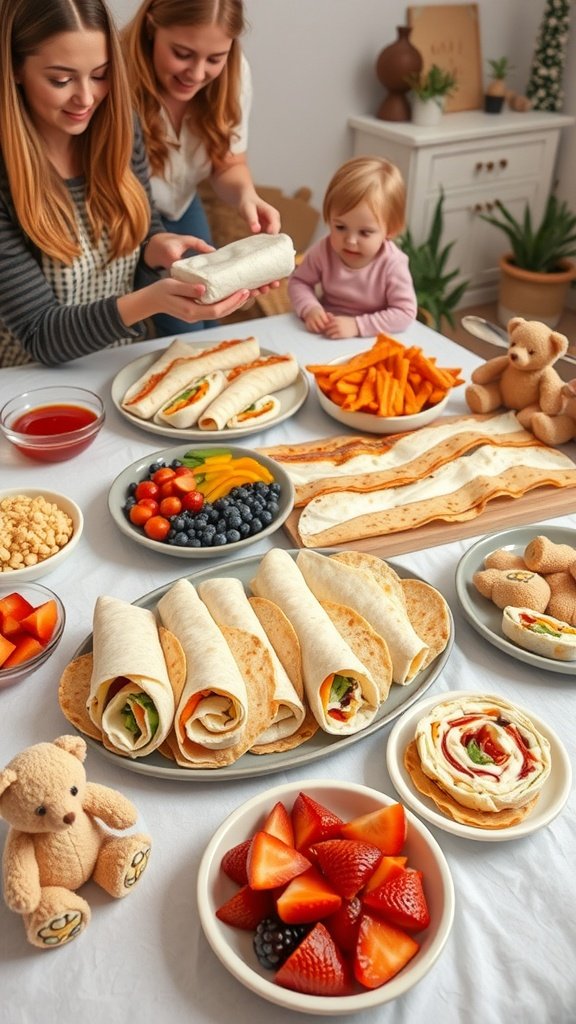
Bear Picnic Breakfast Burritos

These Bear Picnic Breakfast Burritos are a delightful way to start your day. Filled with creamy scrambled eggs, cheese, and colorful fresh fruits, they are not only tasty but also fun to eat. The soft tortilla wraps make them easy to handle, perfect for little hands during a picnic.
Making these burritos is simple and quick. Just whip up some scrambled eggs, toss in your favorite cheese, and wrap it all up in a tortilla. Adding fruit like strawberries and blueberries on the side makes for a cheerful presentation that kids will love. They’re perfect for breakfast, brunch, or even a delightful snack!
Tools and Supplies Needed
- Mixing bowl
- Whisk
- Skillet
- Spatula
- Cutting board
- Knife
- Plates for serving
Ingredients
- 4 large eggs
- 1/4 cup milk
- 1/2 cup shredded cheese (cheddar or your choice)
- 4 soft tortillas
- 1 cup fresh fruit (strawberries, blueberries, etc.)
- Salt and pepper to taste
- Butter or oil for cooking
Instructions
- Whisk the eggs and milk together in a mixing bowl, adding salt and pepper to taste.
- Heat a skillet over medium heat and add a bit of butter or oil. Pour in the egg mixture and cook, stirring gently until scrambled to your liking.
- Add shredded cheese to the eggs and stir until melted.
- Warm the tortillas in another skillet for a few seconds on each side.
- Fill each tortilla with the scrambled eggs and cheese mixture, then wrap it up like a burrito.
- Serve with fresh fruit on the side for a colorful and nutritious breakfast.
Teddy’S Picnic Waffle Bar

Get ready for a fun and delicious way to celebrate the 4th of July with a Teddy’s Picnic Waffle Bar! This playful recipe features adorable teddy bear-shaped waffles that kids will love. They are fluffy, slightly sweet, and perfect for any meal of the day—be it breakfast, brunch, or a festive snack. The best part? It’s super easy to whip up and allows everyone to customize their plates with toppings!
Set up a waffle bar with fresh fruits, whipped cream, chocolate syrup, and nuts for a great mix of flavors and textures. Kids can unleash their creativity with toppings, making each waffle unique. This interactive meal brings everyone together and adds a delightful touch to your picnic.
Tools and Supplies Needed
- Waffle maker
- Mixing bowl
- Whisk
- Measuring cups and spoons
- Spatula
- Plates for serving
- Toppings (fresh fruits, syrup, whipped cream, etc.)
Ingredients
- 2 cups all-purpose flour
- 2 tablespoons sugar
- 1 tablespoon baking powder
- 1/2 teaspoon salt
- 2 large eggs
- 1 3/4 cups milk
- 1/2 cup vegetable oil
- 1 teaspoon vanilla extract
Instructions
- Preheat your waffle maker according to the manufacturer’s instructions.
- In a mixing bowl, whisk together the flour, sugar, baking powder, and salt.
- In another bowl, combine the eggs, milk, vegetable oil, and vanilla extract. Mix until well combined.
- Pour the wet ingredients into the dry ingredients and stir until just combined. Avoid overmixing; a few lumps are okay.
- Spray the waffle maker with non-stick spray and pour the batter onto the hot surface, using enough to fill the mold without overflowing.
- Close the waffle maker and cook for about 4-5 minutes or until the waffles are golden brown.
- Carefully remove the waffles and serve them warm with a variety of toppings!
Uncle Sam’S Bear Bagels

Uncle Sam’s Bear Bagels are a fun and festive way to celebrate the 4th of July with family and friends. These delightful bagels are topped with creamy spreads and an array of fresh berries, making them an enjoyable treat for breakfast, brunch, or even a snack. They have a sweet and creamy taste that kids will love, and they’re simple to make, adding to their charm!
Perfect for gatherings, these bagels can be customized to suit individual tastes. Kids can help assemble their own creations, making it a fun activity for the whole family. Let’s jump into what you’ll need and how to create these delightful bagels!
Tools and Supplies Needed
- Bagels
- Cream cheese or yogurt
- Fresh strawberries
- Fresh blueberries
- Fresh raspberries
- Small teddy bear figurines (optional, for decoration)
- Plates and utensils
Ingredients
- 4 bagels, split in half
- 1 cup cream cheese or yogurt
- 1 cup sliced strawberries
- 1/2 cup blueberries
- 1/2 cup raspberries
- Small teddy bear figurines (optional)
Instructions
- Prepare the Bagels: Toast the bagel halves until golden brown.
- Spread the Base: Generously spread cream cheese or yogurt over each toasted bagel half.
- Add the Berries: Top the cream cheese with sliced strawberries, blueberries, and raspberries. Get creative with the arrangement!
- Decorate: If using, place a small teddy bear figurine on top of the berries for a fun touch.
- Serve: Arrange the bagels on plates and enjoy them with your family!
Independence Bear Breakfast Casserole
This Independence Bear Breakfast Casserole is a fun and festive way to start your 4th of July celebration. With layers of fluffy eggs, savory meats, and melted cheese, it delivers a hearty breakfast that everyone will love. Plus, it’s easy to make in advance, allowing you to enjoy more time with family and friends during the holiday festivities.
The casserole is not only delicious but visually appealing with its bear-shaped bread toppings and vibrant colors. It’s perfect for brunch but can also work for lunch or dinner. With minimal prep and cook time, you’ll have a stunning dish ready to impress your guests!
Tools and Supplies Needed
- Large mixing bowl
- 9×13-inch baking dish
- Whisk
- Measuring cups and spoons
- Knife and cutting board
Ingredients
- 8 large eggs
- 2 cups milk
- 1 pound breakfast sausage, cooked and crumbled
- 1 cup shredded cheddar cheese
- 1 cup diced bell peppers
- 1 teaspoon salt
- 1/2 teaspoon pepper
- 1 teaspoon garlic powder
- 1 loaf of bread, cut into bear shapes
- Chopped parsley for garnish
Instructions
- Preheat the oven to 350°F (175°C).
- In a large mixing bowl, whisk together the eggs and milk. Add salt, pepper, and garlic powder, mixing well.
- Stir in the cooked sausage, bell peppers, and cheese until evenly distributed.
- Pour the egg mixture into a greased 9×13-inch baking dish.
- Arrange the bear-shaped bread pieces on top of the egg mixture.
- Bake for 30-35 minutes, or until the eggs are set and the casserole is slightly golden.
- Garnish with chopped parsley, slice, and serve warm. Enjoy your festive breakfast!
Star-Spangled Bear Muffins

These Star-Spangled Bear Muffins are a delightful treat perfect for your 4th of July picnic! With a soft, fluffy texture and bursting with sweet blueberries, they offer a deliciously fruity flavor every bite. Topped with cute teddy bear cookies, these muffins not only taste great but also bring a smile to your kids’ faces.
Making these muffins is simple and fun, making it an enjoyable activity for both kids and adults. They can serve as a great breakfast option or a sweet snack during your picnic. Everyone will love these charming muffins!
Tools and Supplies Needed
- Muffin tin
- Mixing bowls
- Whisk
- Measuring cups and spoons
- Spatula
- Baking liners (optional)
Ingredients
- 2 cups all-purpose flour
- 1/2 cup granulated sugar
- 1 tablespoon baking powder
- 1/2 teaspoon salt
- 1/2 cup unsalted butter, melted
- 1 cup milk
- 2 large eggs
- 1 cup blueberries (fresh or frozen)
- Teddy bear cookies for decorating
Instructions
- Preheat your oven to 350°F (175°C) and line a muffin tin with baking liners.
- In a large bowl, mix together the flour, sugar, baking powder, and salt.
- In another bowl, combine the melted butter, milk, and eggs. Stir until well blended.
- Pour the wet ingredients into the dry ingredients and mix until just combined. Be careful not to overmix.
- Gently fold in the blueberries.
- Divide the batter evenly among the muffin cups, filling each about 2/3 full.
- Bake for 20-25 minutes, or until a toothpick inserted comes out clean.
- Allow to cool for a few minutes, then decorate the top with teddy bear cookies before serving.
Teddy’S Red White & Blue Quiche

Teddy’s Red White & Blue Quiche is a festive and delicious dish perfect for the 4th of July or any summer gathering. It combines creamy eggs with vibrant veggies like red bell peppers and fresh herbs, all nestled in a flaky crust. The colorful ingredients not only make it appealing to the eye but also create a wonderful blend of flavors that are light and satisfying. Plus, it’s simple enough to whip up, making it a great choice for breakfast, brunch, or even lunch!
This quiche is versatile, allowing you to get creative with your fillings. Whether you stick with the classic combo or mix in your favorites, it’s sure to be a hit. Pair it with some fruit for a full meal or serve it as a delightful snack at your picnic. Enjoy the fresh taste of summer in every bite!
Tools and Supplies Needed
- 9-inch pie pan
- Mixing bowl
- Whisk
- Knife
- Cutting board
- Oven
Ingredients
- 1 pre-made pie crust
- 6 large eggs
- 1 cup milk
- 1/2 cup red bell pepper, diced
- 1/2 cup fresh spinach, chopped
- 1/2 cup shredded cheese (cheddar or mozzarella)
- Salt and pepper to taste
- 1 tablespoon olive oil
Instructions
- Preheat your oven to 375°F (190°C).
- In a skillet, heat olive oil over medium heat. Add diced red bell pepper and chopped spinach. Sauté for about 3-4 minutes until softened.
- In a mixing bowl, whisk together eggs and milk. Season with salt and pepper.
- Place the pie crust in the pie pan. Spread the sautéed veggies evenly in the crust, then pour the egg mixture over the top. Sprinkle shredded cheese on top.
- Bake for 35-40 minutes or until the quiche is set and golden brown on top. Let it cool slightly before slicing.
Patriotic Bear Fruit Salad
Looking for a fun and festive way to celebrate the 4th of July? This Patriotic Bear Fruit Salad is not just adorable but also bursting with fresh flavors. It combines strawberries, blueberries, and bananas, creating a perfect balance of sweetness and tartness. Kids and adults alike will love digging into this colorful treat!
This recipe is simple and quick, making it an excellent choice for brunch, snacks, or even as a refreshing dessert. It’s a great way to incorporate healthy ingredients into your holiday festivities, and the bear shape adds a playful touch that will delight everyone at the picnic.
Tools and Supplies Needed
- Large mixing bowl
- Cutting board
- Knife
- Serving platter
- Small bowls for serving
Ingredients
- 2 cups strawberries, hulled and sliced
- 2 cups blueberries
- 2 bananas, sliced
- 1 cup raspberries
- 1 cup blackberries (optional)
- Honey or yogurt (for drizzling, optional)
- Graham crackers or cookies (for serving)
Instructions
- Prepare the Fruit: Start by washing all the berries thoroughly. Slice the strawberries and bananas into bite-sized pieces.
- Create the Bear Shape: On a large serving platter, arrange the sliced bananas in a circular shape as the bear’s face. Use blueberries for the eyes and a raspberry for the nose. Create ears with extra banana slices or blueberries on top.
- Fill in the Face: Surround the bear’s face with the strawberries, raspberries, and blackberries, filling in any gaps and making the presentation colorful.
- Serve: Drizzle honey or yogurt over the fruit if desired. Serve with graham crackers or cookies on the side for a delightful crunch.
Teddy’S Freedom Granola Parfaits

Teddy’s Freedom Granola Parfaits are a fun and delicious way to celebrate the 4th of July with your little ones. These parfaits layer creamy yogurt, crunchy granola, and a mix of vibrant berries, creating a delightful treat that is both satisfying and nutritious. They are simple to make, making them perfect for brunch, lunch, or even as a snack!
The combination of creamy yogurt and fresh fruit provides a refreshing taste, while the granola adds a nice crunch. Topped with cute teddy bear cookies, these parfaits will surely bring smiles to the kids’ faces. Enjoy making these with the family and customize with your favorite fruits!
Tools and Supplies Needed
- 4 small mason jars or cups
- Spoon
- Mixing bowl
- Measuring cups
- Knife for cutting fruit
Ingredients
- 2 cups yogurt (plain or flavored)
- 1 cup granola
- 1 cup mixed berries (strawberries, blueberries, raspberries)
- Teddy bear cookies for topping
Instructions
- Layer the parfait: Start by adding a few spoonfuls of yogurt to the bottom of each mason jar.
- Add a layer of granola on top of the yogurt.
- Next, add a mix of berries over the granola.
- Repeat the layers until the jars are full, finishing with a layer of yogurt on top.
- Decorate with teddy bear cookies and any extra berries on top before serving.
Bear’S Picnic Sandwich Cutouts

These Bear’s Picnic Sandwich Cutouts bring a playful twist to mealtime, making them perfect for a festive 4th of July gathering or any casual lunch. Their cute bear shape is not only visually appealing but also makes them fun for kids and adults alike. The taste is delightful, combining your favorite sandwich fillings between soft, fresh bread, and they can be made in no time!
With endless filling options, you can customize these sandwiches for breakfast, lunch, or even dinner. Think of classic combinations like ham and cheese or turkey and avocado, or go sweet with peanut butter and banana for a delightful brunch option. These sandwiches are sure to be a hit at your picnic!
Tools and Supplies Needed
- Bear-shaped cookie cutter
- Cutting board
- Sharp knife
- Mixing bowl (for fillings)
- Spatula or spoon
Ingredients
- 4 slices of bread (white, wheat, or your choice)
- 4 slices of cheese (cheddar, Swiss, or your favorite)
- 4 slices of deli meat (ham, turkey, or chicken)
- Fresh lettuce or spinach
- Condiments (mustard, mayo, or hummus)
- Optional: sliced cucumbers, tomatoes, or pickles
Instructions
- Prepare the Ingredients: Gather all your ingredients and set the bread, cheese, and deli meat on a clean cutting board.
- Create Sandwiches: Layer your chosen fillings on two slices of bread. Spread condiments, add cheese, meat, and veggies as desired, then top with the other two slices of bread.
- Cut Out Bear Shapes: Use the bear-shaped cookie cutter to cut out the sandwiches, pressing down firmly to create fun shapes.
- Serve: Arrange the bear sandwiches on a plate and enjoy with fresh fruit or your favorite snacks for a complete meal.
4Th Of July Teddy Bento Boxes

Teddy Bear Bento Boxes are a fun and creative way to celebrate Independence Day with your little ones. These charming meals are not only adorable but also delicious and easy to prepare. Featuring a cuddly teddy bear shape made from fluffy pancakes or sandwiches, they are sure to be a hit during breakfast, lunch, or snacks. The combination of colorful fruits and fun shapes makes them visually appealing and tasty.
This recipe is perfect for families looking to add a festive touch to their meals without spending too much time in the kitchen. The flavors are simple yet delightful, and kids will love being a part of the assembly process. Here’s how to make your own Teddy Bear Bento Boxes!
Tools and Supplies Needed
- Bear-shaped cookie cutter
- Non-stick frying pan
- Mixing bowl
- Spatula
- Storage containers
Ingredients
- 2 cups pancake mix
- 1 1/2 cups water
- 1/2 cup strawberries, sliced
- 1/2 cup blueberries
- 1/2 cup cheese, cut into star shapes
- Chocolate chips for eyes
- Red icing or edible markers for cheeks
Instructions
- Make the Pancakes: In a mixing bowl, combine pancake mix and water until smooth. Heat a non-stick frying pan over medium heat and pour in the batter to form teddy bear shapes using a bear-shaped cookie cutter.
- Cook Until Golden: Cook until bubbles form on the surface, then flip and cook for another minute until golden brown.
- Assemble the Bento Box: Place the teddy bear pancakes in a storage container. Add sliced strawberries and blueberries around the pancakes for a burst of color.
- Decorate: Use chocolate chips for the bear’s eyes and add red icing or edible markers for the cheeks. Finish by placing star-shaped cheese pieces in the box.
- Enjoy: Serve the teddy bear boxes for breakfast, lunch, or as a delightful snack!
Liberty Bear Hot Dog Boats

Liberty Bear Hot Dog Boats are a fun and festive way to celebrate the 4th of July with the family. These playful hot dog creations are simple to make and bring a smile to kids’ faces. The combination of savory hot dogs and fresh toppings makes them a tasty option for lunch or snacks during your picnic.
Not only are they delicious, but they’re also a great way to get creative. You can customize the toppings to fit your family’s taste, making them perfect for any meal throughout the day, be it breakfast, lunch, or dinner. Plus, they’re easy enough for kids to help assemble!
Tools and Supplies Needed
- Hot dog buns
- Hot dogs
- Ketchup
- Mustard
- Small flags (American themed)
- Teddy bear figurines (optional)
- Plates
- Knife (for adult use)
Ingredients
- 4 hot dogs
- 4 hot dog buns
- 1/4 cup ketchup
- 1/4 cup mustard
- 4 small American flags
- 2 teddy bear figurines (optional)
Instructions
- Prepare the Hot Dogs: Boil or grill the hot dogs according to your preference until heated through.
- Assemble the Boats: Place each hot dog in a bun, creating a “boat” look.
- Add Toppings: Squeeze ketchup and mustard on top of the hot dogs for added flavor.
- Decorate: Insert a small American flag into each hot dog boat. If you like, add a teddy bear figurine next to the flag for a cute touch.
- Serve: Arrange the hot dog boats on plates and enjoy them with family and friends!
Teddy’S Stars & Stripes Pinwheels
Teddy’s Stars & Stripes Pinwheels are a fun and festive treat that’s perfect for a 4th of July picnic. These colorful wraps are not only delicious but also easy to make, making them a great choice for breakfast, lunch, or snacks. With a mix of fresh veggies, cream cheese, and vibrant tortillas, these pinwheels are sure to be a hit with kids and adults alike.
The combination of flavors is delightful, with the creamy cheese balancing out the crunch of the veggies. Plus, the bright colors make them visually appealing. Wrap them up and slice them into bite-sized pieces for an easy grab-and-go option during your holiday celebrations!
Tools and Supplies Needed
- Large cutting board
- Sharp knife
- Mixing bowl
- Spatula or spreader
- Platter for serving
Ingredients
- 4 large tortillas (red, white, or blue)
- 8 ounces cream cheese, softened
- 1 cup spinach leaves
- 1 cup sliced bell peppers (red and green)
- 1 cup shredded carrots
- 1/2 cup sliced cucumbers
- Salt and pepper to taste
Instructions
- Prepare the Filling: In a mixing bowl, combine the softened cream cheese, salt, and pepper. Mix until smooth.
- Spread the Cream Cheese: Lay out each tortilla on a cutting board. Evenly spread a layer of the cream cheese mixture over each tortilla.
- Add the Veggies: Layer the spinach leaves, sliced bell peppers, shredded carrots, and cucumbers on top of the cream cheese.
- Roll the Tortillas: Starting from one end, tightly roll each tortilla up, enclosing the fillings. Make sure to roll evenly for a nice shape.
- Slice and Serve: Use a sharp knife to slice the rolled tortillas into 1-inch pinwheels. Arrange them on a platter and serve immediately or refrigerate until ready to enjoy.
Independence Day Bear Picnic Cups

Celebrate the 4th of July with these fun and festive Bear Picnic Cups! This recipe combines colorful pasta and fresh veggies, making it a hit for both kids and adults. The playful presentation and delicious flavors make it a perfect choice for brunch, lunch, or even as a lively snack during your picnic.
Easy to prepare, these cups feature a delightful mix of textures and tastes. With some simple ingredients, you can create a delightful dish that adds a whimsical touch to your Independence Day festivities.
Tools and Supplies Needed
- Microwave-safe bowl
- Mixing spoon
- Measuring cups
- Plastic or glass cups
- Serving platter
Ingredients
- 2 cups cooked pasta (elbow or shell-shaped)
- 1 cup cherry tomatoes, halved
- 1/2 cup black olives, sliced
- 1/2 cup diced bell peppers (red, yellow, or green)
- 1/4 cup Italian dressing
- Bear-shaped cookies or crackers for decoration
- Leafy greens (for garnish)
Instructions
- Combine Ingredients: In a large bowl, mix the cooked pasta, cherry tomatoes, black olives, and bell peppers. Pour the Italian dressing over the mixture and toss to coat evenly.
- Assemble Cups: Layer the pasta and veggie mixture into plastic or glass cups, filling them about three-quarters full.
- Decorate: Top each cup with a bear-shaped cookie or cracker to create a fun bear face. Add leafy greens around the edges for a pop of color.
- Serve: Arrange the cups on a serving platter and enjoy this adorable and tasty dish at your picnic!
Patriotic Bear Pizza

Patriotic Bear Pizza is a fun and colorful dish that brings the spirit of the 4th of July to your dining table. This delightful pizza features a festive design, making it perfect for brunch, lunch, or even snacks during the holiday celebrations. The blend of savory toppings and the cheerful presentation is sure to be a hit with kids and adults alike.
The best part? This recipe is simple enough for the whole family to join in! Gather your loved ones, roll out the dough, and let everyone decorate their own personal pizzas with red, white, and blue toppings. It’s a joyous way to celebrate, and the resulting flavors are delicious.
Tools and Supplies Needed
- Pizza dough (store-bought or homemade)
- Tomato sauce
- Shredded mozzarella cheese
- Blueberries
- Red peppers, sliced
- White cheese (like provolone or mozzarella, cut into stars)
- Pizza stone or baking sheet
- Rolling pin
- Pizza cutter
Ingredients
- 1 pound pizza dough
- 1 cup tomato sauce
- 2 cups shredded mozzarella cheese
- 1/2 cup blueberries
- 1/2 cup sliced red peppers
- 1 cup white cheese (cut into shapes)
Instructions
- Preheat your oven to 475°F (245°C) and prepare your pizza stone or baking sheet.
- Roll out the pizza dough on a floured surface to your desired thickness and shape it into a bear face or any playful design.
- Spread a layer of tomato sauce evenly on the dough.
- Sprinkle a generous amount of shredded mozzarella cheese over the sauce.
- Use the red peppers to create stripes for the pizza, mimicking the American flag, and add blueberries for a pop of color.
- Cut out star shapes from the white cheese and place them on the pizza as decoration.
- Bake in the preheated oven for 12-15 minutes, or until the cheese is bubbly and the crust is golden.
- Let cool for a few minutes, slice, and serve your Patriotic Bear Pizza warm!
Firecracker Teddy Kabobs

Firecracker Teddy Kabobs are a fun and colorful treat perfect for the 4th of July or any festive gathering. These kabobs combine a mix of cheese, cherry tomatoes, and fun toppings for a delightful snack or lunch option that kids will love. They are simple to make, and you can get creative with the ingredients, making them a tasty and appealing way to celebrate.
The kabobs offer a balance of savory and fresh flavors, with the cheese providing creaminess, and the tomatoes adding a burst of juiciness. These treats can easily be customized to suit different tastes, making them a versatile addition to your picnic or party spread.
Tools and Supplies Needed
- Skewers or kabob sticks
- Cutting board
- Knife
- Glass or container for display
Ingredients
- 1 cup cheese cubes (cheddar, gouda, or your choice)
- 1 cup cherry tomatoes
- 1 cup sliced bell peppers (red, yellow, or orange)
- 1 cup cooked sausage or salami slices (optional)
- 1/4 cup olives (optional)
- 1/4 cup small gummy candies (for decoration)
Instructions
- Prepare the Ingredients: Wash the cherry tomatoes and bell peppers. Cut the cheese into cubes and set aside. If using sausage or salami, slice them into bite-sized pieces.
- Assemble the Kabobs: Take a skewer and start adding ingredients in your preferred order. Alternate cheese cubes, cherry tomatoes, and bell pepper slices. If using sausage or olives, add them in as well.
- Decorate: Finish each kabob with a small gummy candy for a festive touch. This adds a splash of color and sweetness to your skewers.
- Display: Place the finished kabobs in a glass or container for an eye-catching presentation. Serve immediately or refrigerate until ready to enjoy.
Uncle Sam’S Bear Trail Mix

Uncle Sam’s Bear Trail Mix is a fun and festive treat perfect for your 4th of July picnic! This colorful mix combines crunchy pretzels, sweet candies, and delightful star-shaped cookies to create a snack that kids and adults will love. The taste is a delightful blend of sweet and salty, making it a great choice for breakfast, lunch, or as an all-day snack.
Plus, it’s incredibly easy to put together! Just mix the ingredients in a bowl, and you’ll have a tasty trail mix that’s perfect for sharing during your family celebrations. It’s an ideal way to keep energy levels up for all the fun outdoor activities.
Tools and Supplies Needed
- Large mixing bowl
- Measuring cups
- Spatula or large spoon
- Storage bag or container
Ingredients
- 2 cups pretzel sticks
- 1 cup red, white, and blue M&M’s
- 1 cup star-shaped cookies
- 1 cup popcorn (popped and unsalted)
- 1/2 cup dried cranberries
Instructions
- In a large mixing bowl, combine the pretzel sticks, M&M’s, star-shaped cookies, popcorn, and dried cranberries.
- Gently mix all the ingredients together using a spatula or large spoon until evenly distributed.
- Store the trail mix in a storage bag or container for easy serving during your picnic.
4Th Of July Bear Veggie Platter

Celebrate the 4th of July with a fun and healthy Bear Veggie Platter! This colorful arrangement not only tastes fresh and crunchy but also adds a playful touch to your holiday spread. Kids love the variety of shapes and colors, making it a perfect snack or appetizer for any gathering.
Making this platter is simple and can be customized with your favorite veggies and dips. It’s a great way to encourage little ones to eat their greens and enjoy a nutritious snack while gathering with friends and family.
Tools and Supplies Needed
- Large serving platter or tray
- Cutting board
- Knife
- Small bowls for dips
- Cookie cutters (optional for fun shapes)
Ingredients
- 1 cup cherry tomatoes, halved
- 1 cup cucumber, sliced
- 1 cup cauliflower florets
- 1 cup black corn tortilla chips
- 1 cup baby carrots
- 1-2 small bowls of dip (ranch, hummus, or your favorite)
Instructions
- Prepare the Veggies: Wash and slice the cherry tomatoes and cucumbers. Cut cauliflower into bite-sized florets and peel the baby carrots if necessary.
- Arrange the Platter: On a large serving platter, create a bear shape using the cauliflower florets for the head and the black tortilla chips for the ears. Place cherry tomatoes, cucumbers, and baby carrots around the bear to fill in the platter.
- Add the Dips: Set small bowls of dips in the center or at the side of the platter for easy access.
- Serve: Enjoy your Bear Veggie Platter with family and friends as a fun and healthy snack option!
Star-Spangled Teddy Popcorn

Star-Spangled Teddy Popcorn is a fun and festive treat that’s perfect for any Fourth of July gathering! This snack combines fluffy popcorn, colorful candies, and cute teddy bear cookies to create a visually appealing and tasty snack. The sweet and salty flavors come together to make it a delightful addition to your brunch, lunch, or dessert table.
This recipe is simple to make and can be prepared in just a few minutes, making it ideal for busy families. Kids will love the vibrant colors and playful presentation, while adults will appreciate the ease of preparation. Gather your loved ones for a teddy bear picnic and enjoy this delightful treat!
Tools and Supplies Needed
- Large mixing bowl
- Popcorn maker or microwave
- Measuring cups
- Mixing spoon
- Decorative cones or cups
Ingredients
- 8 cups popped popcorn
- 1 cup red and blue candy-coated chocolates
- 1 cup dried cherries or cranberries
- 1 cup teddy bear cookies
- 1/4 cup melted white chocolate (optional)
Instructions
- Pop the popcorn according to your preferred method. Place it in a large mixing bowl, making sure to remove any unpopped kernels.
- Add the red and blue candy-coated chocolates and dried cherries or cranberries to the popcorn. If desired, drizzle with melted white chocolate for extra sweetness.
- Toss everything together gently until evenly mixed.
- Fill decorative cones or cups with the popcorn mixture, adding some teddy bear cookies on top for a fun touch.
- Serve immediately and enjoy your Star-Spangled Teddy Popcorn at your festive gathering!
Teddy’S Berry Picnic Cups

Teddy’s Berry Picnic Cups are a delightful and simple treat perfect for your 4th of July gathering. These cups combine creamy yogurt, fresh berries, and crunchy snacks, making them a tasty option for breakfast, brunch, or even a fun dessert. The sweetness of the berries pairs perfectly with the creamy yogurt, while the snacks add a satisfying crunch, making each bite enjoyable.
Not only are these cups easy to assemble, but they also look appealing, making them a hit with kids and families alike. You can customize them with your favorite fruits and toppings, making it a versatile recipe for any meal or snack. Let’s get started with what you’ll need!
Tools and Supplies Needed
- Small cups or bowls for serving
- Mixing spoon
- Measuring cups
Ingredients
- 2 cups plain or vanilla yogurt
- 1 cup fresh strawberries, hulled and halved
- 1 cup fresh blueberries
- 1 cup granola or cereal
- Honey or maple syrup (optional, for sweetness)
Instructions
- Prepare the Base: In each small cup, add a generous scoop of yogurt as the base.
- Add the Berries: Layer the halved strawberries and blueberries on top of the yogurt.
- Top It Off: Sprinkle granola or cereal over the berries for added crunch. Drizzle with honey or maple syrup if desired.
- Serve and Enjoy: These cups can be served immediately or refrigerated until ready to enjoy.
Liberty Bell Bear Pretzels

Liberty Bell Bear Pretzels are a fun and festive treat that’s perfect for any 4th of July picnic. These sweet and salty snacks combine pretzel sticks coated in white chocolate and adorned with red, white, and blue sprinkles, creating a delightful experience for both kids and adults. They are simple to make and can be enjoyed as a snack or dessert, making them a versatile addition to your holiday spread.
The combination of crunchy pretzels and creamy chocolate offers a satisfying contrast in texture and flavor. Plus, they’re a great way to get the kids involved in the kitchen! Everyone will love dipping, decorating, and, of course, devouring these festive treats.
Tools and Supplies Needed
- Baking sheet
- Parchment paper
- Microwave-safe bowl
- Fork or dipping tool
- Small jars or cups
- Sprinkles (red, white, and blue)
Ingredients
- 1 cup pretzel sticks
- 1 cup white chocolate chips
- 1/4 cup red and blue sprinkles
Instructions
- Prepare the Baking Sheet: Line a baking sheet with parchment paper to prevent sticking.
- Melt the Chocolate: In a microwave-safe bowl, melt the white chocolate chips in 30-second intervals, stirring between each until fully melted and smooth.
- Coat the Pretzels: Dip each pretzel stick into the melted white chocolate, allowing any excess chocolate to drip off. Then, place the coated pretzel on the prepared baking sheet.
- Add Sprinkles: While the chocolate is still wet, sprinkle the red and blue sprinkles over the pretzels for a festive touch.
- Set to Harden: Let the pretzels sit at room temperature or refrigerate for about 30 minutes until the chocolate hardens.
- Serve: Once set, place the pretzels in small jars or cups for a cute presentation and enjoy!
Firecracker Bear Cheese Sticks
Firecracker Bear Cheese Sticks are a fun and tasty snack that kids will love! These tasty treats combine creamy cheese with a playful design, making them perfect for any picnic or holiday gathering. They’re easy to whip up, and you can customize them with different cheese varieties to suit your family’s taste.
These cheesy snacks are not only delightful in flavor but also add a festive touch to your 4th of July celebration. They’re great for breakfast, lunch, or even as a fun appetizer at dinner. Plus, the kids will enjoy helping out in the kitchen as they create their little firecracker bears!
Tools and Supplies Needed
- Cheese sticks
- Red and blue fruit strips (like fruit leather or fruit roll-ups)
- Cocktail sticks or toothpicks
- Scissors
- Serving platter
Ingredients
- 1 package of cheese sticks
- Red fruit strips
- Blue fruit strips
- Optional: additional decorations like mini flags or edible glitter
Instructions
- Prepare the Cheese Sticks: Remove the cheese sticks from their packaging and set them aside on a serving platter.
- Cut the Fruit Strips: Cut the red and blue fruit strips into small rectangles for the firecracker design. You’ll need two red pieces and one blue piece for each cheese stick.
- Assemble the Firecrackers: Wrap the red fruit strips around the bottom part of each cheese stick, securing them with a toothpick if necessary. Then, place the blue strip on top to complete the look.
- Display: Arrange the finished firecracker bear cheese sticks on the serving platter. You can add mini flags or other decorations to make them even more festive.
Teddy’S 4Th Of July Snack Skewers

These Teddy’s 4th of July Snack Skewers are the perfect blend of fun and flavor! Made with fresh fruit and crunchy snacks, they are colorful and appealing for kids and adults alike. Their sweet taste, combined with a satisfying crunch, makes these skewers a delightful treat for any picnic or gathering.
Simple to prepare, these skewers can be customized with your favorite fruits and snacks, making them a versatile option for breakfast, lunch, or even desserts. Kids can help assemble them, turning snack time into a creative activity while celebrating the holiday!
Tools and Supplies Needed
- Wooden skewers
- Knife
- Cutting board
- Mixing bowl
- Plate for serving
Ingredients
- 2 cups watermelon, cut into cubes
- 1 cup blueberries
- 1 cup strawberries, hulled and halved
- 1 cup cheese crackers or graham crackers
- Mint leaves for garnish (optional)
Instructions
- Prepare the Fruits: Cut the watermelon into bite-sized cubes and hull the strawberries. Rinse the blueberries under cold water and pat dry with a paper towel.
- Assemble Skewers: On a wooden skewer, alternate threading watermelon cubes, strawberry halves, and blueberries. Leave a bit of space at the ends for handling.
- Serve: Arrange the skewers on a plate alongside cheese crackers or graham crackers for a crunchy contrast. Garnish with mint leaves if desired.
- Enjoy: These snack skewers can be enjoyed fresh or stored in the refrigerator for a cool treat later!
Patriotic Bear Snack Board
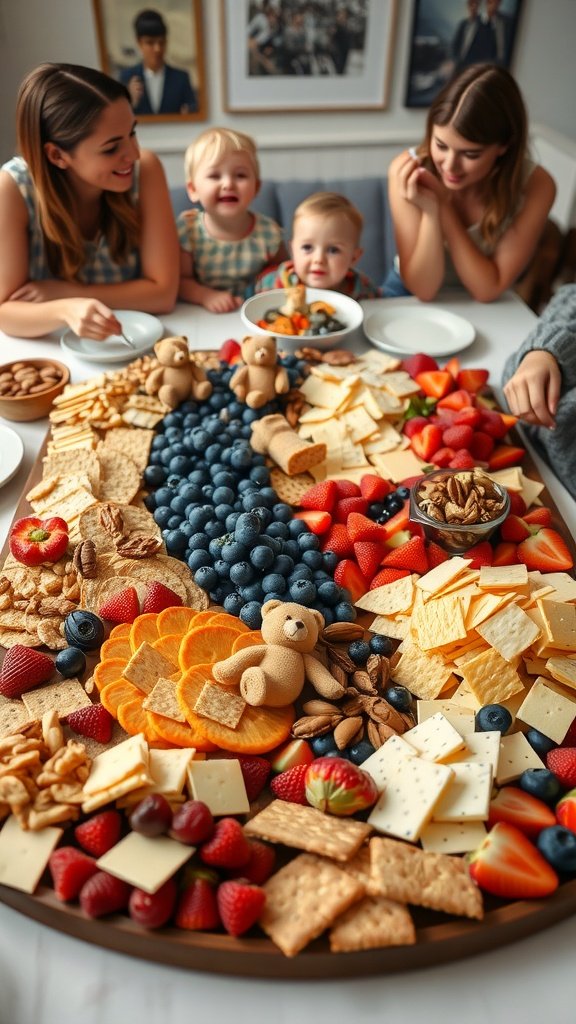
This fun and colorful snack board is perfect for your 4th of July picnic! It combines a variety of tasty treats that appeal to both kids and adults, featuring fresh fruits, cheeses, and crunchy snacks. The adorable teddy bear accents add a playful touch that will surely delight everyone at the gathering.
Making this snack board is simple and allows for creativity. Just gather your favorite red, white, and blue foods to create a festive display. It’s a versatile option for breakfast, lunch, snacks, or even desserts!
Tools and Supplies Needed
- Large serving board or platter
- Small bowls for dips or nuts
- Cheese knife or spreader
- Cutting board
- Knife for slicing fruits
Ingredients
- 1 cup strawberries
- 1 cup blueberries
- 1 cup sliced oranges
- 1 cup sliced cheese (cheddar and mozzarella)
- 1 cup assorted crackers
- 1 cup mixed nuts
- 3-4 teddy bear cookies or snacks for decoration
- Optional: yogurt or dip for the fruits
Instructions
- Prepare the Board: Start by choosing a large serving board or platter. Arrange the cheeses in one section, creating a balance of colors and shapes.
- Add Fruits: Place clusters of strawberries, blueberries, and orange slices around the cheeses, ensuring a vibrant display.
- Fill in with Crackers and Nuts: Add the assorted crackers and nuts in the spaces between the fruits and cheeses for variety and crunch.
- Decorate with Teddy Bears: Strategically place the teddy bear cookies or snacks on the board to create a fun centerpiece.
- Serve: Optionally, include small bowls of yogurt or dip nearby for added flavor. Enjoy with family and friends!
Independence Day Bear Sliders

Independence Day Bear Sliders are a fun and tasty way to celebrate the 4th of July with family and friends. These adorable sliders combine juicy beef patties, melty cheese, and fresh toppings, all nestled between soft burger buns. They’re not only delicious but also super easy to make, making them perfect for kids and adults alike!
These sliders make a great addition to any meal, whether it’s a casual lunch, a fun brunch, or a festive dinner. Kids will love the bear theme, and you can even let them help in the kitchen to create their own unique sliders!
Tools and Supplies Needed
- Grill or stovetop skillet
- Spatula
- Knife
- Cutting board
- Serving platter
Ingredients
- 1 pound ground beef
- 1 teaspoon salt
- 1/2 teaspoon black pepper
- 4 hamburger buns
- 4 slices of cheddar cheese
- 4 slices of tomato
- 4 leaves of lettuce
- Toothpicks
Instructions
- Prepare the Patties: In a bowl, mix ground beef with salt and pepper. Form into four equal-sized patties.
- Cook the Patties: Preheat the grill or skillet over medium heat. Cook the patties for about 4-5 minutes on each side, or until cooked to your desired doneness.
- Add Cheese: In the last minute of cooking, place a slice of cheddar cheese on each patty, allowing it to melt.
- Assemble the Sliders: On each bun, layer a patty, a slice of tomato, and a leaf of lettuce. Top with the other half of the bun.
- Serve: Secure each slider with a toothpick for easy handling. Enjoy your bear sliders as a delicious lunch or dinner option!
Teddy’S Patriotic Pasta Salad

Teddy’s Patriotic Pasta Salad is a fun and colorful dish that adds a festive touch to any 4th of July gathering. With its vibrant blue noodles, fresh vegetables, and creamy dressing, this salad is not only visually appealing but also packed with flavor. It’s simple to prepare, making it an excellent choice for snacks, lunch, or even brunch with family and friends.
This pasta salad is perfect for kids and adults alike. The combination of crunchy veggies and soft pasta creates a delightful texture, while the tangy dressing brings all the flavors together. It’s a great way to celebrate the holiday while keeping mealtime enjoyable for everyone!
Tools and Supplies Needed
- Large pot for boiling pasta
- Colander for draining
- Mixing bowl
- Cutting board
- Sharp knife
- Measuring cups and spoons
- Serving bowl
Ingredients
- 8 ounces tri-color pasta (red, white, and blue)
- 1 cup cherry tomatoes, halved
- 1 cup cucumber, diced
- 1 cup bell peppers (red and yellow), chopped
- 1/2 cup mozzarella cheese, cubed
- 1/2 cup Italian dressing
- Salt and pepper to taste
- Fresh basil for garnish
Instructions
- Cook the Pasta: Boil water in a large pot and cook the tri-color pasta according to package directions. Drain and rinse under cold water to stop the cooking process.
- Prepare the Vegetables: While the pasta is cooking, chop the cherry tomatoes, cucumber, and bell peppers. Set aside.
- Mix the Salad: In a large mixing bowl, combine the cooked pasta, chopped vegetables, and mozzarella cheese.
- Add Dressing: Pour the Italian dressing over the salad and toss gently to combine. Season with salt and pepper to taste.
- Serve: Transfer the salad to a serving bowl and garnish with fresh basil. Enjoy this colorful dish at your 4th of July picnic!
Uncle Sam Bear Kebabs
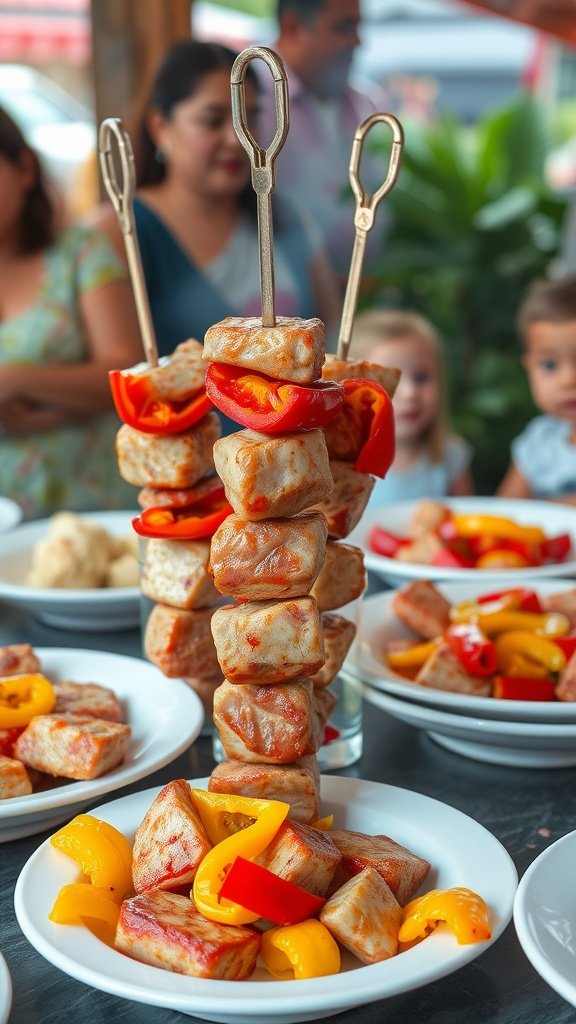
Uncle Sam Bear Kebabs are a fun and colorful way to celebrate the 4th of July with your family. These tasty skewers combine chunks of grilled meat, vibrant bell peppers, and a touch of creativity to resemble everyone’s favorite teddy bear. The blend of savory flavors and crunchy veggies makes these kebabs a hit for both kids and adults alike.
Easy to prepare, these kebabs are perfect for lunch, snacks, or even dinner. Just assemble the ingredients on skewers, grill them briefly, and enjoy! They’re a playful twist on traditional kebabs that bring a festive vibe to any picnic or gathering.
Tools and Supplies Needed
- Skewers (wooden or metal)
- Grill or grill pan
- Knife
- Cutting board
- Bowl for marinating
Ingredients
- 1 pound of chicken breast or beef cut into cubes
- 1 red bell pepper, cut into squares
- 1 yellow bell pepper, cut into squares
- 1 tablespoon olive oil
- 1 teaspoon garlic powder
- Salt and pepper to taste
- 1 teaspoon paprika
- Wooden or metal skewers
Instructions
- Marinate the meat: In a bowl, mix olive oil, garlic powder, salt, pepper, and paprika. Add the cubed chicken or beef and let it marinate for at least 30 minutes.
- Prepare the skewers: Thread the marinated meat and bell pepper pieces onto the skewers, alternating between meat and veggies to create a colorful pattern.
- Preheat the grill: Heat your grill or grill pan over medium-high heat.
- Grill the kebabs: Place the skewers on the grill and cook for about 10-15 minutes, turning occasionally, until the meat is cooked through and slightly charred.
- Serve: Remove the kebabs from the grill and allow them to cool slightly before serving. Enjoy your Uncle Sam Bear Kebabs with your favorite dipping sauce!
Teddy’S 4Th Of July Picnic Plates

Teddy’s 4th of July Picnic Plates are a fun and festive way to celebrate the holiday! These plates feature delicious hot dogs served with a twist, creating a playful and inviting meal for kids and families. The combination of savory hot dogs, colorful toppings, and crunchy tortilla chips makes for an enjoyable experience that’s perfect for any summer gathering.
This recipe is simple to make and allows for plenty of customization, so everyone can enjoy their own version of this classic picnic dish. Whether you’re having breakfast, lunch, or snacks, these plates are sure to impress and satisfy all ages!
Tools and Supplies Needed
- Grill or stovetop skillet
- Hot dog buns
- Hot dogs
- Condiments (ketchup, mustard, relish)
- Cheese slices
- Blue corn tortilla chips
- Plates for serving
Ingredients
- 6 hot dogs
- 6 hot dog buns
- 1/2 cup ketchup
- 1/4 cup mustard
- 1/2 cup relish
- 6 slices of cheddar cheese
- 1 bag of blue corn tortilla chips
Instructions
- Prepare the Hot Dogs: Grill or cook the hot dogs in a skillet over medium heat until heated through and slightly charred (about 5-7 minutes).
- Assemble the Plates: Place each hot dog in a bun and add desired condiments, such as ketchup, mustard, and relish. Top with a slice of cheese, cutting into triangles for a fun presentation.
- Add the Chips: Serve each hot dog plate with a handful of blue corn tortilla chips arranged around the bun, giving a festive look.
- Serve and Enjoy: Gather your family and friends, and enjoy these delicious picnic plates while celebrating the 4th of July!
Star-Spangled Bear Mac & Cheese

Star-Spangled Bear Mac & Cheese is a fun twist on a classic dish that adds a festive flair to any 4th of July picnic. This creamy, cheesy delight is perfect for kids and adults alike, bringing smiles all around the table. It’s simple to make, allowing you to whip up a delicious lunch or dinner without much fuss.
With its vibrant colors and adorable bear shapes, this recipe is sure to be a hit at your gathering. The combination of creamy cheese and playful presentation makes it a delightful option for brunch or snacks too!
Tools and Supplies Needed
- Large pot
- Colander
- Mixing bowl
- Whisk
- Oven-safe baking dish
- Cookie cutter (bear-shaped)
Ingredients
- 2 cups elbow macaroni
- 2 tablespoons butter
- 2 tablespoons all-purpose flour
- 2 cups milk
- 2 cups shredded cheddar cheese
- 1/2 teaspoon garlic powder
- Salt and pepper to taste
- Red and blue tortilla chips (for decoration)
Instructions
- Boil the Pasta: In a large pot, cook the elbow macaroni according to package instructions. Drain and set aside.
- Make the Cheese Sauce: In the same pot, melt the butter over medium heat. Stir in the flour and cook for 1-2 minutes until bubbly. Gradually whisk in the milk, cooking until thickened. Add the cheese, garlic powder, salt, and pepper, stirring until melted and smooth.
- Combine: Add the cooked macaroni to the cheese sauce, mixing until well coated.
- Shape and Bake: Preheat your oven to 350°F (175°C). Using a bear-shaped cookie cutter, cut out shapes from the macaroni mixture and place them in a greased baking dish. Top with additional cheese if desired. Bake for 15-20 minutes until heated through and slightly golden.
- Serve and Decorate: Once baked, serve your adorable bear-shaped mac & cheese on a platter. Use red and blue tortilla chips to create a starry, festive display around the bears.
Teddy’S Red White & Blue Dinner Boats
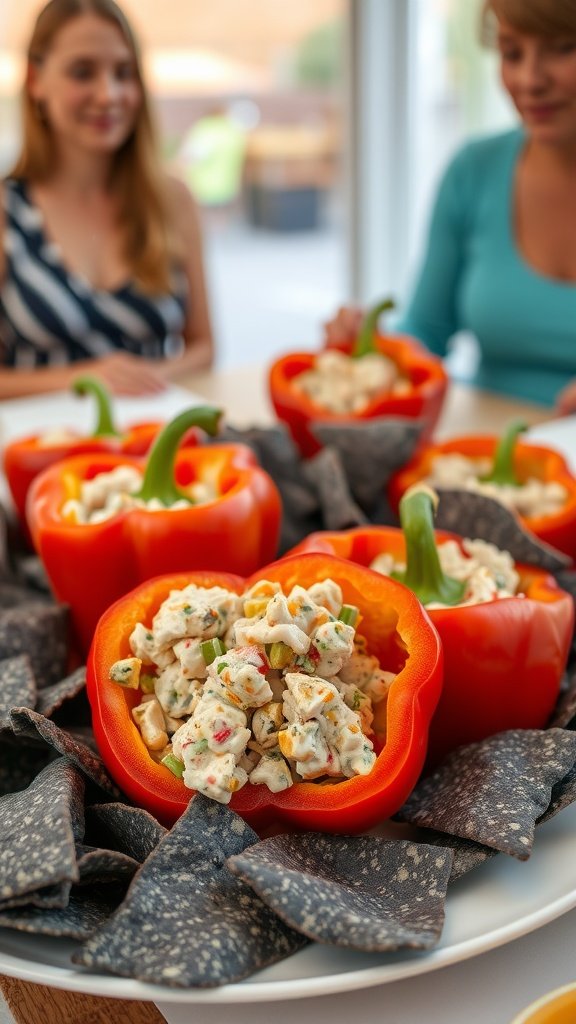
Teddy’s Red White & Blue Dinner Boats are a fun and delicious way to celebrate with family and friends. These vibrant boats are made using bell peppers filled with a scrumptious mix of creamy ingredients, making them a hit for lunch or as a colorful snack. Not only are they delightful to look at, but they also pack a punch of flavor that kids and adults will love.
This recipe is simple to whip up, requiring minimal prep time while still being visually appealing. Perfect for a 4th of July picnic or any festive gathering, these dinner boats are sure to bring smiles to the table!
Tools and Supplies Needed
- Sharp knife
- Cutting board
- Mixing bowl
- Spoon for mixing
- Serving platter
Ingredients
- 4 large red bell peppers
- 1 cup cooked pasta (elbow or shell)
- 1 cup diced vegetables (such as cucumbers, carrots, and bell peppers)
- 1 cup shredded cheese (cheddar or your favorite)
- 1/2 cup ranch dressing
- Salt and pepper to taste
- Fresh parsley for garnish (optional)
Instructions
- Prepare the Bell Peppers: Cut the tops off the red bell peppers and remove the seeds. Set them aside.
- Mix the Filling: In a mixing bowl, combine the cooked pasta, diced vegetables, shredded cheese, and ranch dressing. Season with salt and pepper to taste.
- Fill the Peppers: Spoon the pasta mixture evenly into each bell pepper. Make sure to pack it tightly for a nice presentation.
- Garnish and Serve: Optionally, sprinkle fresh parsley on top of the filled peppers for a pop of color. Arrange them on a serving platter with some chips on the side for a complete meal.
Liberty Bell Bear Corn On The Cob

Get ready to add some fun to your 4th of July festivities with Liberty Bell Bear Corn On The Cob! This playful twist on a classic summer snack combines sweet corn with the charm of teddy bear shapes. It’s simple to make, which is perfect for busy families looking for a festive treat that kids will love.
With a deliciously sweet flavor and a delightful presentation, this dish is a hit at any picnic. The buttery corn is wrapped in colorful paper, giving a whimsical feel that fits right in with your holiday celebrations. Plus, it’s an excellent snack for brunch or lunch!
Tools and Supplies Needed
- Large pot for boiling corn
- Butter knife
- Colorful paper for wrapping
- Small teddy bear cookie cutter
- Bowls for serving
Ingredients
- 4 ears of fresh corn
- 1/2 cup of unsalted butter, softened
- 1/4 cup of shredded cheese (optional)
- Salt and pepper to taste
- Colorful paper for wrapping
- Teddy bear cookie cutter (for butter shapes)
Instructions
- Prepare the Corn: Husk the corn and remove all silk. In a large pot, bring water to a boil and add the corn. Cook for about 5-7 minutes until tender.
- Shape the Butter: While the corn is cooking, use the teddy bear cookie cutter to make butter shapes. Simply press the cutter into soft butter and place the shapes in the fridge to firm up.
- Cool and Serve: Once the corn is cooked, drain and let it cool slightly. Wrap each ear of corn in colorful paper, leaving one end exposed. Top with the teddy bear shaped butter, and sprinkle with salt and pepper if desired.
- Enjoy: Serve warm and let everyone dig in. This fun and festive snack will surely put smiles on faces!
Patriotic Bear Stuffed Potatoes

Patriotic Bear Stuffed Potatoes are a playful and delicious way to celebrate the 4th of July with your family. These baked potatoes are filled with tasty ingredients, topped with fun decorations, and are sure to be a hit at any picnic or gathering. They are simple to make, making them perfect for breakfast, lunch, or even dinner.
The creamy filling, along with fresh veggies and a touch of creativity, makes each potato not only visually appealing but also packed with flavor. Kids will love the bear-shaped cheese and colorful toppings, making mealtime a fun experience.
Tools and Supplies Needed
- Baking sheet
- Large mixing bowl
- Knife
- Spoon
- Oven
Ingredients
- 4 large russet potatoes
- 1 cup shredded cheese (cheddar or mozzarella)
- 1 cup sour cream
- 1/2 cup diced tomatoes
- 1/2 cup diced cucumbers
- 1/4 cup chopped green onions
- 2 tablespoons fresh parsley, chopped
- Bear-shaped cheese slices for decoration
- Salt and pepper to taste
Instructions
- Preheat your oven to 400°F (200°C). Scrub the potatoes under running water and poke several holes in each potato with a fork.
- Place the potatoes on a baking sheet and bake for about 45 minutes or until they are tender when pierced with a fork.
- Once the potatoes are cooked, let them cool slightly. Cut each potato in half and scoop out some of the insides into a mixing bowl, leaving a small border around the edges.
- Add the shredded cheese, sour cream, diced tomatoes, cucumbers, green onions, salt, and pepper to the scooped potato. Mix until well combined.
- Fill each potato half with the mixture, and top with more cheese and bear-shaped cheese slices.
- Return them to the oven for an additional 10 minutes to melt the cheese. Once done, remove from the oven and sprinkle fresh parsley on top before serving.
4Th Of July Teddy S’Mores

These 4th of July Teddy S’Mores are a fun twist on the classic campfire treat. Combining sweet chocolate, gooey marshmallows, and crunchy graham crackers, these treats are perfect for celebrating Independence Day with kids and families. They’re easy to make, and the teddy bear theme adds a delightful touch that kids will love.
With the holiday spirit in mind, these S’Mores can be prepared in a jiffy, making them a great choice for breakfast, lunch, or dessert. Whether you choose to roast the marshmallows over a fire or in the oven, you’re sure to enjoy every bite!
Tools and Supplies Needed
- Graham crackers
- Chocolate bars (milk or dark)
- Large marshmallows
- Teddy bear-shaped cookies or snacks
- Aluminum foil (if roasting in the oven)
- Skewers (if roasting over a fire)
Ingredients
- 4 graham cracker sheets
- 2 chocolate bars
- 4 large marshmallows
- 4 teddy bear-shaped cookies
Instructions
- Prepare the Base: Place one graham cracker sheet on a plate. Top with a piece of chocolate.
- Toast the Marshmallows: If using a fire, skewer the marshmallows and roast them until they’re golden brown. If using the oven, preheat to 400°F (200°C), place marshmallows on a baking sheet, and toast for about 5-7 minutes.
- Add the Marshmallows: Once toasted, place the marshmallow on top of the chocolate.
- Top it Off: Place a teddy bear-shaped cookie on top of the marshmallow, and finish with another graham cracker sheet to create a sandwich.
- Enjoy: Serve immediately and savor the gooey goodness!
Teddy’S Firecracker Popsicles
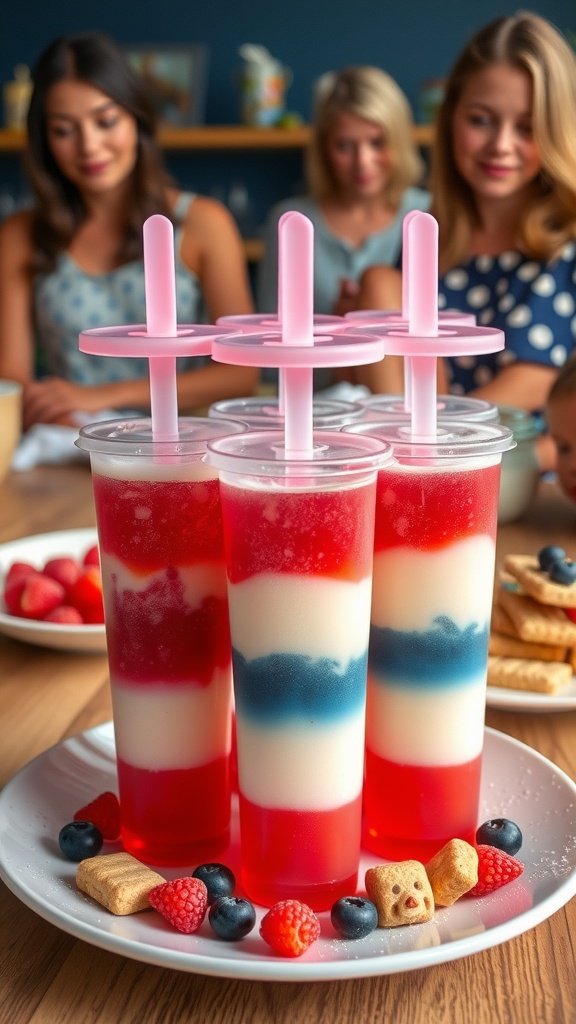
These Teddy’s Firecracker Popsicles are a fun and refreshing treat perfect for celebrating the 4th of July. Bursting with bright colors and fruity flavors, they are sure to delight kids and adults alike. Easy to make, these layered popsicles combine the sweetness of berry flavors with creamy layers for a delicious snack or dessert that’s perfect for summer.
With just a few simple ingredients and some freezing time, you can create these festive popsicles that capture the spirit of a picnic. Serve them at breakfast, lunch, or as a playful dessert during your holiday gatherings!
Tools and Supplies Needed
- Popsicle molds
- Blender
- Mixing bowls
- Measuring cups
- Spatula
Ingredients
- 2 cups strawberry juice (fresh or store-bought)
- 1 cup coconut yogurt (or vanilla yogurt)
- 1 cup blueberry juice (fresh or store-bought)
- 1/4 cup honey or agave syrup (optional, for sweetness)
- Fresh berries for serving (optional)
Instructions
- Prepare the Juices: Blend strawberries until smooth and strain the juice into a bowl. Repeat with blueberries. If desired, mix honey or agave syrup into each juice for sweetness.
- Layer the Juices: In the popsicle molds, pour a layer of strawberry juice to fill about a third of each mold. Freeze for about 1-2 hours, or until firm.
- Add Yogurt Layer: Once the strawberry layer is set, add a layer of coconut yogurt to each mold. Freeze for another hour until firm.
- Finish with Blueberry Juice: Top off the molds with blueberry juice. Insert sticks and freeze for at least 4 hours, or overnight for best results.
- Serve: To remove the popsicles, run warm water over the outside of the molds for a few seconds. Enjoy your colorful and tasty Teddy’s Firecracker Popsicles!
Star-Spangled Bear Cookies

Star-Spangled Bear Cookies are a delightful treat perfect for any 4th of July picnic. These cookies are not only adorable, shaped like cuddly teddy bears, but they also burst with flavor. With a buttery, soft texture and a sweet icing that captures the festive spirit, these cookies are sure to be a hit with kids and adults alike.
Simple to make, this recipe is great for family bonding. Kids will love helping to decorate these charming cookies with colorful icing and sprinkles, making them feel like true little bakers. Enjoy these cookies as snacks, desserts, or even as part of a festive brunch spread!
Tools and Supplies Needed
- Baking sheets
- Parchment paper
- Mixing bowls
- Rolling pin
- Teddy bear cookie cutter
- Spatula
- Decorating bags
- Food coloring
- Icing
- Sprinkles
Ingredients
- 2 ¾ cups all-purpose flour
- 1 teaspoon baking powder
- ½ teaspoon baking soda
- 1 cup unsalted butter, softened
- 1 cup granulated sugar
- 1 large egg
- 1 teaspoon vanilla extract
- 1/2 teaspoon salt
- Royal icing (for decoration)
- Red, white, and blue food coloring
- Star-shaped sprinkles (optional)
Instructions
- Preheat the oven to 350°F (175°C). Line baking sheets with parchment paper.
- In a bowl, whisk together flour, baking powder, baking soda, and salt.
- In a separate bowl, cream the softened butter and sugar together until light and fluffy. Beat in the egg and vanilla extract.
- Gradually mix the dry ingredients into the wet ingredients until a dough forms. Chill the dough for 30 minutes in the refrigerator.
- Roll out the dough on a floured surface to about 1/4 inch thick. Use the teddy bear cookie cutter to cut out shapes and place them on the prepared baking sheets.
- Bake for 8-10 minutes or until the edges are lightly golden. Let the cookies cool completely on a wire rack.
- Once cooled, decorate with royal icing tinted in red, white, and blue. Use star sprinkles for extra festiveness!
Independence Bear Fruit Pizza

Independence Bear Fruit Pizza is a fun and festive treat that combines a sweet cookie crust with a creamy base and a colorful topping of fresh fruits. This dessert is a delightful way to celebrate the 4th of July, making it perfect for brunch or as a sweet snack during your picnic. The combination of flavors is refreshing and light, ensuring that everyone will enjoy it, from kids to adults.
Best of all, this recipe is simple to make! With just a few ingredients, you can whip up this crowd-pleaser in no time. It’s a great way to involve the little ones in the kitchen, allowing them to decorate their own teddy bear pizzas with their favorite fruits. This dessert not only looks appealing but also tastes fantastic, with the sweetness of the cookie crust complementing the tartness of the fruits.
Tools and Supplies Needed
- Baking sheet
- Mixing bowl
- Whisk
- Measuring cups and spoons
- Cookie cutter (teddy bear shape)
- Spatula
Ingredients
- 1 package sugar cookie dough
- 1 cup cream cheese, softened
- 1/2 cup powdered sugar
- 1 teaspoon vanilla extract
- 1 cup strawberries, sliced
- 1 cup blueberries
- 1 cup blackberries
- Graham cracker pieces (optional, for decoration)
Instructions
- Preheat the oven to 350°F (175°C). Roll out the sugar cookie dough on a floured surface to about 1/4 inch thick. Using a teddy bear cookie cutter, cut out bear shapes and place them on a baking sheet lined with parchment paper.
- Bake the cookies for 8-10 minutes or until lightly golden. Remove from the oven and let them cool completely.
- In a mixing bowl, combine the softened cream cheese, powdered sugar, and vanilla extract. Mix until smooth and creamy.
- Once the cookie bears are cool, spread a layer of the cream cheese mixture on each bear cookie.
- Decorate with sliced strawberries, blueberries, and blackberries to create festive designs. Add graham cracker pieces for extra crunch if desired.
- Serve immediately or refrigerate until ready to enjoy!
Teddy’S Liberty Cupcakes

Teddy’s Liberty Cupcakes are a delightful treat that brings a fun twist to your 4th of July celebrations. Bursting with flavor and topped with adorable teddy bear decorations, these cupcakes are perfect for breakfast, lunch, or dessert. They are easy to make, making them an ideal choice for a casual family gathering or picnic.
These cupcakes feature a moist vanilla base, fluffy frosting, and festive red, white, and blue sprinkles, embodying the spirit of the holiday. Kids will love the teddy bear toppers, adding a whimsical touch to your dessert table. Let’s get to baking!
Tools and Supplies Needed
- Mixing bowls
- Electric mixer or whisk
- Measuring cups and spoons
- Cupcake liners
- Cupcake pan
- Spatula
- Piping bag (optional)
Ingredients
- 1 ½ cups all-purpose flour
- 1 cup granulated sugar
- ½ cup unsalted butter, softened
- 2 large eggs
- 1 teaspoon vanilla extract
- ½ cup milk
- 2 teaspoons baking powder
- ½ teaspoon salt
- 1 cup frosting (store-bought or homemade)
- Red and blue sprinkles
- Teddy bear cookie toppers
Instructions
- Preheat the oven to 350°F (175°C). Line a cupcake pan with cupcake liners.
- In a large bowl, cream together softened butter and sugar until light and fluffy. Add eggs, one at a time, mixing well after each addition. Stir in vanilla extract.
- In another bowl, whisk together flour, baking powder, and salt. Gradually add the dry ingredients to the wet mixture, alternating with milk, until just combined.
- Fill each cupcake liner about two-thirds full with batter. Bake for 18-20 minutes or until a toothpick inserted comes out clean. Let cool completely.
- Once cooled, pipe frosting on top of each cupcake. Decorate with red and blue sprinkles, then add a teddy bear cookie on top of each cupcake.
Uncle Sam Bear Pudding Cups
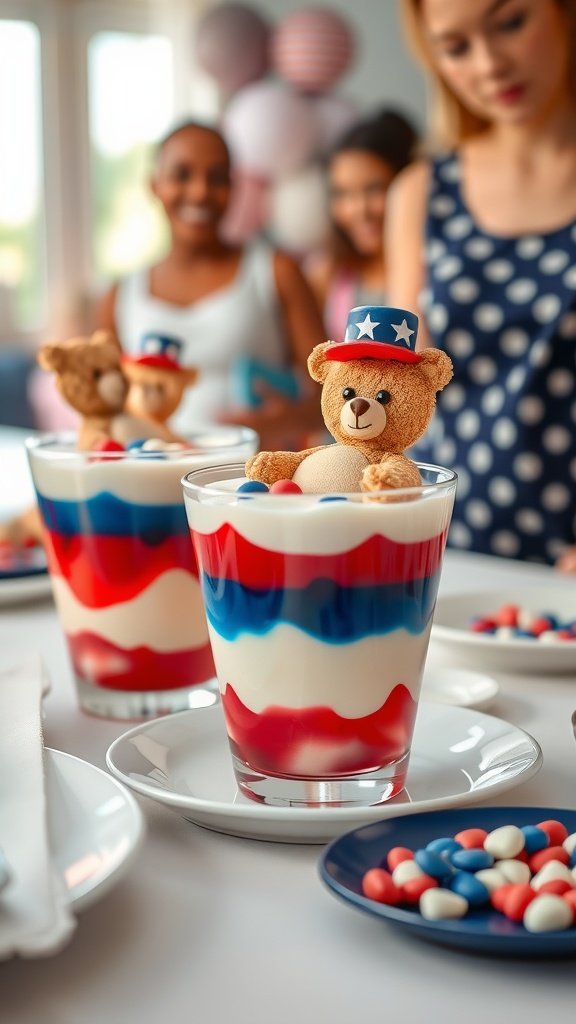
Uncle Sam Bear Pudding Cups are a delightful treat for any 4th of July gathering. These vibrant, layered pudding cups feature a fun mix of red, white, and blue colors, making them a festive addition to your brunch, lunch, or dessert table. The creamy texture and sweet flavors will surely appeal to both kids and adults alike. Plus, they are simple to whip up, so you can spend more time enjoying the celebration and less time in the kitchen!
Each cup combines layers of vanilla pudding, blue raspberry gelatin, and strawberry gelatin, topped with a cute teddy bear for that extra charm. These pudding cups not only taste great but also look fantastic, making them perfect for snacks or desserts during your picnic. Get ready for smiles all around!
Tools and Supplies Needed
- Clear cups or glass jars
- Mixing bowls
- Whisk
- Measuring cups and spoons
- Spoons for serving
- Refrigerator
Ingredients
- 2 cups vanilla pudding
- 1 package (3 oz) blue raspberry gelatin
- 1 package (3 oz) strawberry gelatin
- 2 cups whipped topping (like Cool Whip)
- Teddy bear toppers (mini plush or cookie)
- Red and blue candy (for decoration)
Instructions
- Prepare the Gelatin: Follow the package instructions to make both the blue raspberry and strawberry gelatin. Once prepared, let them cool until set.
- Layer the Pudding: In clear cups, start with a layer of vanilla pudding at the bottom. Follow with a layer of blue raspberry gelatin, then another layer of pudding, and finish with a layer of strawberry gelatin.
- Add Topping: Carefully pipe or spoon whipped topping on the very top layer, creating a fluffy finish. Place a teddy bear on top of the whipped cream, and sprinkle with red and blue candy for extra flair.
- Chill and Serve: Refrigerate the cups for at least an hour before serving to allow the layers to set nicely. Enjoy your festive Uncle Sam Bear Pudding Cups!
Teddy’S 4Th Of July Ice Cream Sandwiches

These Teddy Bear Ice Cream Sandwiches are a fun and festive treat perfect for the 4th of July. With soft, sweet cookies shaped like teddy bears and creamy ice cream in between, they are sure to delight kids and adults alike. The combination of flavors and textures makes for a delightful summer snack or dessert that is easy to whip up.
Gather your family for an enjoyable activity as you decorate these sandwiches with colorful sprinkles and chocolate chips. They are simple to make and can be customized with various ice cream flavors, making them a versatile option for any picnic or gathering.
Tools and Supplies Needed
- Baking sheet
- Parchment paper
- Bowl
- Whisk
- Cookie cutter (teddy bear shape)
- Ice cream scooper
- Spatula
Ingredients
- 2 ½ cups all-purpose flour
- 1 teaspoon baking soda
- ½ teaspoon salt
- 1 cup unsalted butter, softened
- 1 cup granulated sugar
- ½ cup brown sugar, packed
- 2 large eggs
- 2 teaspoons vanilla extract
- 1 cup chocolate chips
- Ice cream (any flavor)
- Rainbow sprinkles for decoration
Instructions
- Preheat the Oven: Start by preheating your oven to 350°F (175°C) and lining a baking sheet with parchment paper.
- Mix Dry Ingredients: In a bowl, whisk together the flour, baking soda, and salt. Set aside.
- Prepare the Dough: In another bowl, cream together the softened butter, granulated sugar, and brown sugar until light and fluffy. Beat in the eggs and vanilla extract. Gradually add the dry mixture, stirring until just combined. Fold in the chocolate chips.
- Shape the Cookies: Using a teddy bear cookie cutter, cut out shapes from the dough and place them on the prepared baking sheet, leaving space between each cookie.
- Bake the Cookies: Bake for 10-12 minutes or until the edges are lightly golden. Let the cookies cool on the baking sheet for a few minutes before transferring them to a wire rack.
- Assemble: Once the cookies are completely cooled, take one cookie, scoop your preferred ice cream on top, and then place another cookie on top to create the sandwich. Press gently.
- Decorate: Roll the edges of the ice cream sandwich in rainbow sprinkles for a festive touch.
- Serve: Enjoy immediately or place in the freezer for a bit if you want them to firm up. Perfect for your 4th of July picnic!
Patriotic Bear Rice Krispie Treats
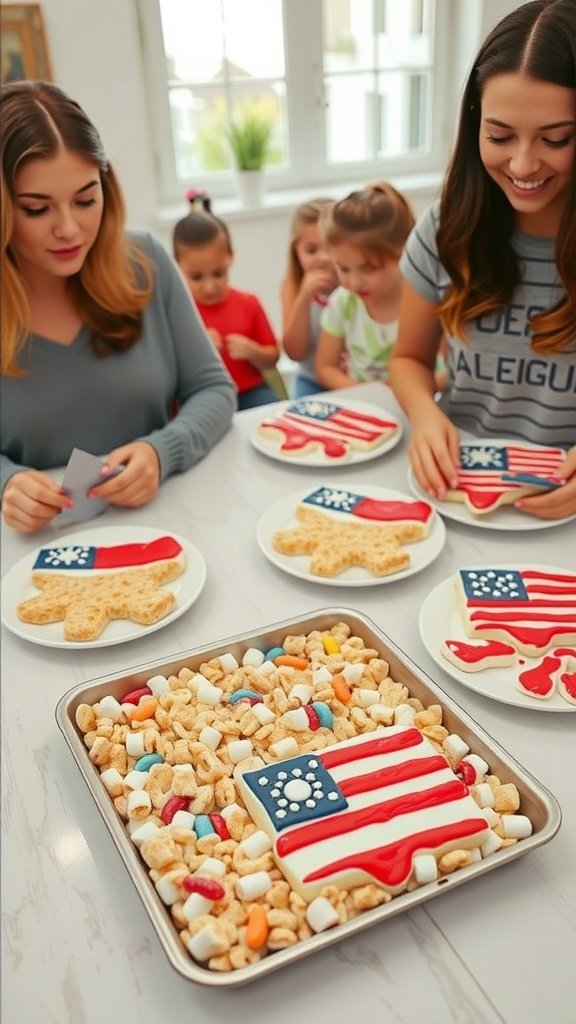
These Patriotic Bear Rice Krispie Treats are a fun and tasty way to celebrate the 4th of July. With their chewy texture and sweet flavor, they’re perfect for kids and adults alike. Plus, crafting them is a simple process that can turn into a delightful family activity.
These treats are not only festive, but they also offer a chance to get creative with decorations. You can customize them with red, white, and blue toppings to match the holiday spirit. They make a great snack for brunch, lunch, or even as a charming dessert at your picnic!
Tools and Supplies Needed
- Large mixing bowl
- Microwave-safe bowl
- Butter knife
- Cookie cutters (bear shape)
- Parchment paper
- Oven-safe pan
- Plastic wrap
Ingredients
- 6 cups Rice Krispies cereal
- 1 package (10 oz) mini marshmallows
- 3 tablespoons unsalted butter
- Red and blue candy melts or icing
- Decorative sprinkles (optional)
Instructions
- Prepare the Mix: In a large microwave-safe bowl, melt the butter over low heat. Add the marshmallows and stir until completely melted and smooth.
- Combine with Cereal: Remove from heat and quickly add the Rice Krispies cereal, mixing until fully coated with the marshmallow mixture.
- Shape the Treats: Line an oven-safe pan with parchment paper. Press the mixture into the pan, shaping it into an even layer. Let it cool for about 30 minutes.
- Cut and Decorate: Once cooled, use bear-shaped cookie cutters to cut out treats. Decorate with red and blue candy melts or icing to create a festive look. Add sprinkles for extra flair!
- Serve: Allow the decorations to set before serving at your 4th of July gathering. Enjoy your sweet and patriotic creations!
Teddy’S Firecracker Fruit Kabobs

These Teddy’s Firecracker Fruit Kabobs are a delightful and fun way to celebrate the 4th of July with kids and families. Combining juicy watermelon, sweet bananas, and fresh blueberries, these kabobs are bursting with flavors that everyone will love. Plus, they’re super easy to make, making them a perfect snack for any summer occasion.
The vibrant colors and playful shapes will bring a festive spirit to your picnic or barbecue. Kids will enjoy assembling their own kabobs, creating a delicious treat that’s both healthy and fun. Serve these at breakfast, lunch, or as a refreshing dessert after a hearty meal!
Tools and Supplies Needed
- Wooden skewers
- Cookie cutters (star shape recommended)
- Cutting board
- Knife
Ingredients
- 1 small watermelon
- 2 ripe bananas
- 1 cup fresh blueberries
- Optional: edible sparklers for decoration
Instructions
- Prepare the Watermelon: Slice the watermelon into thick rounds, then use star-shaped cookie cutters to cut out star shapes. Set aside.
- Slice the Bananas: Cut the bananas into thick rounds.
- Assemble the Kabobs: Take a wooden skewer and thread the watermelon stars, banana slices, and blueberries in any order you like. Repeat until all ingredients are used.
- Decorate: If desired, stick edible sparklers into the top of the kabobs for a festive touch.
- Serve: Arrange the finished kabobs on a platter and enjoy your colorful, fruity creation!
Star-Spangled Bear Brownie Pops

Star-Spangled Bear Brownie Pops are a fun and delightful treat for any gathering. These brownie pops are rich, chocolatey, and bring a festive flair to your 4th of July celebrations. Kids and adults alike will love the cute bear toppers and star shape, making them perfect for breakfast, brunch, or dessert.
Making these brownie pops is simple and enjoyable, especially with little hands helping out in the kitchen. They’re great for adding a touch of sweetness to any meal and are sure to be a hit with your family and friends!
Tools and Supplies Needed
- Baking pan
- Star-shaped cookie cutter
- Popsicle sticks
- Small bowl for melting chocolate
- Microwave or stovetop
- Wax paper or parchment paper
Ingredients
- 1 box brownie mix (plus ingredients required by the box)
- 1 cup milk chocolate chips
- 1 cup bear-shaped candy or cookies
- 1/2 cup white chocolate (for drizzling)
- Sprinkles (optional for decoration)
Instructions
- Prepare the Brownies: Follow the instructions on the brownie mix box to prepare the batter. Pour it into a greased baking pan and bake according to the package directions.
- Cut Out Shapes: Once the brownies have cooled, use a star-shaped cookie cutter to cut out star shapes. Insert a popsicle stick into the bottom of each star to create a handle.
- Melt the Chocolate: In a microwave-safe bowl, melt the milk chocolate chips until smooth. Dip the top of each brownie star into the melted chocolate and let the excess drip off.
- Add Toppers: Place a bear-shaped candy or cookie on top of each coated brownie pop. Allow the chocolate to set.
- Drizzle and Decorate: Melt the white chocolate and drizzle it over the brownie pops. Add sprinkles if desired. Let everything cool until set before serving.
Teddy’S Red White & Blue Strawberries

Teddy’s Red White & Blue Strawberries are a fun and festive treat perfect for your 4th of July picnic. These delightful strawberries are dipped in creamy white chocolate and decorated with vibrant blue sprinkles, creating a sweet snack that kids and adults will love. Not only are they visually appealing, but they also balance the juicy sweetness of fresh strawberries with the rich flavor of chocolate.
This recipe is super simple and requires just a few ingredients, making it a great option for breakfast, lunch, or dessert. Whether you’re looking to impress your guests or just want to enjoy a tasty treat with your family, these strawberries are sure to be a hit!
Tools and Supplies Needed
- Microwave-safe bowl
- Oven mitts
- Fork or dipping tool
- Wax paper or parchment paper
- Plate for serving
Ingredients
- 1 pound fresh strawberries, washed and dried
- 1 cup white chocolate chips
- 1/4 cup blue sprinkles
Instructions
- Melt the Chocolate: Place the white chocolate chips in a microwave-safe bowl. Heat in the microwave in 30-second intervals, stirring in between, until fully melted and smooth.
- Dip the Strawberries: Hold a strawberry by the stem and dip it into the melted chocolate, allowing any excess chocolate to drip off. Place the dipped strawberry onto wax paper.
- Add Sprinkles: While the chocolate is still wet, sprinkle blue decorations on top. You can also create patterns or designs with the sprinkles.
- Chill: Once all strawberries are dipped and decorated, place them in the refrigerator for about 15-20 minutes to allow the chocolate to harden.
- Serve: Transfer the strawberries to a serving plate and enjoy your festive creation!
Independence Day Bear Picnic Cake

This festive Independence Day Bear Picnic Cake is a delightful treat that captures the spirit of the holiday. It’s a simple yet charming cake decorated with a playful bear theme and a vibrant American flag design. Perfect for breakfast, lunch, or dessert, this cake is sure to make your picnic memorable!
With its soft vanilla layers and creamy frosting, this cake is a sweet celebration for kids and families. It’s easy to put together, making it ideal for busy holiday preparations. Everyone will love the flavors and presentation, making it a highlight of your picnic spread.
Tools and Supplies Needed
- 2 9-inch round cake pans
- Mixing bowls
- Electric mixer
- Offset spatula
- Cooling rack
- Decorating tips and piping bags
- Serving platter
Ingredients
- 2 cups all-purpose flour
- 1 1/2 cups granulated sugar
- 1/2 cup unsalted butter, softened
- 1 cup milk
- 3 1/2 teaspoons baking powder
- 1 teaspoon vanilla extract
- 1/2 teaspoon salt
- 2 large eggs
- 4 cups whipped cream (for frosting)
- Food coloring (red, white, blue)
- Graham crackers (for decoration)
- Fresh strawberries (for garnish)
Instructions
- Preheat the oven to 350°F (175°C). Grease and flour the 9-inch round cake pans.
- In a large bowl, mix together flour, sugar, baking powder, and salt. Add in the softened butter, milk, eggs, and vanilla. Beat with an electric mixer for about 2 minutes until smooth.
- Divide the batter evenly between the two prepared pans. Bake for 25-30 minutes or until a toothpick comes out clean. Let the cakes cool in the pans for 10 minutes before transferring them to a cooling rack.
- Once the cakes are completely cool, place one layer on a serving platter. Spread whipped cream on top. Place the second layer on top and frost the sides and top with whipped cream.
- Use food coloring to tint portions of whipped cream red and blue. Decorate the top of the cake to create an American flag design using graham crackers and colored whipped cream. Top with fresh strawberries for a fun finish.