Picnics are a blast, and having the right snacks on hand can make all the difference. Whether you’re heading to the park, beach, or just enjoying some time outside, these 10 easy-to-pack snacks will fit right in your purse and keep you fueled for fun. Say goodbye to boring lunches and hello to tasty bites that are super convenient!
Mini Cheese and Crackers Pack

Mini cheese and crackers are the perfect snack for any picnic! They offer a delightful balance of creamy cheese and crunchy crackers, making each bite satisfying and tasty. This recipe is simple to prepare, allowing you to assemble everything in just a few minutes. Plus, it’s easily portable, so you can throw it in your purse and enjoy it anywhere.
Pack your favorite types of cheese along with a variety of crackers for a delightful mix. Feel free to add some extras like nuts or dried fruits to elevate your snacking experience. This snack is not just delicious but also customizable to match your preferences!
Ingredients
- 4 ounces of cheese (cheddar, gouda, or your choice)
- 8-10 small crackers (like water crackers or wheat thins)
- Optional: sliced fruits (like apple or grapes) or nuts
Tools and Supplies Needed
- Small airtight container
- Knife (for slicing cheese)
- Cutting board
Instructions
- Slice the cheese into small squares or rectangles for easy snacking.
- Arrange the crackers in the bottom of your airtight container.
- Place the cheese slices on top of the crackers or next to them.
- If using, add any sliced fruits or nuts to the container for additional flavor and texture.
- Seal the container and pack it in your purse for your picnic!
Homemade Granola Bars Wrapped for Freshness

Homemade granola bars are a tasty and nutritious snack that’s super easy to make. They offer a delightful blend of crunch and chewiness, packed with wholesome ingredients. Perfect for picnics, these bars are not only satisfying but also customizable to your taste. Make a batch and enjoy a yummy snack on the go!
These bars can be made in just a few steps and are wrapped for freshness, ensuring they stay delicious until you’re ready to eat. You can mix and match ingredients like nuts, seeds, and dried fruits for a snack that’s uniquely yours. Whether you prefer a nutty flavor or a fruity twist, this recipe will satisfy your cravings.
Ingredients
- 2 cups rolled oats
- 1/2 cup honey or maple syrup
- 1/4 cup peanut butter or almond butter
- 1/2 cup mixed nuts, chopped
- 1/2 cup dried fruit (like cranberries or apricots)
- 1/4 teaspoon salt
- 1/2 teaspoon vanilla extract
- 1/4 cup mini chocolate chips (optional)
Instructions
- Preheat your oven to 350°F (175°C) and line an 8×8 inch baking pan with parchment paper.
- In a large bowl, mix rolled oats, chopped nuts, dried fruit, and salt.
- In a small saucepan over low heat, combine honey (or maple syrup) and peanut butter until smooth. Remove from heat and stir in vanilla extract.
- Pour the wet mixture over the dry ingredients and mix until everything is well coated. If using, fold in chocolate chips.
- Transfer the mixture to the prepared pan and press down firmly to create an even layer.
- Bake for about 20-25 minutes until lightly golden. Allow to cool completely in the pan before cutting into bars.
- Wrap each bar individually in parchment paper for freshness and pack them up for your picnic!
Tools and Supplies Needed
- Large mixing bowl
- Small saucepan
- Wooden spoon or spatula
- 8×8 inch baking pan
- Parchment paper
Popcorn Seasoned with Herbs and Spices

Popcorn seasoned with herbs and spices is a fantastic snack that brings a burst of flavor to your picnic. This light and crunchy treat can be customized with whatever spices you enjoy, making it a delightful addition to your picnic bag. It’s super easy to make and requires just a few ingredients, perfect for a quick snack on the go.
The blend of herbs and spices elevates the humble popcorn, giving it a savory twist that’ll keep everyone reaching for more. Whether you prefer something zesty with a touch of garlic or a classic herby mix, this recipe is all about making your favorite popcorn flavor come to life.
Ingredients
- 1/2 cup popcorn kernels
- 2 tablespoons olive oil
- 1 teaspoon garlic powder
- 1 teaspoon onion powder
- 1 teaspoon dried oregano
- 1 teaspoon dried basil
- Salt to taste
Instructions
- Pop the Corn: In a large pot, heat olive oil over medium heat. Add popcorn kernels, cover, and shake the pot occasionally until popping slows down.
- Mix the Seasoning: In a small bowl, combine garlic powder, onion powder, oregano, basil, and salt.
- Season the Popcorn: Once popped, transfer popcorn to a large bowl and immediately sprinkle the herb mixture over it. Toss well to coat.
- Serve: Enjoy your seasoned popcorn as a tasty snack during your picnic!
Tools and Supplies Needed
- Large pot with a lid
- Mixing bowl
- Small bowl for seasoning
- Spoon for mixing
Vegetable Sticks with Hummus Cups
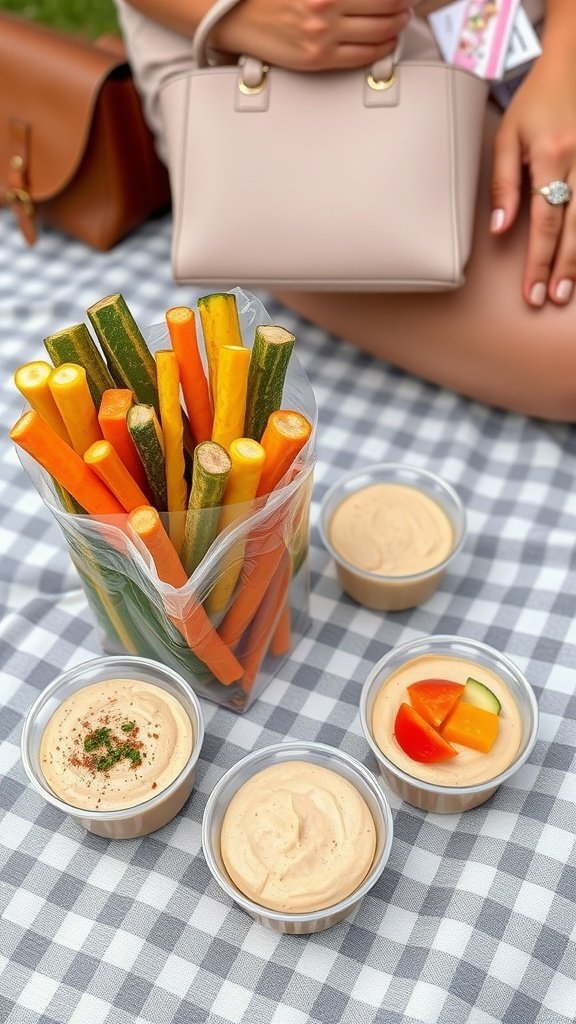
Vegetable sticks with hummus cups are a crisp and creamy delight that make for a perfect snack on the go. The vibrant crunch of fresh veggies paired with smooth, flavorful hummus is not only satisfying but also packed with nutrients. This simple recipe can be prepared in just a few minutes, making it an ideal picnic treat that’s easy to throw in your purse.
Choosing a variety of colorful vegetables like carrots, cucumbers, and bell peppers adds both visual appeal and a range of flavors. The hummus can be store-bought or homemade, allowing for customization to suit your taste. Enjoy this wholesome snack that’s sure to please everyone at your picnic!
Ingredients
- 1 cup carrots, cut into sticks
- 1 cup cucumber, cut into sticks
- 1 cup bell peppers, cut into sticks
- 1 cup celery, cut into sticks
- 1 cup hummus (store-bought or homemade)
- Spices for garnish (optional)
Instructions
- Prepare the Vegetables: Wash and cut all vegetables into sticks. Ensure they are uniform in size for easy dipping.
- Portion the Hummus: Divide the hummus into small cups or containers. You can use 1/4 cup of hummus per serving.
- Pack for the Picnic: Arrange the vegetable sticks in a container and place the hummus cups alongside them. If desired, sprinkle some spices on top of the hummus for extra flavor.
- Serve and Enjoy: Take your vegetable sticks with hummus to your picnic, and enjoy a delicious and healthy snack!
Tools and Supplies Needed
- Cutting board
- Sharp knife
- Containers for hummus
- Vegetable peeler (if needed)
- Ziplock bags or a picnic container for transport
Fruit Kabobs for Easy Snacking

Fruit kabobs are a fun and colorful way to enjoy fresh fruit on the go. These tasty treats are not only visually appealing but also packed with nutrients, making them a perfect snack for picnics or any outing. The sweetness of the fruit combined with a hint of mint creates a refreshing experience that everyone will love.
Making fruit kabobs is super easy! Just chop your favorite fruits into bite-sized pieces, skewer them on sticks, and they’re ready to serve. You can mix and match fruits like strawberries, melon, pineapple, and blueberries for a delightful combination. This snack is not only simple but allows you to get creative with your fruit choices!
Ingredients
- 1 cup strawberries, hulled and halved
- 1 cup watermelon, cut into cubes
- 1 cup cantaloupe, cut into cubes
- 1 cup pineapple, cut into cubes
- 1 cup blueberries
- Fresh mint leaves for garnish
- Wooden skewers
Tools and Supplies Needed
- Cutting board
- Sharp knife
- Bowls for fruit
- Wooden skewers
Instructions
- Prepare the Fruit: Wash all the fruits thoroughly. Hull the strawberries and cut them into halves. Chop the watermelon, cantaloupe, and pineapple into bite-sized cubes.
- Assemble the Kabobs: Take a wooden skewer and start threading the fruit pieces. Alternate between the different types of fruit for a colorful presentation. Finish with a blueberry on top for a pop of color.
- Garnish and Serve: Once the kabobs are assembled, place them on a serving platter and garnish with fresh mint leaves. Enjoy immediately or store in the fridge for later!
Mini Muffins in a Resealable Bag

Mini muffins are a delightful treat that packs a punch of flavor in a tiny bite. These little wonders are perfect for picnics, as they’re easy to transport and eat on the go. With a variety of flavors to choose from, everyone can find something they love. Plus, they’re simple to whip up, making them an ideal option for a last-minute snack.
These mini muffins offer a moist texture and a burst of sweetness, complemented by fresh fruits or chocolate chips, depending on your choice. Just toss them in a resealable bag, and you’re ready for your outing!
Ingredients
- 1 ½ cups all-purpose flour
- ½ cup granulated sugar
- 1 tablespoon baking powder
- ¼ teaspoon salt
- ½ cup unsalted butter, melted
- 2 large eggs
- 1 teaspoon vanilla extract
- ½ cup milk
- 1 cup chocolate chips or berries (optional)
Instructions
- Preheat your oven to 350°F (175°C) and grease a mini muffin pan.
- In a large bowl, mix together the flour, sugar, baking powder, and salt.
- In another bowl, whisk together the melted butter, eggs, vanilla extract, and milk until well combined.
- Pour the wet ingredients into the dry ingredients and stir until just combined. Be careful not to overmix.
- If using, gently fold in the chocolate chips or berries.
- Fill each muffin cup about ¾ full with the batter.
- Bake for 12-15 minutes, or until a toothpick comes out clean.
- Let them cool slightly before transferring to a resealable bag for your picnic.
Tools and Supplies Needed
- Mini muffin pan
- Mixing bowls
- Whisk
- Spoon or spatula
- Measuring cups and spoons
- Resealable bag for storage
Savory Trail Mix with Nuts and Dried Fruits

This savory trail mix is the perfect snack for your next picnic! It combines crunchy nuts with chewy dried fruits for a delightful taste experience. You’ll love the salty and sweet balance, making it a satisfying choice to munch on while enjoying the outdoors.
Best of all, this recipe is super simple to make. Just mix your favorite nuts and dried fruits together, and you’re good to go! It’s a great way to add some nutrition to your snack time without any fuss.
Ingredients
- 1 cup almonds
- 1 cup cashews
- 1 cup walnuts
- 1 cup dried cranberries
- 1 cup dried apricots, chopped
- 1/2 cup sunflower seeds
- 1/2 teaspoon sea salt
- 1 teaspoon cinnamon (optional)
Instructions
- Combine the Ingredients: In a large bowl, mix together the almonds, cashews, walnuts, dried cranberries, dried apricots, and sunflower seeds.
- Add Seasoning: If desired, sprinkle sea salt and cinnamon over the mixture for extra flavor. Toss everything together until well coated.
- Store and Serve: Transfer the mix into an airtight container or a resealable bag for easy transport. Enjoy your trail mix as a tasty snack on your picnic!
Tools and Supplies Needed
- Large mixing bowl
- Measuring cups
- Spatula or spoon for mixing
- Airtight container or resealable bag for storage
Cheese-Stuffed Olives for a Savory Treat

Cheese-stuffed olives are a delightful snack that combines the briny goodness of olives with rich, creamy cheese. They provide a perfect bite-sized treat that’s tasty and satisfying. Making these treats is pretty straightforward, and they pack a flavor punch that makes them irresistible.
These little gems are not only great for picnics but can also elevate any snack spread. You can choose your favorite type of olives and cheese to customize the flavors to your liking. Plus, they’re easy to transport, making them a perfect choice to toss in your purse for on-the-go munching!
Ingredients
- 1 cup green or black olives (pitted)
- 1/2 cup cream cheese, softened
- 1/4 cup grated Parmesan cheese
- 1 tablespoon fresh herbs (like parsley or dill), chopped
- 1 teaspoon garlic powder
- Salt and pepper to taste
Tools and Supplies Needed
- Mixing bowl
- Spoon or small spatula
- Plastic wrap or an airtight container for storage
- Small piping bag (optional)
Instructions
- Prepare the Filling: In a mixing bowl, combine the softened cream cheese, grated Parmesan, chopped herbs, garlic powder, salt, and pepper. Mix until smooth and well combined.
- Stuff the Olives: Using a spoon or a small piping bag, fill each olive with the cheese mixture. Make sure to fill them generously.
- Chill: Once stuffed, place the olives in an airtight container and refrigerate for at least one hour to allow the flavors to meld.
- Serve: Enjoy your cheese-stuffed olives as a savory snack on their own or as part of a larger appetizer spread!
Fruit Leather Rolls for a Sweet Option

Fruit leather rolls are a fantastic way to enjoy a sweet treat without any fuss. Made from pureed fruit, these snacks are chewy, flavorful, and perfect for picnic outings. They pack a fruity punch that can satisfy your sweet tooth while being healthy at the same time. Plus, they are super simple to make at home!
With just a few ingredients, you can create a variety of flavors to suit your taste. They are great for kids and adults alike, making them an excellent choice for a picnic snack. Just roll them up, toss them in your purse, and you’re ready to go!
Ingredients
- 2 cups of your favorite fruit (strawberries, apples, or peaches work well)
- 1 tablespoon honey or agave syrup (optional)
- 1 tablespoon lemon juice
- Pinch of salt
Instructions
- Prep the Fruit: Wash and chop your chosen fruit. If using apples or peaches, you can peel them if you prefer.
- Blend: In a blender, combine the fruit, honey (if using), lemon juice, and salt. Blend until smooth.
- Spread: Line a baking sheet with parchment paper and pour the fruit puree onto it. Spread it evenly with a spatula to about 1/8 inch thick.
- Dry: Place the baking sheet in a preheated oven at 170°F (75°C). Leave the door slightly ajar to allow moisture to escape. Dry the fruit for about 6-8 hours, or until it is no longer sticky to the touch.
- Cool and Cut: Once dried, let the fruit leather cool completely. Cut it into strips and roll them up. Store in an airtight container or zip-top bag.
Tools and Supplies Needed
- Baking sheet
- Parchment paper
- Blender
- Spatula
Chocolate-Covered Almonds in a Snack Bag

Chocolate-covered almonds are a delightful treat that perfectly blend the rich, creamy taste of chocolate with the satisfying crunch of almonds. They make a fantastic snack for picnics, road trips, or just an afternoon pick-me-up. Plus, they are super easy to make at home!
The sweet and nutty flavor combination is simply irresistible. Whether you prefer dark, milk, or white chocolate, this recipe is adaptable to your taste. With just a few simple ingredients, you can whip up a batch in no time and store them in a snack bag for on-the-go enjoyment.
Tools and Supplies Needed
- Double boiler or microwave-safe bowl
- Parchment paper or silicone baking mat
- Mixing spoon
- Snack bags or airtight container
Ingredients
- 1 cup raw almonds
- 1 cup chocolate chips (dark, milk, or white)
- 1 teaspoon coconut oil (optional, for a smoother chocolate)
Instructions
- Melt the Chocolate: In a double boiler or microwave, melt the chocolate chips and coconut oil (if using) until smooth, stirring frequently to prevent burning.
- Coat the Almonds: Add the almonds to the melted chocolate and stir until they are evenly coated.
- Set on Parchment: Using a fork, lift the chocolate-covered almonds out of the bowl and place them on a sheet of parchment paper or a silicone baking mat. Allow excess chocolate to drip off.
- Cool and Harden: Let the almonds cool at room temperature until the chocolate hardens, or place them in the refrigerator for quicker results.
- Pack for Snacks: Once hardened, transfer the chocolate-covered almonds to snack bags or an airtight container for easy storage and transport.