Picnics are a blast, especially when you have fun snacks that kids can’t resist! Whether you’re heading to the park or just enjoying your backyard, these 20 easy picnic snacks will make your outing a hit.
Packed with flavor and simplicity, these treats are sure to keep the little ones happy and satisfied. Let’s jump into some tasty ideas!
Mini Sandwich Skewers

Mini sandwich skewers are a fun and colorful way to enjoy sandwiches without the mess. Kids love the combination of different flavors packed onto a stick, making them not only tasty but also appealing to the eyes. They are super easy to whip up and can be customized with your child’s favorite ingredients.
These mini skewers bring together the goodness of bread, cheese, veggies, and deli meats in a bite-sized format, perfect for little hands. They’re also portable, making them a great addition to any picnic or lunchbox.
Ingredients
- 8 slices of bread (white, wheat, or your choice)
- 4 slices of cheese (cheddar, Swiss, or mozzarella)
- 1 cup assorted deli meats (turkey, ham, or roast beef)
- 1/2 cup assorted vegetables (lettuce, tomatoes, cucumbers, peppers)
- Olive oil or mayonnaise (optional, for spreading)
- Skewers or toothpicks
Instructions
- Prepare the Ingredients: Start by laying out all your ingredients. Cut the bread into squares, cheese into slices, and veggies into bite-sized pieces.
- Assemble the Skewers: Take a skewer or toothpick and start layering the ingredients. Begin with a piece of bread, then add cheese, a slice of meat, and a veggie. Repeat until the skewer is filled, finishing off with another piece of bread.
- Chill (optional): If you prefer, you can refrigerate the skewers for about 30 minutes to help them hold their shape and make them extra refreshing.
- Serve: Arrange the skewers on a plate and serve them at your picnic or as a tasty snack!
Mini Quiche Bites

Mini quiche bites are a tasty, bite-sized snack perfect for picnics. They are savory, creamy, and can be customized with your kids’ favorite ingredients. Plus, they’re easy to make, making them an ideal choice for a fun family cooking activity.
These little delights can be made with various fillings, such as cheese, vegetables, or meats, giving you endless possibilities to suit everyone’s taste. Not only are they a hit with kids, but they also pack well, making them a fantastic addition to your picnic basket!
Ingredients
- 1 package of refrigerated pie crusts or puff pastry
- 4 large eggs
- 1 cup milk
- 1 cup shredded cheese (cheddar or your choice)
- 1/2 cup diced vegetables (spinach, bell peppers, or onions)
- 1/2 cup cooked and crumbled bacon or sausage (optional)
- Salt and pepper to taste
Instructions
- Preheat the oven to 375°F (190°C).
- Roll out the pie crusts and cut them into small circles to fit into a greased muffin tin.
- In a bowl, whisk together the eggs, milk, salt, and pepper.
- Add in the cheese, vegetables, and meat (if using), mixing well.
- Place the crusts into the muffin tin, filling each with the egg mixture until nearly full.
- Bake for 20-25 minutes or until the egg is set and the tops are golden brown.
- Let cool slightly before removing from the muffin tin. Serve warm or at room temperature.
Tools and Supplies Needed
- Muffin tin
- Rolling pin
- Mixing bowl
- Whisk
- Cutting board
Veggie Cups with Hummus

Veggie cups with hummus are a fun and healthy snack that kids will love to munch on during picnics. These vibrant cups are filled with colorful, crunchy vegetables like carrots, cucumbers, and bell peppers, making them visually appealing and delicious. Paired with creamy hummus, this snack is not only tasty but also super simple to prepare, making it perfect for busy parents.
The best part about veggie cups is their versatility. You can mix and match veggies based on your child’s favorites or whatever you have on hand. Plus, they are portable and mess-free, making them an ideal choice for outdoor gatherings. Your kids will beg you to pack these delightful veggie cups every time you head out!
Tools and Supplies Needed
- Clear plastic cups or small jars
- Cutting board
- Knife
- Mixing bowl
- Vegetable peeler (optional)
Ingredients
- 1 cup carrots, cut into sticks
- 1 cup cucumbers, cut into sticks
- 1 cup bell peppers (red, yellow, or green), cut into sticks
- 1 cup celery, cut into sticks
- 1 cup cherry tomatoes (optional)
- 1 cup hummus (store-bought or homemade)
Instructions
- Prepare the Veggies: Wash and cut all vegetables into sticks. Use a vegetable peeler for the carrots if desired.
- Assemble the Cups: Take the clear plastic cups and fill each one with a mix of cut veggies. Place them in the cup vertically to showcase the colorful array.
- Add Hummus: In the center of each cup, add a generous dollop of hummus for dipping.
- Pack and Serve: Cover the cups with lids or plastic wrap for transport. Serve chilled or at room temperature during your picnic.
Air-Popped Popcorn Bags

Air-popped popcorn bags are a simple and tasty snack that kids will love to munch on during a picnic. Light, fluffy, and customizable, these popcorn bags are perfect for a fun outdoor treat that is both healthy and satisfying.
With the ability to add a variety of seasonings, from classic butter and salt to exciting flavors like cheese or cinnamon sugar, this snack is sure to please every palate. Plus, making air-popped popcorn is quick and easy, making it a great choice for busy parents!
Tools and Supplies Needed
- Air popper or stovetop pot
- Large mixing bowl
- Measuring cups
- Seasoning shaker (optional)
- Paper bags or small bowls for serving
Ingredients
- 1/2 cup popcorn kernels
- 1 tablespoon olive oil (optional)
- Salt to taste
- Your choice of seasonings (cheese powder, cinnamon sugar, etc.)
Instructions
- Pop the Corn: Using an air popper or stovetop pot, pop the popcorn kernels according to the manufacturer’s instructions.
- Season the Popcorn: In a large mixing bowl, drizzle the popcorn with olive oil if using, then sprinkle with salt and any other desired seasonings. Toss well to combine.
- Serve: Portion the popcorn into paper bags or small bowls for easy snacking. Enjoy your tasty picnic treat!
Cheese and Crackers Platter

A cheese and crackers platter is a simple yet delightful snack that kids can’t resist. It offers a tasty balance of creamy cheese and crunchy crackers, making it an easy-to-make favorite for any picnic. You can mix and match different cheeses and crackers to suit your family’s preferences, and even add fruits for a hint of sweetness.
This snack is not only delicious but also fun to assemble. Kids can help by choosing their favorite cheese and arranging everything on a platter. It’s a great way to get them involved in the kitchen while keeping snack time exciting!
Ingredients
- 1 cup assorted cheese (cheddar, gouda, or mozzarella)
- 1 cup assorted crackers (whole grain, flavored, or classic)
- 1 cup grapes or apple slices
- 1/4 cup nuts (optional)
- Honey or jam for dipping (optional)
Instructions
- Prepare the Cheese: Cut the cheese into bite-sized cubes or slices.
- Arrange the Crackers: Lay out a variety of crackers on a large platter.
- Add Fruits: Scatter grapes or apple slices around the cheese and crackers for a fresh touch.
- Include Nuts: If using, add a small bowl of nuts to the platter.
- Serve: Provide honey or jam for dipping, if desired, and let everyone dig in!
Tools and Supplies Needed
- Cheese knife
- Cutting board
- Large platter or serving board
- Small bowls for nuts and dips
Peanut Butter Banana Roll-Ups

Peanut Butter Banana Roll-Ups are a delicious and fun snack that kids love. With the creamy flavor of peanut butter combined with the sweetness of bananas, these roll-ups are not only tasty but also super simple to make. Perfect for picnics, they’re easy to pack and eat on the go!
This recipe offers a delightful crunch from the tortilla and a rich filling that keeps the kids coming back for more. Plus, they can be made in just a few minutes, making them a quick and nutritious choice for any outing.
Tools and Supplies Needed
- Tortillas
- Peanut butter
- Bananas
- Knife
- Cutting board
Ingredients
- 4 large tortillas
- 1 cup peanut butter
- 2 ripe bananas
- Honey (optional, for drizzling)
Instructions
- Spread a generous layer of peanut butter on each tortilla, making sure to cover it evenly.
- Peel and slice the bananas into thin rounds, and place them on top of the peanut butter.
- Roll the tortilla up tightly, starting from one end.
- Slice the roll into bite-sized pieces to make them easier for kids to handle.
- If desired, drizzle honey over the top before serving for extra sweetness.
Fruit and Yogurt Parfaits

Fruit and yogurt parfaits are a delightful and nutritious snack that kids will love. Bursting with fresh flavors and vibrant colors, these parfaits combine layers of creamy yogurt with sweet fruits, making them not only tasty but also visually appealing. They are super simple to prepare and can even be made ahead of time for a quick grab-and-go option.
Perfect for picnics, these parfaits offer a refreshing taste that balances the richness of yogurt with the sweetness of fruits like strawberries, blueberries, and raspberries. They are versatile too—you can swap in seasonal fruits or even add granola for a crunchy twist. Your kids will be begging you to pack these!
Ingredients
- 2 cups plain or flavored yogurt
- 1 cup strawberries, sliced
- 1 cup blueberries
- 1 cup raspberries
- 1 cup granola (optional)
- Honey or maple syrup (optional, for sweetness)
Instructions
- In a glass or bowl, start with a layer of yogurt at the bottom.
- Add a layer of mixed berries on top of the yogurt.
- If using, sprinkle a layer of granola over the berries.
- Repeat the layers until the glass is filled, finishing with a layer of berries on top.
- Drizzle with honey or maple syrup if desired for added sweetness.
- Serve immediately or cover and refrigerate until ready to pack for your picnic.
Tools and Supplies Needed
- Glasses or bowls for serving
- Spoon for layering
- Knife for slicing fruit
- Measuring cups
- Optional: airtight container for transport
Trail Mix in Snack Bags

Trail mix is a fun and tasty snack that’s perfect for picnics. It’s a mix of nuts, dried fruits, and sometimes even a touch of chocolate or yogurt-covered treats. This mix offers a great blend of crunchy, chewy, and sweet flavors that kids absolutely love. Plus, it’s super easy to make and can be customized to fit your family’s preferences!
Creating individual snack bags helps with portion control and makes it easy for kids to grab and go. You can get creative with the ingredients, ensuring each bag is filled with their favorite bits. This is a snack that keeps well, making it a great choice for any outing.
Tools and Supplies Needed
- Mixing bowl
- Spoon for mixing
- Snack-sized ziplock bags
- Measuring cups
- Storage container (optional)
Ingredients
- 1 cup mixed nuts (almonds, walnuts, cashews)
- 1 cup dried fruits (raisins, cranberries, apricots)
- 1/2 cup chocolate chips or yogurt-covered treats
- 1 cup cereal (Cheerios, granola, or any favorite)
- 1/2 cup seeds (pumpkin or sunflower)
- 1/2 cup pretzels (optional)
Instructions
- Mix Ingredients: In a large mixing bowl, combine all the ingredients. Stir until everything is evenly distributed.
- Portion it Out: Once combined, use measuring cups to scoop the mix into individual snack-sized ziplock bags. This makes them easy to grab for your picnic.
- Seal and Store: Seal each bag tightly. You can also place them in a larger storage container for travel.
- Enjoy: Pack these in your picnic basket, and watch the kids enjoy their personalized trail mix when you’re out and about!
Yogurt-Covered Raisins

Yogurt-covered raisins are a delightful treat that perfectly balance sweetness and creaminess. These tasty bites are not only quick to make but also a fun way to get kids excited about snacking. The chewy raisins paired with a smooth yogurt coating create a delightful texture that will have everyone begging for more.
This simple recipe is perfect for picnics, lunchboxes, or just a snack at home. With a handful of ingredients and minimal effort, you can whip up these delectable goodies in no time!
Ingredients
- 1 cup raisins
- 1 cup plain or flavored yogurt
- 1 tablespoon honey (optional)
- Wax paper or parchment paper
Instructions
- Prepare the Raisins: If desired, rinse the raisins under warm water and pat them dry.
- Mix Yogurt: In a bowl, combine yogurt with honey for extra sweetness, if using.
- Coat the Raisins: Dip each raisin into the yogurt mixture, ensuring they are well-coated.
- Set to Dry: Place the coated raisins on wax paper or parchment paper in a single layer. Let them sit at room temperature until the yogurt has set, about 30 minutes.
- Store: Transfer the yogurt-covered raisins to an airtight container and refrigerate until ready to serve.
Homemade Fruit Leather
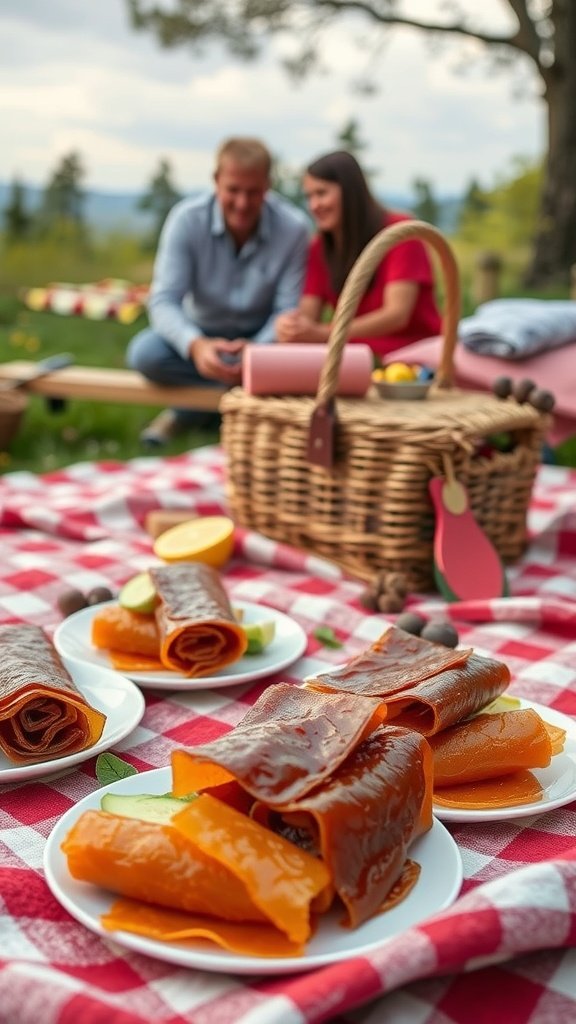
Homemade fruit leather is a fun and tasty treat that kids will love. It’s chewy, flavorful, and packed with the goodness of fruit. Plus, it’s super easy to make, making it a great addition to any picnic basket.
This recipe allows you to customize flavors using your favorite fruits, so you can mix and match to create something unique. It’s a healthy alternative to store-bought snacks, and the natural sweetness will definitely satisfy any sweet tooth!
Ingredients
- 4 cups of fruit (like strawberries, apples, or peaches)
- 1/4 cup honey or maple syrup (optional, to taste)
- 1 tablespoon lemon juice
- 1/2 teaspoon cinnamon (optional)
Tools and Supplies Needed
- Blender or food processor
- Baking sheet
- Parchment paper
- Oven or dehydrator
- Spatula
Instructions
- Preheat your oven to 170°F (or the lowest setting on your oven).
- Combine the fruit, honey (if using), lemon juice, and cinnamon in a blender. Blend until smooth.
- Line a baking sheet with parchment paper and pour the fruit mixture onto it. Spread it evenly with a spatula.
- Bake in the oven for 5-6 hours, checking periodically until the fruit leather is no longer sticky to the touch.
- Once done, let it cool completely. Cut into strips and roll them up. Store in an airtight container.
Caprese Salad Skewers

Caprese salad skewers are a fun and tasty twist on the classic Italian dish. They combine fresh mozzarella, ripe tomatoes, and fragrant basil, all drizzled with olive oil and balsamic vinegar. These skewers are light, refreshing, and bursting with flavor, making them a perfect addition to any picnic. Plus, they’re super easy to make, which is a win for busy parents!
Your kids will love assembling these colorful bites, and they can even get creative by adding their favorite ingredients. Whether enjoyed as a snack or a side dish, caprese salad skewers are sure to impress everyone at your outing.
Tools and Supplies Needed
- Skewers
- Cutting board
- Knife
- Serving platter
Ingredients
- 1 pint cherry tomatoes
- 8 oz fresh mozzarella balls
- Fresh basil leaves
- 2 tablespoons olive oil
- 1 tablespoon balsamic vinegar
- Salt and pepper to taste
Instructions
- Prepare the Skewers: Start by threading a cherry tomato onto each skewer, followed by a basil leaf and a mozzarella ball. Repeat until the skewer is filled, leaving space at the ends for easier handling.
- Dress the Skewers: Once all skewers are prepared, drizzle them with olive oil and balsamic vinegar. Sprinkle with salt and pepper to taste.
- Serve: Arrange the skewers on a serving platter and enjoy them fresh! They can also be made ahead of time and stored in the fridge for a few hours before serving.
Frozen Grapes and Berries

Frozen grapes and berries are perfect for a sunny picnic! These bite-sized treats are a refreshing way to enjoy fruit while keeping cool. They burst with flavor and are incredibly easy to prepare, making them a great option for kids and adults alike.
Simply wash your favorite grapes and berries, freeze them, and they’re ready to go. Whether you pack them as a sweet snack or toss them into drinks for a chill, they’ll be a hit!
Ingredients
- 2 cups grapes (red or green)
- 2 cups mixed berries (strawberries, blueberries, raspberries)
- 1 tablespoon granulated sugar (optional)
- 1 tablespoon lemon juice (optional)
Instructions
- Rinse the grapes and berries under cold water to remove any dirt.
- If desired, toss them in a bowl with sugar and lemon juice for extra flavor.
- Spread the grapes and berries on a baking sheet lined with parchment paper in a single layer.
- Place the baking sheet in the freezer for about 2-3 hours until frozen solid.
- Once frozen, transfer them to a freezer bag or container for easy storage. Pack them in your picnic basket and enjoy!
Tools and Supplies Needed
- Baking sheet
- Parchment paper
- Freezer bags or airtight container
Chocolate-Dipped Pretzels

Chocolate-dipped pretzels are a delightful combination of sweet and salty that kids absolutely love. They are simple to make and can be customized with various toppings like sprinkles, nuts, or candies, making them a fun treat for any picnic. The crunch of the pretzel paired with the smooth, rich chocolate creates a perfect bite-sized snack that will keep the little ones coming back for more.
Not only are they easy to prepare, but they also offer a great opportunity for kids to help out in the kitchen. Melt some chocolate, dip the pretzels, and let them add their favorite toppings. It’s a great way to make memories while preparing a tasty snack!
Tools and Supplies Needed
- Medium microwave-safe bowl
- Wax paper or parchment paper
- Baking sheet
- Fork or dipping tool
Ingredients
- 2 cups pretzel rods
- 1 cup semi-sweet chocolate chips
- 1 tablespoon vegetable oil (optional, for thinning chocolate)
- 1/2 cup assorted toppings (sprinkles, crushed nuts, etc.)
Instructions
- Melt the Chocolate: In a medium microwave-safe bowl, combine the chocolate chips and vegetable oil. Heat in the microwave in 30-second intervals, stirring after each interval, until smooth and fully melted.
- Dip the Pretzels: Hold each pretzel rod by one end and dip it into the melted chocolate, allowing any excess chocolate to drip off.
- Add Toppings: While the chocolate is still wet, sprinkle your desired toppings over the chocolate-dipped portion of the pretzel. Be creative!
- Set to Cool: Place the dipped pretzels on a baking sheet lined with wax paper or parchment paper. Let them cool at room temperature until the chocolate hardens.
- Serve: Once the chocolate has set, pack them in a container for your picnic or enjoy them right away!
Stuffed Celery Sticks

Stuffed celery sticks are an easy and fun snack that kids will love. They combine the crunchy freshness of celery with a creamy, flavorful filling, making each bite a delightful experience. This recipe is simple to whip up and is perfect for picnics, lunchboxes, or even as an after-school snack.
The creamy filling can be customized with various ingredients, ensuring there’s something for everyone. From classic cream cheese to zesty herb flavors, these stuffed delights are sure to be a hit!
Tools and Supplies Needed
- Cutting board
- Knife
- Mixing bowl
- Spatula or spoon
- Serving platter
Ingredients
- 1 bunch of celery
- 8 oz cream cheese, softened
- 1/4 cup shredded cheddar cheese
- 2 tablespoons ranch dressing
- 1 tablespoon chopped fresh chives
- Salt and pepper to taste
Instructions
- Prepare the Celery: Wash the celery and cut it into 3-4 inch pieces. Set aside.
- Mix the Filling: In a mixing bowl, combine the softened cream cheese, shredded cheddar cheese, ranch dressing, chopped chives, salt, and pepper. Mix until smooth and well combined.
- Stuff the Celery: Using a spatula or spoon, fill each celery stick with the cream cheese mixture.
- Serve: Arrange the stuffed celery on a serving platter and enjoy fresh!
Savory Cheese Muffins

These Savory Cheese Muffins are a delightful blend of cheesy goodness and fluffy texture. Perfect for picnics or lunchboxes, they are simple to whip up and kids will love the cheesy taste in every bite. These muffins are versatile; you can customize them with your favorite cheeses and add-ins like herbs or vegetables.
With a golden crust and a tender crumb, they are a satisfying snack that pairs well with fruits or veggies. Plus, they’re easy to make ahead of time and pack for a fun day out!
Tools and Supplies Needed
- Mixing bowl
- Whisk
- Spoon or spatula
- Muffin tin
- Baking paper or spray
Ingredients
- 2 cups all-purpose flour
- 1 tablespoon baking powder
- 1/2 teaspoon salt
- 1 cup shredded cheese (cheddar works great)
- 1/2 cup milk
- 1/3 cup vegetable oil
- 2 large eggs
- 1/2 cup diced vegetables (optional, like bell peppers or spinach)
Instructions
- Preheat your oven to 375°F (190°C) and grease or line a muffin tin.
- In a mixing bowl, whisk together the flour, baking powder, and salt.
- Add the shredded cheese and optional diced vegetables to the dry ingredients, mixing until well combined.
- In another bowl, beat together the milk, vegetable oil, and eggs until smooth.
- Pour the wet ingredients into the dry ingredients and stir gently until just combined; be careful not to overmix.
- Divide the batter evenly among the muffin cups, filling each about 2/3 full.
- Bake for 18-20 minutes, or until the muffins are golden and a toothpick inserted into the center comes out clean.
- Let cool slightly before transferring to a wire rack. Enjoy warm or pack for your picnic!
Mini Pita Pockets

Mini pita pockets are a fun and tasty way to pack a satisfying snack for your kids’ picnic. These little delights are versatile, allowing you to fill them with whatever ingredients your little ones love, from fresh veggies to tender meats or creamy dips. Each bite is filled with flavor and a delightful crunch, making them perfect for outdoor eating.
Not only are mini pita pockets easy to prepare, but they also provide a chance for kids to get involved in the kitchen. Let them choose their favorite fillings and help assemble their own pockets. It’s a snack that combines fun, flavor, and simplicity!
Ingredients
- 4 whole wheat mini pitas
- 1 cup cooked chicken, diced
- 1/2 cup cucumber, diced
- 1/2 cup bell peppers, diced
- 1 cup spinach or mixed greens
- 1/4 cup hummus or yogurt dressing
- Salt and pepper to taste
Tools and Supplies Needed
- Cutting board
- Knife
- Mixing bowl
- Small spoon for spreading
- Sealable bags or containers for packing
Instructions
- Prepare the Filling: In a mixing bowl, combine the diced chicken, cucumber, bell peppers, and greens. Add hummus or yogurt dressing and mix well. Season with salt and pepper to taste.
- Assemble the Pita: Gently open each mini pita pocket and stuff it with the filling. Be generous but avoid overfilling to prevent spills.
- Pack for the Picnic: Place the filled pita pockets in a sealable bag or container. Keep them cool until you’re ready to enjoy!
Mini Fruit Kebabs

Mini fruit kebabs are a fun and tasty snack that’s perfect for picnics. These colorful skewers combine a variety of fruits, making them not only delicious but also visually appealing. The sweet and juicy taste of the fruit will have kids begging for more, while the easy preparation means you can whip them up in no time.
Creating these kebabs is as simple as it gets. Just cut up your favorite fruits, slide them onto skewers, and you’re ready to go! You can customize them with any fruits you have on hand, making them a versatile option for any outing.
Tools and Supplies Needed
- Wooden or metal skewers
- Cutting board
- Sharp knife
- Mixing bowl
Ingredients
- 1 cup strawberries, hulled
- 1 cup pineapple, cubed
- 1 cup melon, cubed (honeydew or cantaloupe)
- 1 cup grapes
- 1 cup blueberries
- 1 cup kiwi, peeled and sliced
- 1 cup orange segments
Instructions
- Prepare the Fruit: Wash all the fruits thoroughly. Cut the strawberries, pineapple, melon, and kiwi into bite-sized pieces.
- Assemble the Kebabs: Take a skewer and start threading the fruit pieces onto it. You can create fun patterns by alternating colors and types of fruit.
- Repeat: Continue until all the fruit is used up or you have the desired number of kebabs.
- Serve: Place the assembled kebabs on a platter and enjoy them fresh at your picnic!
Granola Bars
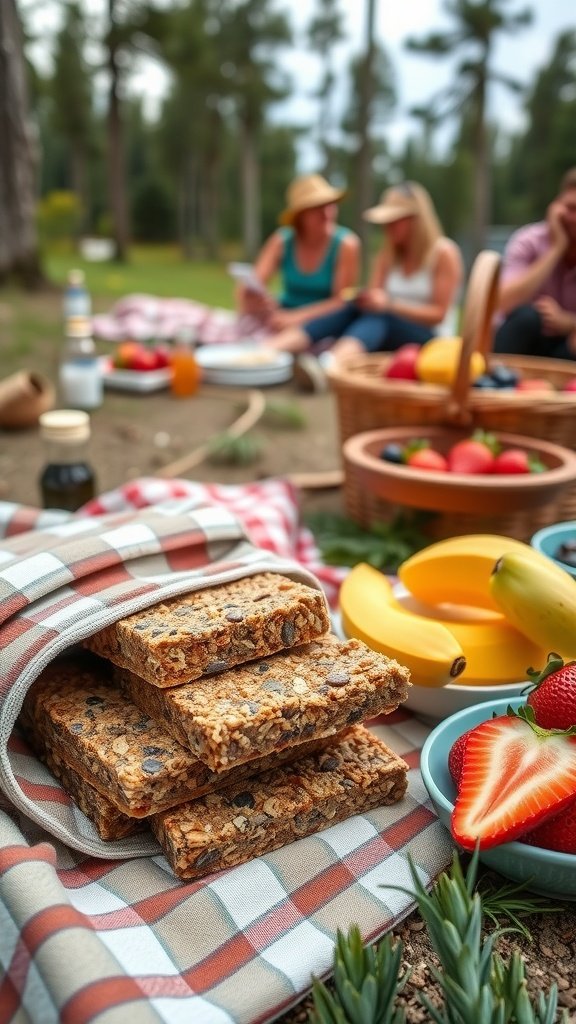
Granola bars are a fantastic snack for picnics, especially for kids who crave something sweet yet nutritious. They are chewy, crunchy, and packed with wholesome ingredients, making them a favorite among both kids and parents. Plus, they are super easy to make at home, so you can customize them with your family’s favorite flavors.
The best part about homemade granola bars is that you can control what goes in them. From oats and nuts to dried fruits and chocolate chips, the combinations are endless. They are perfect for a quick energy boost, and the kids will love having a snack that feels like a treat!
Ingredients
- 2 cups rolled oats
- 1 cup nut butter (like almond or peanut butter)
- 1/2 cup honey or maple syrup
- 1/2 cup brown sugar
- 1 teaspoon vanilla extract
- 1/2 cup mini chocolate chips (optional)
- 1/2 cup chopped nuts or seeds (optional)
- 1/2 cup dried fruit (like cranberries or raisins, optional)
Instructions
- Preheat the oven to 350°F (175°C) and line a baking dish with parchment paper.
- In a large bowl, combine the rolled oats, nut butter, honey, brown sugar, and vanilla extract. Stir until well mixed.
- If using, fold in the chocolate chips, nuts, and dried fruit until evenly distributed.
- Pour the mixture into the prepared baking dish, pressing it down firmly to create an even layer.
- Bake for 20-25 minutes or until golden brown. Let cool completely before cutting into bars.
- Store in an airtight container for up to a week, or freeze for longer storage.
Tools and Supplies Needed
- Baking dish
- Parchment paper
- Mixing bowl
- Spoon or spatula
- Oven
Cucumber Sandwiches

Cucumber sandwiches are a refreshing and simple snack that kids love. With their crunchy texture and mild flavor, these sandwiches make for an ideal picnic treat. They’re easy to whip up and can be customized with various spreads and seasonings, making them perfect for little taste buds.
The lightness of the cucumber pairs perfectly with soft bread, creating a delightful finger food option. Plus, they can be prepared ahead of time, giving you more time to enjoy the picnic!
Tools and Supplies Needed
- Cutting board
- Sharp knife
- Butter knife
- Serving platter
- Plastic wrap or container for storing
Ingredients
- 8 slices of white or whole wheat bread
- 1 medium cucumber, thinly sliced
- 1/2 cup cream cheese or butter
- Salt and pepper to taste
- Fresh herbs (like dill or parsley) for garnish (optional)
Instructions
- Prepare the Bread: Spread cream cheese or butter evenly on one side of each slice of bread.
- Add the Cucumber: Layer thin cucumber slices on half of the bread slices. Sprinkle with a little salt and pepper.
- Assemble the Sandwiches: Top the cucumber slices with the remaining bread slices, cream cheese side down. Press gently to secure.
- Cut and Serve: Cut the sandwiches into quarters or halves, and arrange them on a platter. Garnish with fresh herbs if desired.
- Store: Cover with plastic wrap until ready to serve, or pack in a container for your picnic.
Brownie Bites

Looking for a sweet treat that’s easy to make and perfect for picnics? These brownie bites are just the ticket! They’re rich, fudgy, and full of chocolaty goodness. Kids will love their bite-sized portions, making them an ideal snack for outdoor fun.
Making brownie bites is simple and requires just a few ingredients. With a quick baking time, you can whip up a batch in no time. These little delights are sure to be a hit, whether you’re at a picnic, a birthday party, or just enjoying a sunny day in the park.
Tools and Supplies Needed
- Mixing bowl
- Whisk or electric mixer
- Spatula
- 8×8 inch baking pan
- Parchment paper (optional)
- Cooling rack
Ingredients
- 1/2 cup unsalted butter, melted
- 1 cup granulated sugar
- 1/2 cup brown sugar
- 2 large eggs
- 1 teaspoon vanilla extract
- 1/3 cup unsweetened cocoa powder
- 1 cup all-purpose flour
- 1/4 teaspoon salt
- 1/4 teaspoon baking powder
- 1/2 cup chocolate chips (optional)
Instructions
- Preheat your oven to 350°F (175°C). Grease the baking pan or line it with parchment paper for easier removal.
- In a mixing bowl, combine the melted butter, granulated sugar, and brown sugar. Mix until well combined.
- Add the eggs and vanilla extract, mixing until smooth.
- In a separate bowl, whisk together the cocoa powder, flour, salt, and baking powder. Gradually add this dry mixture to the wet ingredients, stirring until just combined. If desired, fold in the chocolate chips.
- Pour the batter into the prepared baking pan and spread it evenly. Bake for about 20-25 minutes or until a toothpick inserted in the center comes out with a few moist crumbs.
- Allow the brownies to cool in the pan for a few minutes before transferring them to a cooling rack. Once cool, cut into bite-sized squares and enjoy!