Edible bear bowls for ice cream at your picnic social are a fun and delicious twist to your outdoor gatherings! These cute, treat-sized bowls not only hold your favorite scoops but also bring a playful element to your dessert table. Let’s check out how to whip up these adorable creations that are sure to delight guests of all ages!
Tools and Supplies Needed:
- Baking silicone bear molds
- Melting chocolate (dark, milk, or white)
- Non-stick spray
- Sprinkles or edible decorations
- Ice cream of your choice
- Spoon for serving
**Honey Graham Bear Bowls**

These Honey Graham Bear Bowls are a fun and tasty treat, perfect for adding a touch of whimsy to your picnic. Made with soft and sweet graham cracker bowls, they’re the ideal vessel for your favorite ice cream. The delightful combination of honey and graham flavors gives each bite a warm, comforting taste that everyone will love.
Plus, they’re super easy to make! In just a few simple steps, you can whip up these adorable bowls that will impress kids and adults alike. Enjoy them filled with ice cream, whipped cream, or even fruit for a delightful dessert experience.
Tools and Supplies Needed
- Mixing bowl
- Baking sheet
- Parchment paper
- Cookie cutter (bear-shaped)
- Oven
Ingredients
- 1 1/2 cups graham cracker crumbs
- 1/4 cup granulated sugar
- 1/4 cup unsalted butter, melted
- 1/4 cup honey
- 1/2 teaspoon vanilla extract
- 1/4 teaspoon salt
Instructions
- Preheat your oven to 350°F (175°C) and line a baking sheet with parchment paper.
- In a mixing bowl, combine graham cracker crumbs, sugar, melted butter, honey, vanilla extract, and salt. Mix until well combined.
- Using a cookie cutter, cut out bear shapes from the mixture on the baking sheet, pressing firmly to hold their shape.
- Bake in the preheated oven for about 10-12 minutes, until golden brown. Let them cool completely before serving.
- Fill each bowl with your favorite ice cream, whipped cream, or fruit and enjoy!
**Chocolate Paw Print Cups**

Chocolate Paw Print Cups are a delightful treat perfect for any picnic gathering. With their soft, rich chocolate texture and creamy ice cream center, these cups are not only tasty but also super fun to make! The combination of chocolate and a hint of sweetness creates a dessert that will please both kids and adults alike.
Making these cups is a breeze. Just whip up the chocolate batter, bake it in muffin tins, and once cooled, fill them with your favorite ice cream. Top it all off with whipped cream and sprinkles for that festive touch. These paw print cups are sure to be the highlight of your picnic!
Tools and Supplies Needed
- Muffin tin
- Mixing bowls
- Whisk or electric mixer
- Ice cream scoop
- Spatula
- Measuring cups and spoons
Ingredients
- 1 cup all-purpose flour
- 1 cup granulated sugar
- 1/2 cup unsweetened cocoa powder
- 1 teaspoon baking powder
- 1/2 teaspoon baking soda
- 1/4 teaspoon salt
- 2 large eggs
- 1/2 cup milk
- 1/4 cup vegetable oil
- 1 teaspoon vanilla extract
- 1 cup chocolate chips
- Your favorite ice cream
- Whipped cream for topping
- Sprinkles (optional)
Instructions
- Preheat your oven to 350°F (175°C). Grease a muffin tin or use cupcake liners.
- In a large bowl, combine flour, sugar, cocoa powder, baking powder, baking soda, and salt.
- In another bowl, whisk together eggs, milk, vegetable oil, and vanilla until smooth.
- Pour the wet ingredients into the dry ingredients and mix until just combined. Fold in the chocolate chips.
- Pour the batter into the prepared muffin tin, filling each cup about 2/3 full.
- Bake for 18-20 minutes or until a toothpick inserted comes out clean. Let them cool completely.
- Once cool, use a small scoop to hollow out the center of each cup. Fill them with your favorite ice cream and top with whipped cream and sprinkles if desired.
- Serve and enjoy your Chocolate Paw Print Cups at your picnic!
**Bear Ears Waffle Bowls**

Making Bear Ears Waffle Bowls is a fun and simple way to elevate your picnic ice cream experience. These cute waffle bowls resemble a bear’s face, complete with chocolate ears, and are perfect for holding your favorite ice cream flavors. The combination of crisp waffle and creamy ice cream creates a delightful texture that everyone will love.
These bowls are easy to whip up, and they add a whimsical touch to any outdoor gathering. Pair with fresh fruits and whipped cream, and you have a treat that’s as tasty as it is adorable!
Tools and Supplies Needed
- Waffle maker
- Mixing bowl
- Spatula
- Cookie cutter (for ears)
- Small bowls for melting chocolate
- Refrigerator
Ingredients
- 2 cups all-purpose flour
- 2 tablespoons sugar
- 1 tablespoon baking powder
- 1/2 teaspoon salt
- 2 large eggs
- 1 1/2 cups milk
- 1/2 cup melted butter
- 1 cup chocolate chips (for ears)
- Ice cream (any flavor)
- Whipped cream and fresh fruit for toppings
Instructions
- Preheat your waffle maker according to the manufacturer’s instructions.
- In a mixing bowl, combine flour, sugar, baking powder, and salt. In another bowl, whisk together eggs, milk, and melted butter. Gradually add the wet ingredients to the dry ingredients, mixing until just combined.
- Pour the batter into the preheated waffle maker, using enough to cover the plate without overflowing. Cook until golden brown, usually about 5 minutes.
- Once cooked, carefully remove the waffle and shape it into a bowl while it’s still warm. Use a bowl or your hands to mold it gently, allowing it to cool in that shape.
- While the waffle bowls cool, melt chocolate chips in a microwave-safe bowl, stirring every 30 seconds until smooth. Use a cookie cutter to cut out small ear shapes from the cooled waffles. Dip the edges of the ears in melted chocolate and attach them to the sides of the waffle bowl.
- Once the chocolate has set, fill each bowl with ice cream, top with whipped cream, and add fresh fruit. Enjoy your delicious Bear Ears Waffle Bowls!
**Oatmeal Hug Bowls**

These delightful Oatmeal Hug Bowls are the perfect treat for your picnic social! Made with a soft and chewy oatmeal cookie base, they offer a warm hug for your favorite ice cream. The combination of sweet and nutty flavors makes each bite a delightful experience. Plus, they’re super simple to whip up, making them an ideal dessert for gatherings.
Imagine scooping your favorite ice cream into these cozy bowls, topped with fresh fruits and nuts. They’re not just tasty; they’re also fun to make and share with friends and family. Get ready to enjoy a deliciously sweet treat that’s sure to impress everyone at your picnic!
Tools and Supplies Needed
- Mixing bowl
- Baking sheet
- Parchment paper
- Cookie cutter (optional, for shaping)
- Measuring cups and spoons
- Spatula
Ingredients
- 1 cup rolled oats
- 1 cup all-purpose flour
- 1/2 cup brown sugar
- 1/4 cup granulated sugar
- 1/2 cup unsalted butter, softened
- 1 large egg
- 1 teaspoon vanilla extract
- 1 teaspoon baking soda
- 1/2 teaspoon salt
- 1/2 cup chopped nuts (pecans or walnuts)
- Your favorite ice cream
- Sliced bananas or other toppings (optional)
Instructions
- Preheat oven to 350°F (175°C) and line a baking sheet with parchment paper.
- In a large mixing bowl, cream together the softened butter, brown sugar, and granulated sugar until smooth.
- Add the egg and vanilla extract to the mixture and blend well.
- In another bowl, combine rolled oats, flour, baking soda, and salt. Gradually mix the dry ingredients into the wet mixture.
- Fold in the chopped nuts until evenly distributed.
- Using your hands, shape the dough into small bowls, pressing the mixture into a cookie cutter or your hands to form a cup shape on the baking sheet.
- Bake for 10-12 minutes or until the edges are golden brown. Let cool completely before removing from the baking sheet.
- Once cooled, fill each bowl with your favorite ice cream and top with sliced bananas or other toppings of your choice.
**Cinnamon Cub Crunch Cups**

Cinnamon Cub Crunch Cups are a delightful treat that marry the warmth of cinnamon with the crunchiness of cereal. This recipe is not only easy to whip up, but it also adds a fun twist to your ice cream bowls, making them perfect for summer picnics or casual gatherings.
Each cup is filled with creamy goodness and topped with a generous swirl of whipped cream and a sprinkle of crunchy bear-shaped snacks. The sweet and spicy cinnamon flavor will leave you wanting more, while the fun presentation is sure to be a hit with kids and adults alike!
Tools and Supplies Needed
- Mixing bowl
- Measuring cups
- Measuring spoons
- Whisk
- Serving cups or bowls
- Spatula
Ingredients
- 1 cup heavy whipping cream
- 1/4 cup powdered sugar
- 1 teaspoon vanilla extract
- 1/2 teaspoon ground cinnamon
- 2 cups bear-shaped cereal
- 4 large cookies (like graham crackers or shortbread)
Instructions
- Prepare the Whipped Cream: In a mixing bowl, beat the heavy whipping cream until soft peaks form. Gradually add powdered sugar, vanilla extract, and ground cinnamon. Continue beating until the mixture holds stiff peaks.
- Assemble the Cups: In serving bowls, place a cookie at the bottom. Next, layer the bear-shaped cereal on top of the cookie.
- Top it Off: Spoon the whipped cream mixture generously over the cereal, creating a lovely swirl on top.
- Garnish and Serve: Sprinkle a few extra bear-shaped snacks on top for added crunch. Serve immediately and enjoy the delightful combination of flavors and textures!
**Brownie Bear Bowls**
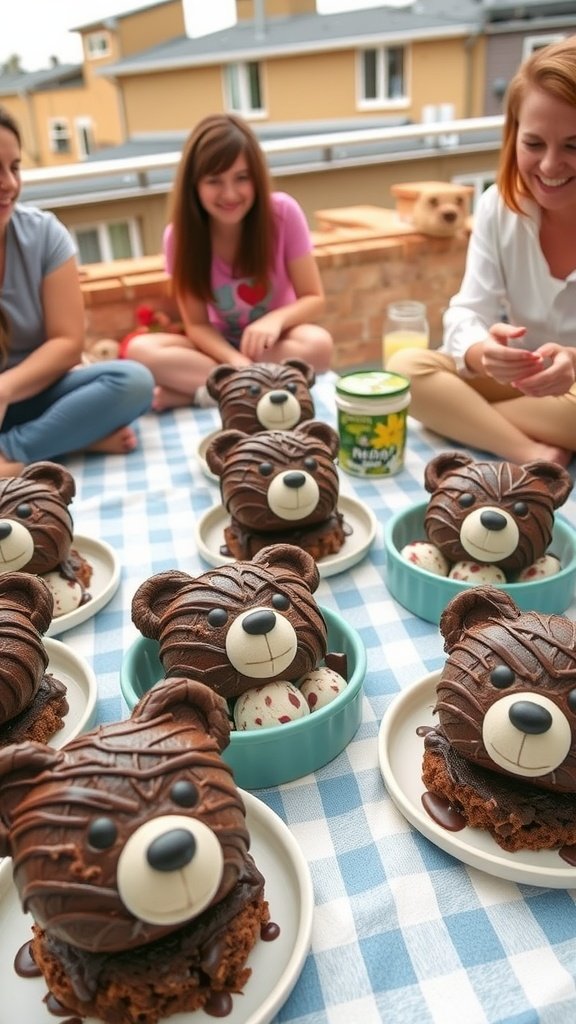
Brownie bear bowls are a fun and creative way to serve ice cream at your next picnic. These adorable treats combine rich, fudgy brownies with delightful ice cream, all shaped like cute bears. They’re not only delicious but also simple to make, making them perfect for a casual gathering with friends and family.
The combination of warm, chocolatey brownie and cold, creamy ice cream is a crowd-pleaser. Kids and adults alike will love digging into these sweet bowls, and their playful presentation makes any picnic feel special. Let’s get started on making these yummy brownie bear bowls!
Tools and Supplies Needed
- Mixing bowl
- Whisk
- Brownie pan
- Baking parchment
- Bear-shaped cookie cutter
- Ice cream scoop
- Spatula
- Decorative frosting or chocolate for decoration
Ingredients
- 1 box brownie mix (plus ingredients required on the box)
- 1 pint of your favorite ice cream flavor
- Chocolate syrup (for drizzling)
- Decorative candies (for eyes and nose)
- Frosting (for bear fur design)
Instructions
- Prepare the Brownies: Follow the instructions on the brownie mix box to prepare the batter. Pour the batter into a lightly greased brownie pan and bake according to package instructions.
- Cool and Cut: Once baked, allow the brownies to cool completely. Once cooled, use the bear-shaped cookie cutter to cut out bear shapes from the brownies.
- Assemble the Bowls: Place a brownie bear in a bowl. Using an ice cream scoop, add a generous serving of ice cream on top of the brownie.
- Decorate: Drizzle chocolate syrup over the ice cream and use decorative candies to create eyes and a nose. Use frosting to pipe on bear fur details if desired.
- Serve and Enjoy: Present your brownie bear bowls at your picnic and watch them disappear!
**Peanut Butter Picnic Pots**
These Peanut Butter Picnic Pots are a delightful treat perfect for summer outings. With a creamy peanut butter base, they offer a rich and nutty flavor that pairs beautifully with your favorite ice cream. This recipe is simple to whip up and will surely impress your friends and family at your next picnic.
It’s a fun and interactive dessert, allowing everyone to customize their own bowls with toppings. Whether you prefer chocolate chips, nuts, or fresh fruit, these pots are versatile and a hit among kids and adults alike!
Tools and Supplies Needed
- Mixing bowl
- Measuring cups and spoons
- Whisk or hand mixer
- Serving bowls
- Spatula
Ingredients
- 1 cup creamy peanut butter
- 1/2 cup powdered sugar
- 1/4 cup milk (or almond milk)
- 1 teaspoon vanilla extract
- Ice cream of your choice
- Chocolate chips, nuts, and sprinkles for topping
Instructions
- In a mixing bowl, combine the peanut butter, powdered sugar, milk, and vanilla extract. Whisk until smooth and well combined.
- Divide the peanut butter mixture into serving bowls, creating a base layer for your ice cream.
- Scoop your favorite ice cream on top of the peanut butter layer in each bowl.
- Add your desired toppings like chocolate chips, nuts, or sprinkles.
- Serve immediately and enjoy your tasty Peanut Butter Picnic Pots!
**Coconut Cub Cups**

Coconut Cub Cups are a fun and refreshing way to serve ice cream at your next picnic. These delightful bowls are made from fresh coconuts, offering a tropical twist on your typical dessert presentation. The combination of creamy ice cream and the subtle sweetness of coconut creates a delicious treat that everyone will love.
Making these cups is simple and requires minimal ingredients, making them perfect for a casual gathering. They’re not just tasty; they also add a charming touch to your picnic spread, especially with fun garnishes like fruits and little umbrellas.
Tools and Supplies Needed
- Fresh coconuts
- Sharp knife or coconut opener
- Spoon
- Ice cream of your choice
- Fruits for garnish (berries, mint leaves, etc.)
- Small umbrellas (optional)
Ingredients
- 2 fresh coconuts
- 1 quart of your favorite ice cream
- Mixed fruits for toppings
- Mint leaves for garnish
Instructions
- Open the coconuts: Carefully use a sharp knife or coconut opener to remove the top of each coconut. Drain the water and set it aside.
- Scoop out the flesh: Use a spoon to carefully scoop out the coconut flesh. You can use this for another recipe or snack!
- Fill with ice cream: Scoop your favorite ice cream into the coconut cups, filling them generously.
- Garnish: Top with mixed fruits and mint leaves. You can also add little umbrellas for a fun touch!
- Serve: Enjoy your Coconut Cub Cups immediately, or keep them in a cooler until ready to serve.
**Mini Muffin Bear Bowls**

Mini muffin bear bowls are a fun and creative way to serve ice cream at your picnic. These adorable edible bowls are made from soft, sweet muffins, perfect for holding your favorite creamy flavors. Each bite combines the delightful taste of the muffin with the coolness of ice cream, creating a delicious dessert experience that’s sure to impress.
The best part? They’re easy to make! With just a few ingredients and some simple baking steps, you can whip up these charming bowls that are perfect for sharing with friends and family.
Tools and Supplies Needed
- Oven
- Mixing bowls
- Whisk
- Muffin tin
- Baking spray
- Cooling rack
Ingredients
- 2 cups all-purpose flour
- 1 cup granulated sugar
- 2 teaspoons baking powder
- 1/2 teaspoon salt
- 1/2 cup unsalted butter, melted
- 1 cup milk
- 2 large eggs
- 1 teaspoon vanilla extract
- Chocolate candies (for decoration)
- Ice cream of your choice
- Fruit or sprinkles (optional, for topping)
Instructions
- Preheat the oven to 350°F (175°C) and grease the muffin tin.
- In a large mixing bowl, combine the flour, sugar, baking powder, and salt.
- In another bowl, whisk together melted butter, milk, eggs, and vanilla extract until smooth.
- Pour the wet ingredients into the dry ingredients, stirring until just combined.
- Fill the muffin cups about halfway with batter. Bake for 15-18 minutes, or until a toothpick comes out clean.
- Let the muffins cool for a few minutes, then carefully remove them from the tin and place on a cooling rack.
- Once cool, scoop out a small portion from the center to create a bowl shape.
- Fill each bear bowl with a scoop of ice cream and decorate with chocolate candies and fruit or sprinkles if desired.
**Pretzel Paw Cups**

These adorable Pretzel Paw Cups are the perfect treat for your picnic social! They combine the salty crunch of pretzels with a rich, sweet filling, making them a delightful snack for both kids and adults. Easy to whip up, these cups are sure to be a hit at any gathering.
The sweetness of the filling balances beautifully with the salty pretzel base, creating a satisfying and fun dessert. Plus, they look super cute, which adds to the fun of enjoying treats outdoors!
Ingredients
- 2 cups crushed pretzels
- 1/2 cup unsalted butter, melted
- 1/4 cup granulated sugar
- 1 cup chocolate chips
- 1/2 cup heavy cream
- 1/2 cup peanut butter
- 1/4 cup powdered sugar
Tools and Supplies Needed
- Mixing bowls
- Muffin tin
- Whisk
- Measuring cups and spoons
- Spatula
Instructions
- Preheat your oven to 350°F (175°C). In a mixing bowl, combine crushed pretzels, melted butter, and granulated sugar. Mix until well combined.
- Press the pretzel mixture into the bottom and up the sides of a muffin tin to create little cups. Bake for 8-10 minutes until golden. Let cool.
- In a saucepan, heat the heavy cream until just simmering. Remove from heat and stir in chocolate chips until melted and smooth.
- In a separate bowl, mix peanut butter and powdered sugar until smooth. Fill each pretzel cup with a layer of the peanut butter mixture, then pour the chocolate ganache on top.
- Chill in the refrigerator for at least an hour to set before serving. Enjoy your delicious Pretzel Paw Cups at your outdoor picnic!
**Almond Honey Bear Baskets**

These Almond Honey Bear Baskets are a delightful, sweet treat that is perfect for any picnic. With a crunchy almond base and a hint of honey, each bite offers a satisfying crunch followed by a touch of sweetness. They’re simple to make, making them a fun activity for families or friends to enjoy together.
These bear-shaped bowls not only look adorable but also serve as a fun way to present ice cream and other desserts. The combination of almond and honey creates a flavor that complements your favorite ice cream perfectly. Let’s dive into how to make these cute baskets!
Tools and Supplies Needed
- Mixing bowl
- Baking sheet
- Silicone baking mat or parchment paper
- Rolling pin
- Bear-shaped cookie cutter
- Oven
Ingredients
- 1 cup almond flour
- 1/4 cup all-purpose flour
- 1/2 cup honey
- 1/4 cup unsalted butter, softened
- 1/2 teaspoon vanilla extract
- 1/4 teaspoon salt
- 1 egg
Instructions
- Preheat your oven to 350°F (175°C). Line a baking sheet with a silicone mat or parchment paper.
- In a mixing bowl, combine almond flour, all-purpose flour, and salt. Mix well.
- Add softened butter, honey, vanilla extract, and egg to the dry ingredients. Stir until a dough forms.
- On a floured surface, roll out the dough to about 1/4 inch thick. Use the bear-shaped cookie cutter to cut out shapes.
- Place the cutouts on the prepared baking sheet. Bake for 10-12 minutes or until golden brown.
- Remove from the oven and let cool completely before using them as bowls for ice cream.
**Graham Cone Cubs**

Graham Cone Cubs are a fun and delightful treat perfect for any picnic. Combining the sweet, crunchy flavor of graham crackers with the joy of ice cream, these bear-shaped bowls are ideal for serving up your favorite frozen desserts. They’re simple to make and sure to be a hit with both kids and adults alike!
The recipe is all about creativity and deliciousness, featuring a playful bear design that makes each bite special. Plus, with just a few ingredients, you can whip these up in no time, giving you more time to enjoy your picnic.
Tools and Supplies Needed
- Graham cracker sheets
- Chocolate frosting
- Ice cream (your favorite flavors)
- Gummy candies (for decoration)
- Wafer cookies (for ears)
- Sprinkles (optional)
Ingredients
- 12 graham cracker sheets
- 1 cup chocolate frosting
- 4 cups ice cream (variety of flavors)
- 1 cup gummy candies (for decoration)
- 8 wafer cookies (for ears)
- 1/4 cup sprinkles (optional)
Instructions
- Prepare the Bear Bowl: Take two graham cracker sheets and spread a layer of chocolate frosting along the edges. Stand them up to form the sides of the bear bowl. Use more frosting to attach additional graham crackers to create the bottom.
- Decorate the Bowl: Use chocolate frosting to stick the wafer cookies to the top edges for the ears. Add edible eyes and any other decorative elements you like using gummy candies and sprinkles.
- Fill with Ice Cream: Scoop your favorite ice cream into the bear bowl. Feel free to mix and match flavors for an exciting treat.
- Garnish: Top the ice cream with more gummy candies and sprinkles for an extra touch of fun.
- Serve: Enjoy your Graham Cone Cub bowls with friends and family, and watch the smiles as they dig into these adorable creations!