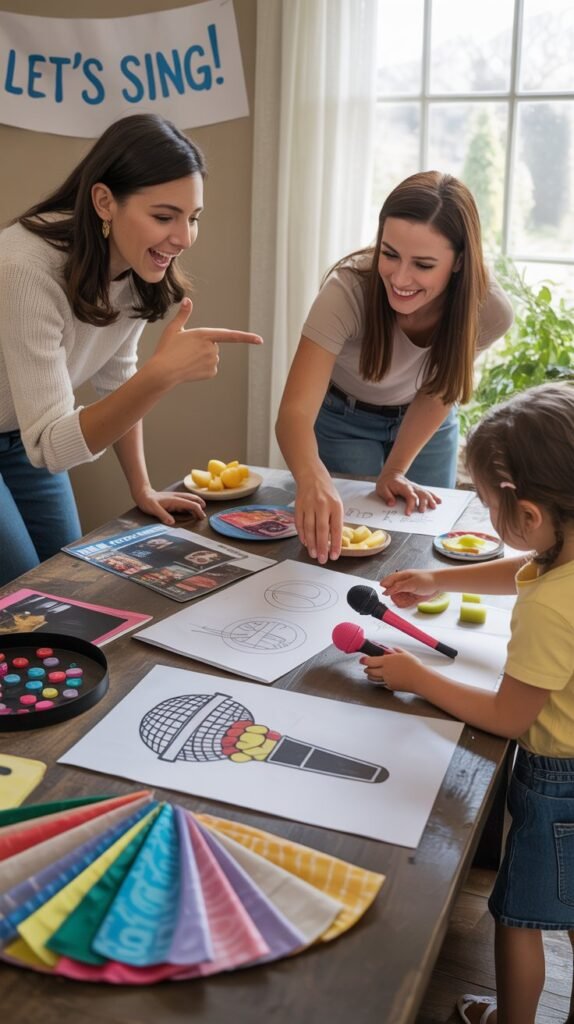
Transform your next karaoke celebration into a feast for both the eyes and taste buds with a music-themed food display that will hit all the right notes with young singers! This creative charcuterie board combines fun musical elements with kid-approved snacks, creating a perfect pre-party grazing station that sets the tone for your melodious event. Let’s explore how to create a showstopping spread that’s as entertaining as it is delicious!
Karaoke-Themed Charcuterie Board Concept
Before diving into assembly, it’s important to understand the overall concept of a karaoke-themed charcuterie board. This isn’t just any food display—it’s a carefully orchestrated arrangement that visually communicates your musical theme while providing practical snacking options for singing stars of all ages!
The perfect karaoke board combines instantly recognizable musical elements—microphones, musical notes, record shapes, or staff lines—with colorful, kid-friendly foods that appeal to younger palates. Think of your board as the opening act that sets the stage for your karaoke main event, establishing the musical mood from the moment guests arrive.
When designing for children, focus on clear, simple musical motifs rather than subtle references. Bold shapes, primary colors, and recognizable music symbols will resonate with younger guests while creating striking visual impact. Consider your party’s age range when determining complexity—simpler designs for preschoolers, more detailed arrangements for older children who can appreciate the creative connections.
Your board should serve both as pre-party fuel and ongoing refreshment during singing breaks, so arrange with accessibility and ease of service in mind. The goal is creating a thematic centerpiece that transitions smoothly from initial “wow factor” to practical food service throughout your event.


Tools and Supplies Needed
Successful board creation starts with gathering all the right tools! Here’s everything you’ll need to orchestrate your musical masterpiece:
Board and Serving Vessels:
- Large rectangular or round serving board (12-18″ depending on party size)
- 3-5 small bowls for dips, spreads, and loose items
- Microphone or musical note-shaped serving dishes (if available)
- Raised platforms or stands for creating height variation
- Small cups or containers for individual servings
Food Preparation Tools:
- Sharp knife for adult food preparation
- Cutting board dedicated to board preparation
- Musical note and microphone cookie cutters (various sizes)
- Round cutters for creating “record” shapes
- Star cutters for “celebrity star” themed elements
- Toothpicks and decorative food picks
- Child-safe serving utensils
- Small spatulas for dips and spreads
Decorative Elements:
- Non-edible musical decorations (small instruments, printed music sheets)
- Microphone-shaped food picks or decorative items
- Musical note confetti (placed around board, not on food)
- Small chalkboard signs or food labels
- LED string lights for dramatic effect (if appropriate)
- Colorful napkins in theme colors
Preparation efficiency tip: Organize all your tools and containers before starting food preparation. Create separate stations for cutting, assembling, and decorating to streamline your workflow. Non-food decorative elements should be kept together but separate from food items until final assembly to prevent contamination.
Food Selection Guide
The stars of your musical display are the foods themselves! The best karaoke boards combine visual appeal with kid-approved flavors. Here’s what to select for perfect harmony:
Kid-Approved Proteins:
- Rolled deli meats (turkey, ham) for creating “scrolls” or “records”
- Cheese slices that can be cut into musical shapes (cheddar, provolone)
- Cheese cubes or sticks for building structures
- Pepperoni “records” with cheese note “details”
- Mini meatballs on picks for “microphone” effects
Fruits and Vegetables:
- Sturdy fruits that hold shape when cut (apples, melon, pineapple)
- Grapes for “musical note” heads
- Celery sticks for staff lines or guitar strings
- Carrot sticks for music staff or instrument outlines
- Cucumber rounds for “records” or “speaker” elements
- Bell pepper strips for colorful accents
Breads and Crackers:
- Round crackers for record shapes
- Breadsticks for staff lines or microphone stands
- Shaped crackers for background patterns
- Soft bread for sandwich cutouts
- Pretzel rods for music element details
Dips and Spreads:
- Hummus (can be colored with food-safe additions)
- Ranch dip (popular with most children)
- Cream cheese-based spreads
- Chocolate dip for sweet sections
- Nut or seed butters (if no allergies)
Sweet Treats:
- Cookies cut in musical shapes
- Chocolate-covered pretzels for “music notes”
- Mini cupcakes with musical decorations
- Chocolate coins as “records”
- Color-coordinated candies for accents
When selecting foods, consider not just appearance but practicality. Choose items that:
- Hold their shape at room temperature
- Won’t bleed color onto neighboring items
- Can be easily grabbed by small hands
- Maintain quality throughout a typical party duration
- Offer options for various dietary needs
Pro tip: While adults might appreciate unusual flavor combinations, most children prefer familiar foods presented in creative ways. Focus on transforming kid-favorite basics into musical shapes rather than introducing exotic new flavors that might go uneaten.
Step-by-Step Assembly Instructions

Creating your karaoke masterpiece is easier when following a logical sequence! This step-by-step approach ensures structural integrity while maximizing visual impact:
1. Preparing the Base and Planning the Layout
- Clean your serving board thoroughly and dry completely
- Place any non-food decorative elements that will go under food items
- If using a template, position it now or sketch your design lightly
- Place empty containers for dips or loose items to reserve their spots
- Consider the board’s orientation and viewing angles at your serving location
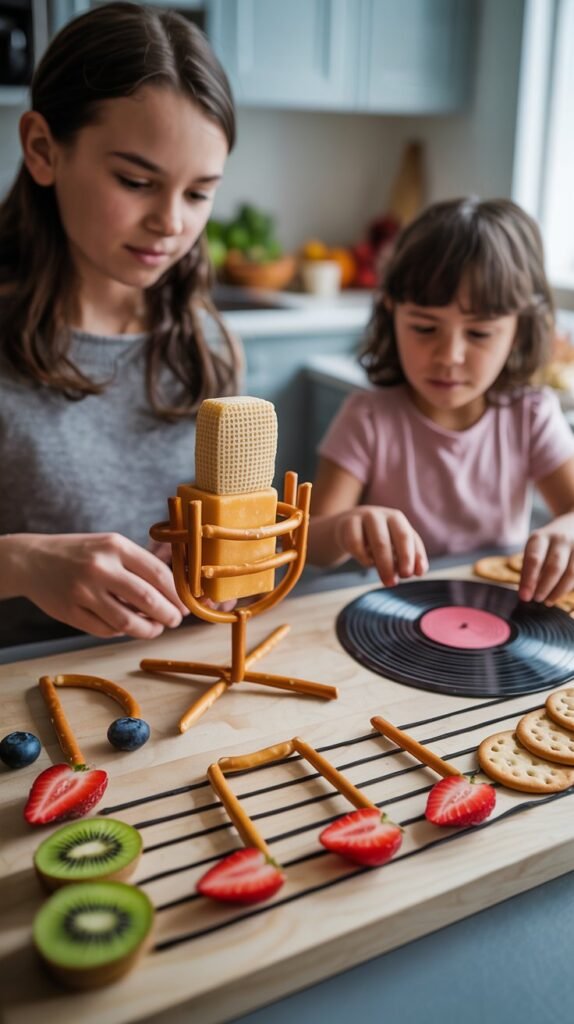
2. Creating the Musical Centerpiece
- Position your main focal point (typically a microphone shape or large musical note)
- For a microphone: use a round cheese or large round cracker for the top, with pretzel rods or breadsticks forming the handle
- For a musical note: use a grape cluster or round cheese for the note head, with celery or a cheese stick for the stem
- Secure elements with hidden toothpicks if needed for stability
- Add details that make the shape recognizable (grid pattern on microphone head, flag on musical note)
3. Establishing the Structure
- Create any “music staff” lines using straight food elements (breadsticks, celery, carrot sticks)
- Position larger shaped elements like record-shaped crackers or cheese cutouts
- Build any raised or three-dimensional elements that other foods will surround
- Place small containers filled with dips or loose items
4. Adding Main Proteins
- Arrange larger meat and cheese elements, focusing on areas that need substantial coverage
- Create rollups, fans, or stacks for visual interest
- Position pre-cut shaped cheese or meat cutouts (musical notes, stars, etc.)
- Leave space between major protein sections for fruits and vegetables
5. Incorporating Fruits and Vegetables
- Add colorful fruits and vegetables to create contrast with proteins
- Use these elements to fill gaps and create flow between sections
- Position any special fruit/vegetable cutouts in prominent positions
- Create patterns or gradients with similar items in different colors
6. Placing Breads and Crackers
- Distribute crackers and bread elements throughout the board
- Use these items to create borders or separations between sections
- Stand breadsticks or pretzel rods vertically in containers for height
- Fill any remaining gaps in the design
7. Adding Final Touches
- Place small sweet treats in remaining spaces
- Add decorative picks, flags, or non-edible decorations
- Position any food labels or identification cards
- Make final adjustments to ensure stability and accessibility
8. Presentation Enhancement
- Clean any smudges or crumbs from exposed board areas
- Adjust lighting to highlight dimensional elements
- Place serving utensils strategically for easy access
- Add themed napkins and plates nearby
Pro assembly tip: Take photos at each stage of your assembly process! This not only creates a record for future recreations but helps you identify any areas that need adjusting before proceeding to the next step. Viewing your work through a camera lens often reveals balance issues or gaps that aren’t obvious when working up close.
Musical Design Elements to Include
The magic of your karaoke board comes from instantly recognizable musical elements that transform ordinary foods into themed art! These signature designs will make your board sing:
Microphone Centerpiece
The quintessential karaoke symbol makes a perfect focal point. Create using:
- Large circular cracker or round cheese slice for the microphone head
- Black olives arranged in a circle for a classic microphone grid
- Pretzel rods or breadsticks for the handle
- Small cheese cube at the bottom for the base
- Tiny details with edible markers or food coloring for authenticity
Musical Notes
Scatter these throughout your board for immediate theme recognition:
- Quarter notes using grapes or cherry tomatoes for heads with celery or pretzel sticks for stems
- Eighth notes connected with thin cheese strips
- Create flags using small triangular cheese or meat cutouts
- Vary sizes from large centerpiece notes to tiny accents
- Group together to form recognizable song fragments
Music Staff
Create the foundation of written music using:
- Five parallel lines made from thin pretzel sticks, celery strips, or carrot sticks
- Position musical note foods directly on these lines
- Add a treble clef shape at the beginning using a curved breadstick or piped soft cheese
- Create a recognizable pattern that music-reading guests might identify
Record Design Elements
Harken back to vinyl records with these circular arrangements:
- Round crackers with smaller round cheese centers
- Concentric circles created with different colored foods
- Spiral patterns using contrasting ingredients
- Label sections with “A-side” and “B-side” designations
Amplifier and Speaker Concepts
Add electronic music elements through:
- Square or rectangular cheese slices with pretzel “grill” details
- Volume knobs using circular crackers or olives
- Small cups of ingredients representing speaker components
- Connect to microphone elements with pretzel “wires”
Pro design tip: Layering is the secret to recognizable musical elements! Most music symbols have specific proportions that make them instantly identifiable. Create a draft version using paper cutouts to test sizes and proportions before committing to food cutting. This ensures your musical elements retain their characteristic shapes that guests will immediately recognize without explanation.
Voice-Friendly Food Arrangements

Since your charcuterie board serves a karaoke party, special consideration for singers’ needs creates thoughtful hosting! Organize your board with these voice-supporting strategies:
Hydration-Supporting Section
Create a dedicated area with moisture-rich foods that help keep vocal cords hydrated:
- Cucumber slices (high water content)
- Melon chunks (hydrating and soothing)
- Grapes (juicy and voice-friendly)
- Pineapple (helps cut through mucus)
- Small water bottles with decorative straws nearby
Easy-Grip, One-Handed Options
Position these items around the board’s perimeter for quick grabbing between songs:
- Cheese cubes on picks
- Rolled meat slices secured with toothpicks
- Fruit skewers designed for clean eating
- Individual portions in cupcake liners
- Stable, non-crumbly options that won’t create mess
Throat-Soothing Selections
Include specific foods known to soothe vocal cords:
- Honey-drizzled small treats
- Warm temperature (not cold) items
- Non-acidic fruit options
- Soft, easy-to-swallow bites
- Mild flavors that won’t irritate throats
Strategic Placement
Organize your board with performance needs in mind:
- Most-needed items positioned at easily accessible edges
- Less messy options near high-traffic areas
- Potentially voice-irritating foods (very salty, acidic, or spicy items) clearly separated
- Individual serving vessels to prevent double-dipping
- Finger foods that don’t require utensils
Pro voice care tip: Create small “Singer’s Survival Kit” cups with perfect vocal support combinations! Fill individual cups with a balanced mixture of hydrating fruits, protein for energy, and a small honey-based treat. These grab-and-go portions provide perfect between-song nourishment without requiring singers to assemble their own combinations while focusing on their next performance.
Presentation and Display Tips

Elevate your creation from simple snack board to showstopping centerpiece with these presentation techniques that maximize visual impact:
Height Variation Strategies
Create dynamic visual interest by varying heights across your display:
- Use cake stands or raised platforms under your board
- Place small inverted bowls under certain sections of the display
- Stand items vertically (breadsticks, pretzel rods) in strategic locations
- Create paper cone holders for vertical display of specific items
- Layer ingredients to build dimension within the flat board surface
Strategic Lighting
Enhance the drama of your display with thoughtful illumination:
- Position your board where natural light highlights its features
- Add battery-operated mini string lights around (not on) the board
- Use LED candles nearby for warm, flattering light
- Consider a small spotlight effect for your centerpiece element
- Avoid harsh direct lighting that causes unflattering shadows
Themed Labeling
Help guests identify items while reinforcing your theme:
- Create mini microphone or record-shaped food identification cards
- Use musical terminology for section names (“Sweet Symphony” for desserts)
- Write labels on small chalkboards shaped like music notes
- Incorporate song lyrics or music puns in your descriptions
- Keep labels visible but not distracting from the food itself
Strategic Positioning
Place your board for maximum impact and practicality:
- Position away from the main karaoke performance area to prevent disruption
- Ensure accessibility from multiple sides for easier serving
- Consider traffic flow around the table during active singing
- Place at a height appropriate for your young guests
- Ensure stable, level surface that won’t shift during serving
Pro presentation tip: Create a “backstage” area nearby with backup supplies for refreshing your board throughout the party! Keep additional cut ingredients, extra serving utensils, and cleaning supplies within easy reach but out of sight. This allows quick touch-ups during the event without disrupting the polished presentation or requiring a trip back to the kitchen during party time.
Make-Ahead Components and Final Assembly Timeline

Stress-free execution comes from smart planning! This timeline approach allows you to enjoy both creation and celebration without last-minute pressure:
1-2 Days Before
Complete these tasks ahead for maximum efficiency:
- Cut hard cheeses into shapes and store in airtight containers
- Prepare denser fruits that won’t brown (melons, grapes, pineapple)
- Bake any homemade crackers or bread elements
- Create and refrigerate stable dips (hummus, cheese-based spreads)
- Prepare non-perishable decorative elements
- Pre-portion nuts or dry elements into serving containers
- Clean and sanitize your serving board and utensils
Day Before
Focus on preparation that maintains freshness but reduces day-of work:
- Pre-cut vegetable elements that stay fresh (carrots, celery, bell peppers)
- Roll and store meat slices in sealed containers
- Prepare any simple syrup or honey mixtures
- Organize all serving containers, picks, and decorative elements
- Set up your serving area with non-perishable items
- Locate and clean all necessary serving tools
- Print or create any labels or identification cards
Morning of Party
Complete these tasks several hours before guests arrive:
- Prepare remaining fruit elements that may brown
- Assemble any last-minute dips or spreads
- Cut bread components that dry out quickly
- Begin arranging shelf-stable items on board if time allows
- Prepare any temperature-sensitive sweet elements
- Set out serving utensils and napkins
- Place board in its final position
1-2 Hours Before Party
Focus on final assembly with everything prepared:
- Arrange your centerpiece and structural elements
- Position containers with dips or loose items
- Layer on proteins and stable ingredients first
- Add fruits and vegetables next
- Position bread and cracker elements
- Add sweet treats and final decorative elements
- Take photos of completed board before guests arrive
During the Party
Maintain your masterpiece with minimal effort:
- Have backup ingredients ready for quick replenishment
- Check board every 30-45 minutes for needed touch-ups
- Rotate or refresh any temperature-sensitive items
- Keep extra serving utensils available for replacement
Pro timeline tip: Create a board assembly photograph reference! Do a “practice run” with a few key elements a day or two before your party, taking photos of your design plan. This visual reference makes final assembly significantly faster and less stressful than trying to create your design concept from scratch while managing other party preparations. The practice version doesn’t need all ingredients—just enough to establish your pattern and placement strategy.
Dietary Accommodations and Modifications

Ensure every little singer can safely enjoy your musical masterpiece with these thoughtful accommodations that maintain theme continuity while addressing dietary needs:
Allergen-Friendly Adaptations
Create safe options that don’t compromise your design:
- Nut-Free Options: Replace nut-based items with seed butters or hummus
- Gluten-Free Zone: Designate a specific section with gluten-free crackers and breads
- Dairy Alternatives: Offer non-dairy cheese alternatives shaped into musical designs
- Egg-Free Selections: Ensure any baked elements have egg-free alternatives available
- Multiple Allergies: Create completely allergen-free “safe zone” with dedicated serving utensils
Visual Identification Systems
Make special options easily identifiable without disrupting your theme:
- Use musical note picks in specific colors to code different allergen-free items
- Create a discreet legend card explaining your identification system
- Position allergen-free options throughout the board rather than in a segregated section
- Use themed containers that subtly indicate special dietary options
- Ensure labels are visible but integrated into your design aesthetic
Modification Strategies
Adapt your design concept for various needs while maintaining impact:
- Scale portions appropriately for different age groups
- Create simplified sections for very young children
- Offer more sophisticated flavor combinations for adult chaperones
- Adjust spice levels and flavor intensity based on your guest preferences
- Consider cultural dietary preferences relevant to your guest list
Pro accommodation tip: Create “Inclusive Ensemble” food groupings that naturally accommodate multiple dietary needs! Design several complete snack combinations using items that are naturally free from common allergens (fresh fruits, vegetables, allergen-free crackers) arranged in musical patterns. This approach ensures that guests with dietary restrictions enjoy complete, intentionally designed experiences rather than cobbling together random “safe” items from around the board.
Conclusion

Your karaoke-themed charcuterie board is more than just food—it’s a visual overture that sets the perfect tone for your musical celebration! By thoughtfully combining recognizable musical elements with kid-approved foods, you’ve created a memorable starting note that will have young guests singing your praises.
What makes these themed boards so special is how they transform ordinary snacking into an extension of your party’s entertainment. The connections between food presentation and activity create a cohesive experience where every element feels intentionally designed. This attention to detail elevates simple gatherings into Instagram-worthy events that children remember long after the last song has been sung.
For maximum impact with minimum stress, remember that advance preparation is your secret weapon. Breaking the process into manageable steps ensures you can create something spectacular without feeling overwhelmed. Start with the basic musical elements that create immediate theme recognition, then add complexity as your comfort and confidence grow.
Most importantly, customize these concepts to match your specific guest list and personal strengths. The most successful boards reflect both host creativity and guest preferences—creating a harmonious blend that hits all the right notes. Whether you go all-out with elaborate designs or create a simpler arrangement with a few key musical elements, the thoughtful connection to your karaoke theme will be appreciated.
We’d love to see your musical masterpieces! Tag us @CelebrationSHE with photos of your karaoke charcuterie creations and let us know which elements became instant favorites with your singing stars. Happy hosting, and even happier harmonizing!