Introduction: Creating Magic Through Thoughtful Details
You know that feeling when you walk into a beautifully decorated space and instantly feel more relaxed, happy, and ready to celebrate? That’s the magic we’re going to create for your next outdoor gathering! The secret isn’t expensive decorations or complicated installations—it’s about those simple, thoughtful touches that show your guests how much you care about creating something special together.
Here’s what I’ve learned from hosting countless outdoor gatherings: people remember how you made them feel, and beautiful spaces make everyone feel valued and celebrated. The psychology behind this is real—when we’re surrounded by beauty, we naturally relax, engage more deeply with each other, and create those precious memories that last long after the last crumb is swept away.
The best part? You don’t need a Pinterest-perfect budget or Martha Stewart-level skills to create these magical moments. With some creativity, basic DIY techniques, and a willingness to embrace the natural beauty that outdoor settings provide, you can transform any picnic into an occasion that feels truly special. Let’s dive into these simple but stunning ideas that will have your friends asking for your decorating secrets!
1. Natural Elements and Foraged Beauty

Nature provides the most beautiful decorations absolutely free! There’s something so satisfying about creating stunning centerpieces and accents using elements you’ve gathered yourself. Plus, natural decorations automatically complement outdoor settings in ways that store-bought items simply can’t match.
Seasonal foraging treasures: Spring offers budding branches and early wildflowers, summer provides lush greenery and blooming everything, autumn delivers gorgeous colored leaves and interesting seed pods, while winter gives us evergreen boughs and sculptural bare branches. Each season has its own palette of natural beauty just waiting to be gathered!
The key is learning to see decorative potential in natural elements. Those interesting twisted branches? Perfect for creating rustic centerpiece bases. Smooth river rocks? Beautiful scattered around candles or used as place card holders. Autumn leaves? Gorgeous when pressed between glass plates or scattered artfully across tables.
Materials and Supplies Needed
- Small basket or container for collecting
- Sharp garden shears or small pruning scissors
- Spray bottle for keeping fresh elements hydrated
- Clear acrylic sealer (optional, for preserving delicate items)
- Small containers for water if using fresh flowers
- Clean cloth for wiping collected items
- Camera for identifying and remembering good foraging spots
DIY Instructions
- Gathering responsibly: Only collect fallen items or take small amounts from abundant sources, never rare or protected plants. Always ask permission on private property and follow Leave No Trace principles.
- Creating branch arrangements: Look for interesting shapes and textures in fallen branches. Clean them with a damp cloth, then arrange in tall containers or use as table runners down the center of your picnic table.
- Stone and rock displays: Collect smooth, interesting stones to use as natural place card holders (write names with metallic markers), candle bases, or simply scatter for textural interest.
- Leaf and flower preservation: For delicate items like flowers or perfect leaves, press between heavy books for a week, or use between wax paper and iron on low heat for immediate use.
- Natural centerpieces: Combine different textures—rough bark, smooth stones, delicate flowers—in wooden bowls or woven baskets for centerpieces that cost nothing but look professionally designed.

2. Mason Jar Magic: Versatile Vintage Charm

Mason jars are the ultimate multitaskers for outdoor entertaining! They’re affordable, virtually unbreakable, and can be transformed into everything from elegant lighting to serving pieces to centerpieces. Plus, they’re endlessly reusable, making them both budget-friendly and environmentally responsible.
Multiple magical uses: Mason jars can become luminaries with battery-operated tea lights, flower vases with simple ribbon wrapping, beverage containers with cute straws, or even food serving vessels for things like layered salads or dessert parfaits. The vintage aesthetic automatically adds charm to any outdoor setting.
The beauty of working with mason jars is how easily they can be customized for any theme or season. Wrap them in burlap for rustic charm, add metallic spray paint for elegance, or tie them with colorful ribbons for festive celebrations. They’re like a blank canvas that adapts to any decorating vision!
Materials and Supplies Needed
- Various sizes of mason jars (start with a dozen mixed sizes)
- Battery-operated tea lights or string lights
- Decorative materials: burlap, lace, ribbon, twine
- Metallic spray paint in gold, silver, or copper
- Wire or thin rope for hanging applications
- Fresh flowers or greenery
- Glass markers for personalization
- Small rocks or sand for weighted luminaries
DIY Instructions
- Creating hanging luminaries: Wrap thin wire around the jar rim, create a hanging loop, add battery tea lights inside. Hang from tree branches or shepherd’s hooks for magical evening lighting.
- Elegant centerpieces: Spray paint jars in metallic tones, let dry completely, then arrange fresh flowers inside. Group in odd numbers for most pleasing visual impact.
- Beverage station setup: Use large mason jars as beverage dispensers with spigot lids, and smaller jars as individual drinking glasses. Add custom labels or decorative touches that match your theme.
- Personalized place settings: Use small jars as individual place settings by adding each guest’s name with glass markers. Fill with flowers, candles, or small treats as take-home favors.
- Layered food presentations: Create beautiful layered salads, parfaits, or desserts in wide-mouth jars for individual servings that look professionally catered but travel perfectly for outdoor dining.
3. Fabric and Textile Transformations

Fabric is your secret weapon for instantly elevating any outdoor dining experience! Beautiful textiles add color, texture, and sophistication while being surprisingly practical for outdoor use. The best part? You can create stunning effects with minimal sewing skills and even use household linens you already own.
No-sew solutions for busy schedules: Many fabric projects require no sewing at all! Fabric table runners can be created by simply cutting and hemming with fabric glue, napkins can be made from fabric squares with frayed edges for rustic charm, and cushion covers can use pillowcase-style construction that’s practically foolproof.
The key to outdoor fabric success is choosing materials that photograph beautifully while standing up to outdoor conditions. Look for colorfast fabrics that won’t run if they get damp, and consider fabric treatments that repel stains and moisture for pieces you’ll use repeatedly.
Materials and Supplies Needed
- Various fabric remnants or affordable yardage
- Fabric scissors and rotary cutter
- Fabric glue or basic sewing supplies
- Iron and ironing board
- Measuring tape and fabric markers
- Scotchgard or similar fabric protector spray
- Pins or clips for holding fabric during projects
- Coordinating thread if sewing
DIY Instructions
- Simple table runners: Cut fabric 12-18″ wide by your table length plus 12″ for overhang. Hem edges with fabric glue or simple straight stitches for professional finish.
- Elegant cloth napkins: Cut 18″x18″ squares from coordinating fabrics. For rustic look, simply fray edges by pulling threads. For polished look, hem with 1/4″ double fold.
- Cushion makeovers: Measure existing cushions, cut fabric with 1″ seam allowance all around, sew three sides, insert cushion, and hand-stitch fourth side closed. Remove and wash covers as needed.
- Outdoor tablecloth creation: Use flat sheets or fabric yardage to create custom tablecloths. Add fabric weights to hem corners to prevent wind lifting.
- Coordinated color schemes: Choose 2-3 colors that complement your outdoor setting and repeat them across all fabric elements for cohesive, professional appearance.

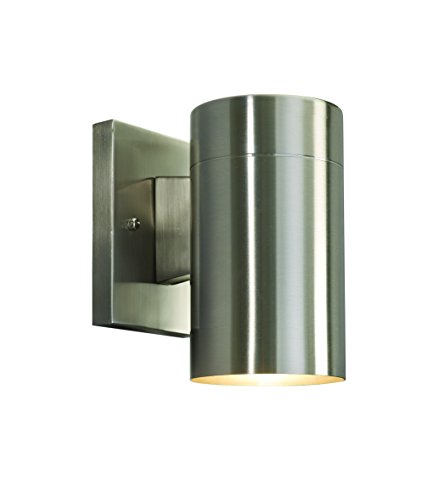
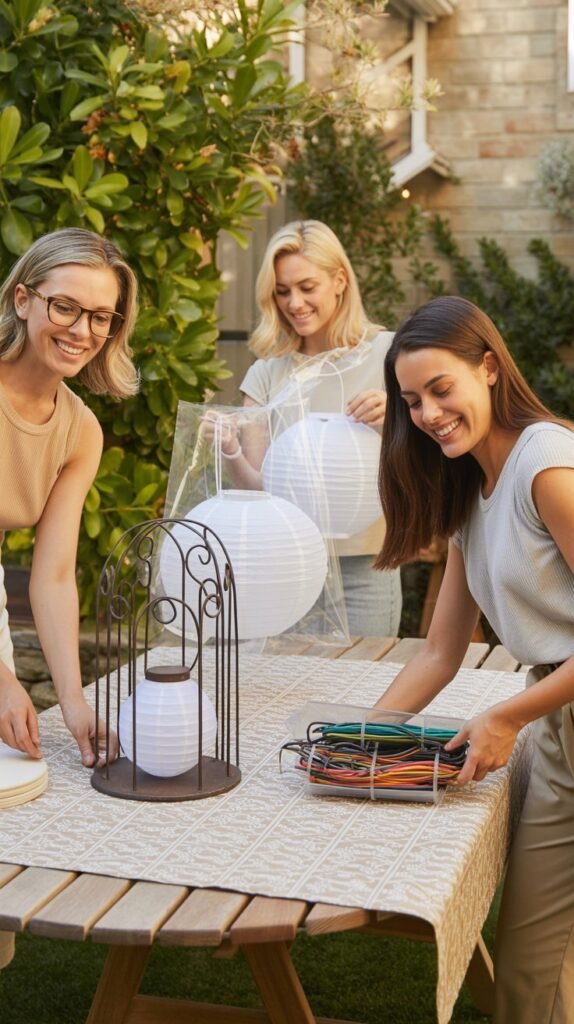
4. Lighting Solutions for Ambiance

Lighting is absolutely magical for creating atmosphere, especially as day transitions to evening! The right lighting can transform even the most basic outdoor space into something that feels enchanted and special. The secret is layering different types of lighting to create depth and warmth.
Battery and solar solutions: Modern lighting options make it easy to create stunning effects without worrying about electrical access or fire safety. Solar lights charge during the day and automatically illuminate at dusk, while battery-powered options give you complete control over timing and placement.
The goal is creating multiple levels of light—overhead string lights for general illumination, table-level lanterns or candles for intimate dining light, and pathway lighting for safety and beauty. This layering creates depth and interest while ensuring everyone feels comfortable and can see their food!
Materials and Supplies Needed
- String lights (battery or solar powered)
- Various lanterns and luminaries
- Battery-operated candles or tea lights
- Extension cords and outdoor power strips (if using plug-in options)
- Hanging hardware: hooks, clips, zip ties
- Timers for automatic lighting control
- Extra batteries for backup power
- Weather-resistant outdoor bulbs
DIY Instructions
- String light installation: Hang between trees, posts, or umbrellas at varying heights for most visual interest. Use clips or hooks that won’t damage trees or structures.
- Layered lighting design: Plan three levels—overhead for general lighting, table level for dining ambiance, and ground level for safety and pathway marking.
- Safe candle alternatives: Use battery-operated candles in luminaries for all the ambiance with none of the fire risk. Many are indistinguishable from real candles and last for hours.
- Solar light strategy: Position solar lights to charge in sunny spots during day, then move to desired locations for evening illumination. Perfect for lighting pathways or marking gathering boundaries.
- Timer coordination: Set timers so lights activate automatically as natural light fades, creating seamless transition from day to evening celebration.

5. Floral Arrangements and Garden Beauty

Fresh flowers instantly elevate any gathering from casual to special! The wonderful thing about outdoor entertaining is that even simple flower arrangements look more impressive against natural backdrops. You don’t need expensive florist arrangements—garden flowers, wildflowers, or even grocery store bouquets can create stunning effects with the right techniques.
Budget-friendly flower strategies: Shop grocery stores for the best flower deals, especially day-old bouquets that are still beautiful but discounted. Consider growing your own cutting garden with easy flowers like zinnias, marigolds, and cosmos that bloom all season and love being cut frequently.
The key to outdoor flower success is choosing arrangements that complement rather than compete with natural settings. Looser, more natural arrangements often work better than formal, structured designs, and flowers that can handle some wind and weather changes will keep your decorations looking fresh throughout your gathering.
Materials and Supplies Needed
- Sharp floral scissors or garden shears
- Various containers: mason jars, vases, or repurposed containers
- Floral foam or flower frogs for arrangements
- Fresh water and flower food
- Spray bottle for maintaining freshness
- Waterproof container liners
- Collection of flowers: garden, wildflower, or store-bought
DIY Instructions
- Simple centerpieces: Use odd numbers of containers (3 or 5) filled with single flower types for biggest impact. Vary heights for visual interest while keeping arrangements low enough for conversation.
- Wildflower gathering: Collect wildflowers early morning or evening when they’re most hydrated. Immediately place stems in water and arrange within an hour for longest-lasting beauty.
- Weather-resistant arrangements: Choose flowers that handle outdoor conditions well—sunflowers, marigolds, zinnias, and most herbs create arrangements that stay beautiful despite wind and temperature changes.
- Water source solutions: Fill containers on-site to avoid carrying heavy water-filled vases. Bring gallon jugs of water and flower food for freshest arrangements.
- Multiple small arrangements: Instead of one large centerpiece, create several small arrangements that can be moved as needed and won’t block sight lines across tables.

6. Paper and Cardstock Creative Projects

Paper crafts offer endless possibilities for custom decorations that perfectly match your theme and style! The key to outdoor paper projects is choosing weather-resistant materials and protection methods that keep your creations looking fresh despite outdoor conditions.
Weather-resistant techniques: Laminating, using cardstock instead of regular paper, and protective sprays can make paper decorations surprisingly durable outdoors. Choose projects that can be easily replaced if damaged, and always have backup decorations for important elements.
Paper projects are perfect for creating custom signage, personalized place cards, themed decorations, and unique elements that show your personality and attention to detail. Plus, they’re often the most budget-friendly decorating option while offering unlimited customization possibilities!
Materials and Supplies Needed
- Various weights of cardstock and decorative papers
- Laminating machine and sheets (or clear contact paper)
- Weather-resistant markers and pens
- Scissors, craft knife, and cutting mat
- Double-sided tape and glue sticks
- Hole punch and eyelets for hanging elements
- String or ribbon for hanging decorations
- Clear acrylic sealer spray
DIY Instructions
- Custom bunting creation: Cut triangle shapes from decorative paper, punch holes in corners, thread onto string or ribbon. Laminate pieces first for weather protection.
- Menu and signage design: Create custom menus, welcome signs, or activity instructions using beautiful fonts and decorative papers. Laminate or place in clear protective sleeves.
- Paper flower alternatives: Create lasting paper flowers using tissue paper or crepe paper. These won’t wilt in heat and can be reused for multiple gatherings.
- Place card personalization: Design custom place cards that reflect your theme. Include guest names and perhaps special messages or inside jokes that show thoughtfulness.
- Weather protection application: Use clear contact paper as budget-friendly lamination, or spray finished projects with acrylic sealer for basic water resistance.
7. Upcycled and Repurposed Decorations

Some of the most charming decorations come from seeing new potential in everyday items! Upcycling not only saves money but creates unique decorative pieces that have character and personality you simply can’t buy in stores. Plus, there’s something deeply satisfying about transforming “trash” into treasure!
Creative vision development: Start looking at household items with decorator’s eyes. Glass jars become luminaries, tin cans become planters, old fabric becomes table runners, and cardboard becomes custom signage. The key is seeing past an item’s original purpose to its decorative potential.
The beauty of upcycled decorations is that they tell a story and often become conversation starters. Guests love hearing about how you transformed ordinary items into beautiful decorations, and these pieces often become treasured elements you’ll reuse for multiple gatherings.
Materials and Supplies Needed
- Various clean containers: cans, bottles, jars
- Spray paint in coordinating colors
- Decorative materials: twine, ribbon, fabric scraps
- Strong adhesive or hot glue gun
- Sandpaper for surface preparation
- Primer for better paint adhesion
- Protective clear coat for durability
- Basic tools: scissors, brushes, cleaning supplies
DIY Instructions
- Tin can transformations: Clean thoroughly, remove labels, sand lightly, prime, then paint in coordinating colors. Use as planters, utensil holders, or luminaries with battery candles.
- Wine bottle elegance: Clean bottles, remove labels with hot water and scraping. Wrap with twine, paint, or etch with glass etching cream for sophisticated candle holders or vases.
- Cardboard creativity: Transform sturdy boxes into serving trays by covering with decorative paper or fabric. Add handles cut from the cardboard and reinforce with tape for functionality.
- Fabric scrap magic: Turn old sheets, clothes, or fabric remnants into napkins, table runners, or decorative banners. Even damaged fabrics can become beautiful rustic decorations.
- Glass jar elevation: Remove labels, paint lids in coordinating colors, add decorative elements like twine or ribbon to create cohesive sets of containers for flowers, candles, or food service.
8. Color Schemes and Coordination Strategies

Choosing palettes that photograph beautifully: Think about how your colors will look in natural outdoor lighting and against green backgrounds. Jewel tones often pop beautifully outdoors, while pastels create romantic, soft effects. Consider the time of day you’ll be gathering—golden hour light enhances warm colors, while cooler evening light flatters blues and purples.
The secret to stunning color coordination is the “60-30-10 rule”—60% of your color palette should be a neutral base, 30% your main decorative color, and 10% an accent color that adds pop and interest. This creates visual balance while preventing overwhelming busy-ness that competes with natural outdoor beauty.
Planning and Design Process
- Seasonal coordination: Spring calls for fresh greens and soft pastels, summer embraces bright and bold colors, autumn celebrates warm oranges and deep reds, while winter can handle dramatic jewel tones and metallics.
- Natural environment integration: Consider your outdoor setting’s existing colors—the green of grass and trees, the blue of sky and water, the brown of earth and wood. Choose colors that complement rather than compete with these natural elements.
- Photography optimization: Test your color combinations in outdoor lighting before your event. Take photos at different times of day to see how lighting affects your chosen palette.
Implementation Techniques
- Repetition for cohesion: Repeat your chosen colors across all decorative elements—flowers, linens, serving pieces, lighting, and signage. This repetition creates professional-looking coordination.
- Texture mixing: Within your color palette, mix different textures—smooth ceramics, rough natural elements, soft fabrics, and metallic accents. This prevents monochromatic schemes from looking flat or boring.
- Accent color strategy: Use your accent color sparingly but consistently—perhaps in napkin ties, flower centers, candle holders, or small decorative details that draw the eye and create visual interest.
9. Weather-Resistant and Practical Solutions
Decorations that maintain beauty despite challenges: The reality of outdoor entertaining is that weather happens! Successful outdoor decorating means planning for wind, potential rain, and temperature changes while still creating beautiful spaces. The key is choosing projects and materials that bend without breaking.
Wind-resistant strategies: Weight everything down! Use decorative stones in tablecloth corners, choose flowers with strong stems, secure all hanging elements with multiple attachment points, and have backup plans for relocating decorations if weather becomes challenging.
The most successful outdoor decorators think like event planners—they anticipate problems and have solutions ready. This doesn’t mean expecting disaster, but rather being prepared so you can relax and enjoy your gathering regardless of what Mother Nature decides to do!
Materials and Supplies Needed
- Decorative weights for securing lightweight items
- Weather-resistant storage containers
- Plastic table covering or clear vinyl for protection
- Bungee cords and clips for securing decorations
- Quick-deploy tarps or umbrellas for emergency coverage
- Waterproof markers and laminating supplies
- Wind-resistant anchoring hardware
DIY Instructions
- Anchoring systems: Create decorative weights by filling small fabric bags with rice or sand. These can double as napkin holders or decorative elements while preventing wind damage.
- Quick-change protection: Design decorations that can be quickly covered or moved indoors. Use trays and containers that make moving multiple items simple and fast.
- Water-resistant treatments: Apply clear protective sprays to paper elements, choose waterproof tablecloths or add plastic liners under fabric ones, and select decorations that actually improve with a little weathering.
- Modular design approach: Create decorations in sections that can be quickly assembled or disassembled. This makes both setup and emergency takedown much more manageable.
- Storage integration: Design storage solutions that are themselves decorative—beautiful baskets or containers that hold decorations while also serving as table elements.
10. Table Setting and Place Setting Elegance

Creating restaurant-quality presentations outdoors: The secret to elegant outdoor dining is treating it with the same attention to detail you’d give an indoor dinner party. Beautiful place settings show your guests they’re valued while creating those special moments that transform ordinary meals into celebrations.
Mix-and-match sophistication: You don’t need matching dinnerware to create elegant place settings! In fact, thoughtfully mixed elements often create more interesting and personal table presentations than perfectly matched sets. The key is finding unifying elements—color, texture, or style—that tie different pieces together harmoniously.
The goal is creating place settings that feel special and intentional while being practical for outdoor dining. Everything should be functional and easy to manage while still contributing to the overall beauty and atmosphere of your gathering.
Materials and Supplies Needed
- Outdoor-appropriate dinnerware (melamine, bamboo, or vintage finds)
- Cloth napkins in coordinating colors
- Place cards and menu cards
- Small decorative elements for each place setting
- Charger plates or placemats for layering
- Elegant but practical glassware
- Small favors or take-home treats
DIY Instructions
- Layering technique mastery: Start with charger plates or placemats, add dinner plates, then smaller salad or appetizer plates. This creates depth and visual interest while providing practical serving surfaces.
- Napkin folding elegance: Learn 2-3 simple but elegant napkin folds that complement your theme. Practice beforehand so setup goes smoothly, and consider napkin rings or ties that add decorative elements.
- Place card personalization: Create custom place cards that reflect your theme and show attention to individual guests. Include names and perhaps special messages or seating suggestions that enhance social connections.
- Small detail integration: Add small decorative elements at each place setting—a single flower, small favor, or themed decoration that makes each guest feel special and creates photo-worthy table presentations.
- Practical elegance balance: Choose elements that look beautiful but can handle outdoor conditions. Avoid very light items that blow away or very delicate pieces that stress guests who worry about breakage.
11. Themed Decoration Strategies

Adapting themes for outdoor settings: The best outdoor themes work with rather than against natural environments. Instead of trying to completely transform outdoor spaces, successful themes enhance and complement existing natural beauty while adding personality and celebration to the setting.
Cultural sensitivity and respect: When exploring cultural themes, research thoroughly and approach with respect and appreciation rather than appropriation. Focus on celebrating and honoring traditions rather than using surface-level decorations without understanding their significance.
The key to successful themed decorating is restraint—a few well-chosen elements that clearly communicate your theme are more effective than overwhelming spaces with too many decorative pieces that compete for attention.
Theme Development Process
- Research and inspiration: Gather ideas from multiple sources, understand the cultural or historical significance of theme elements, and identify key colors, symbols, and decorative elements that authentically represent your chosen theme.
- Natural integration: Plan how theme elements will work with your outdoor setting. Consider how decorations will look against grass, trees, and sky, and choose elements that complement rather than compete with natural beauty.
- Budget-conscious implementation: Identify which themed elements will have the biggest visual impact for your budget. Often, a few key pieces combined with themed colors and simple decorations create more impressive effects than many expensive decorative items.
Execution Techniques
- Focal point creation: Choose one area to be your main themed display—perhaps the food table or entrance area—then use smaller themed touches throughout the rest of your space for cohesion.
- Layered theme building: Start with basic theme elements and add layers of detail. Begin with color scheme and major decorative pieces, then add smaller details that reinforce the theme without overwhelming the space.
- Interactive theme elements: Include ways for guests to participate in your theme—perhaps themed games, activities, or photo opportunities that engage everyone and create shared experiences around your chosen concept.
12. Photography-Ready Setup Tips

Creating spaces that photograph beautifully: In our social media world, creating photo-worthy spaces isn’t vanity—it’s about documenting precious memories and sharing the joy of beautiful gatherings with friends and family. The good news is that spaces designed to photograph well are usually more beautiful and functional for actual use too!
Understanding outdoor lighting: Natural light is your best friend, but it changes throughout the day. Golden hour (the hour before sunset) provides the most flattering light for both people and decorations, while midday sun can be harsh and create unflattering shadows.
The secret to photography-ready setups is creating visual depth and interest while maintaining functionality. Decorations should enhance rather than overwhelm the human connections and experiences that are the real heart of your gathering.
Photography Planning
- Lighting timing strategy: Plan your gathering timing around optimal lighting conditions. Late afternoon provides beautiful warm light, while overcast days offer soft, even lighting that’s very flattering.
- Depth creation techniques: Layer decorative elements at different heights and distances to create visual depth in photographs. This prevents flat, one-dimensional images and adds professional-looking composition.
- Color photography considerations: Some colors photograph better outdoors than others. Test your color scheme in outdoor lighting before your event to ensure decorations translate well in photos.
Setup Techniques
- Multiple angle accommodation: Arrange decorations so they look good from various viewpoints. Consider where people will naturally take photos and ensure those angles showcase your decorative efforts effectively.
- Natural focal point creation: Use decorative elements to guide the eye toward natural focal points—gathering areas, food displays, or conversation spaces that highlight the human connections in your photos.
- Balance staged and candid opportunities: Create some obviously photo-worthy setups for staged shots, but also ensure your overall space looks beautiful for candid moments that capture authentic interactions and emotions.
Budget-Friendly Decorating Strategies

Maximum impact on minimal budgets: The most impressive outdoor decorations often cost the least because they rely on creativity rather than expensive purchases. Nature provides free decorative elements, basic crafting supplies can create custom pieces, and a little imagination transforms ordinary items into special decorations.
Strategic spending priorities: When you do spend money, invest in items that will be reused repeatedly—quality lighting, basic serving pieces, or versatile decorative containers that adapt to different themes and seasons. Save money on one-time-use items by making them yourself or using natural alternatives.
The secret is recognizing that your time and creativity are more valuable than expensive decorations. Guests are impressed by thoughtfulness and personal touches far more than costly store-bought items that anyone could purchase.
Shopping strategies for maximum value:
- Shop your own home first—you likely already own items that can be repurposed for outdoor decorating
- Visit dollar stores and thrift shops for basic items that can be transformed with paint or simple modifications
- Buy basic supplies in bulk during sales, then use them for multiple gatherings
- Partner with friends to share costs of items that can be used by multiple people
- Focus spending on items that photograph well and create major visual impact
DIY techniques that save money:
- Master a few simple crafting techniques that can be applied to many different projects
- Learn to see decorative potential in everyday items rather than always buying new
- Create templates and patterns that can be reused for multiple occasions
- Invest time in learning skills that will save money long-term—basic sewing, painting techniques, or simple woodworking
- Focus on projects that can be completed quickly but look professionally done
Storage and Reuse Systems

Organizing for multiple uses: The key to sustainable outdoor decorating is creating storage systems that protect your decorations while making them easily accessible for future use. Well-organized storage turns decorating from a major project into a simple, enjoyable process that encourages more frequent entertaining.
Preservation techniques: Different decoration types require different storage approaches. Fabric items need protection from moisture and pests, paper decorations benefit from flat storage in protective sleeves, and fragile items need cushioning and support to prevent breakage.
Smart storage systems save both money and time by extending decoration life and making setup for future gatherings quick and easy. When you can easily find and access decorations, you’re more likely to entertain regularly and build those traditions that bring families and friends together.
Organization strategies that work:
- Use clear containers so you can see contents without opening everything
- Label containers with both contents and occasion suggestions
- Store seasonal decorations together for easy access when needed
- Keep an inventory list with photos to remember what you own
- Create “event kits” with everything needed for specific types of gatherings
Preservation best practices:
- Clean all decorations before storing to prevent stains and deterioration
- Use acid-free tissue paper for delicate items and fabric decorations
- Store items in climate-controlled areas when possible to prevent moisture damage
- Check stored items periodically and refresh preservation materials as needed
- Take photos of complex setups to remember how items work together
Safety Considerations for Outdoor Decorating

Fire safety essentials: When using candles or flame-based lighting outdoors, safety must be your top priority. Use protective glass covers, ensure adequate clearance from flammable materials, have water or sand available for emergency extinguishing, and never leave flames unattended.
Environmental responsibility: Outdoor entertaining should leave no negative impact on natural spaces. Use biodegradable materials when possible, pack out all decorations and waste, avoid damaging plants or wildlife habitats, and choose decorations that won’t harm animals if accidentally left behind.
Child and pet considerations: Design decorations with curious children and pets in mind. Avoid small parts that could be choking hazards, secure all decorations against tipping or falling, choose non-toxic materials, and position breakable items away from play areas.
Essential safety practices:
- Always have first aid supplies readily available during setup and events
- Check local fire restrictions before using any flame-based decorations
- Secure all decorations against wind to prevent them becoming projectiles
- Use battery-powered alternatives to open flames whenever possible
- Inform guests of any potential hazards like steps, uneven ground, or electrical cords
Environmental stewardship guidelines:
- Research local regulations about decorating in public outdoor spaces
- Use only decorations that can be completely removed without trace
- Choose materials that won’t harm wildlife if accidentally ingested
- Avoid decorations that could entangle birds or other animals
- Pack emergency cleanup supplies for quick response to accidents
Conclusion: Creating Lasting Memories Through Beautiful Spaces

The most beautiful thing about creating gorgeous outdoor spaces isn’t the decorations themselves—it’s the memories you create and the connections you strengthen while surrounded by beauty. Every time you take the effort to make a gathering special, you’re telling your friends and family that they matter, that time together is precious, and that ordinary moments deserve extraordinary celebration.
Building confidence through practice: Start small and build your decorating confidence gradually! Choose one or two techniques from this guide and master them before adding more complex projects. Each successful gathering will teach you something new and inspire you to try additional creative touches for future celebrations.
The ripple effect of beautiful gatherings: When you create beautiful spaces, you inspire others to do the same. Your efforts contribute to a culture of celebration and connection that strengthens communities and builds traditions that last for generations. Those photos you take of beautifully decorated gatherings become treasured memories that families look back on for years.
Remember, the goal isn’t perfection—it’s intention and joy! Your friends and family will remember how you made them feel far more than they’ll notice any decorating imperfections. The love and thought you put into creating beautiful spaces for sharing will always shine through, creating the kind of memories that remind us what’s truly important in life.
So grab some mason jars, gather some flowers, and start creating those magical moments that turn ordinary days into treasured memories. Your future self—and all the people you love—will thank you for taking the time to make life more beautiful, one gathering at a time!