Planning a picnic in a toga? Here are 15 vegetarian lunch ideas perfect for keeping it light and lovely! From vibrant salads to savory wraps, these tasty options are easy to prepare and are sure to impress your friends. Plus, you’ll find a handy list of tools and supplies to make your picnic prep a breeze. Let’s get to the deliciousness!
Tools and Supplies Needed:
– Picnic blanket or tote
– Reusable containers
– Cutting board
– Knife
– Serving utensils
– Napkins or paper towels
– Ice packs (optional for keeping items cool)
– Portable cooler (if needed)
**Olive Grove Picnic Wraps**

Olive Grove Picnic Wraps are a delightful and fresh option for a light lunch. Bursting with colorful veggies and a creamy spread, these wraps are simple to prepare and perfect for enjoying outdoors. The combination of flavors from olives, cucumbers, and sweet peppers creates a refreshing taste that complements any picnic vibe.
Whether you’re packing them for a day out or serving at home, these wraps are versatile and satisfying. Plus, they can easily be made in advance, making them a convenient choice for busy days!
Tools and Supplies Needed
- Large mixing bowl
- Cutting board
- Sharp knife
- Wrap or tortilla
- Serving plate
Ingredients
- 4 large tortillas or wraps
- 1 cup hummus
- 1 cup sliced cucumbers
- 1 cup cherry tomatoes, halved
- 1/2 cup black olives, pitted and sliced
- 1/2 cup roasted red peppers, sliced
- 1/4 cup fresh basil or spinach leaves
- Salt and pepper to taste
Instructions
- Preparation: Spread hummus evenly over each tortilla, leaving a small border at the edges.
- Add Vegetables: Layer the cucumbers, cherry tomatoes, black olives, roasted red peppers, and basil or spinach on top of the hummus.
- Season: Sprinkle with salt and pepper to taste.
- Wrap It Up: Carefully roll each tortilla tightly, starting from one end, until fully wrapped. Secure with toothpicks or wrap in parchment paper.
- Serve: Slice each wrap in half and serve immediately or refrigerate until ready to enjoy.
**Mount Olympus Veggie Skewers**

Mount Olympus Veggie Skewers are a delightful and colorful dish perfect for a light and lovely picnic. These skewers combine sweet cherry tomatoes, creamy feta cheese, and vibrant bell peppers, making each bite a burst of flavor. They are simple to prepare, requiring just a bit of assembly, and they look stunning on any picnic table.
With a drizzle of olive oil and a sprinkle of herbs, these skewers bring fresh Mediterranean vibes to your outing. They’re not only tasty but also healthy and satisfying, making them a great choice for anyone looking to enjoy a delicious vegetarian option.
Tools and Supplies Needed
- Skewers (wooden or metal)
- Cutting board
- Knife
- Small bowl (for dressing)
Ingredients
- 1 cup cherry tomatoes
- 1 cup feta cheese, cubed
- 1 bell pepper (red, yellow, or green), cut into bite-sized pieces
- Fresh herbs (like basil or oregano)
- Olive oil
- Salt and pepper to taste
Instructions
- Prepare the Skewers: Start by threading cherry tomatoes, feta cubes, and bell pepper pieces onto the skewers, alternating them for a colorful presentation.
- Season: In a small bowl, mix olive oil, salt, pepper, and chopped herbs. Drizzle this mixture over the skewers to coat them lightly.
- Grill or Serve: You can either grill the skewers for a few minutes to enhance the flavors or serve them fresh as they are.
- Enjoy: Serve immediately or keep them cool until it’s time to enjoy your picnic!
**Golden Grain Salad Bowls**

Golden Grain Salad Bowls offer a fresh and satisfying option for a light picnic. This vibrant dish combines nutritious grains with colorful veggies, creating a delightful mix of flavors. It’s simple to prepare, making it perfect for a quick lunch or an enjoyable outdoor meal.
The nutty taste of the grains pairs beautifully with the sweetness of roasted cherry tomatoes and the freshness of herbs. Each bite is a celebration of textures and tastes, ensuring everyone at your picnic will love it!
Tools and Supplies Needed
- Medium saucepan
- Large bowl
- Cutting board
- Knife
- Spoon for mixing
Ingredients
- 1 cup quinoa or bulgur
- 2 cups vegetable broth or water
- 1 cup cherry tomatoes, halved
- 1 cup yellow cherry tomatoes, halved
- 1/2 cup cucumber, diced
- 1/4 cup red onion, finely chopped
- 1/4 cup fresh parsley, chopped
- 2 tablespoons olive oil
- 1 tablespoon lemon juice
- Salt and pepper to taste
Instructions
- Cook the Grains: In a medium saucepan, bring vegetable broth or water to a boil. Add quinoa or bulgur, reduce heat, cover, and simmer for about 15 minutes until the grains are fluffy and the liquid is absorbed. Let it cool.
- Prepare the Veggies: While the grains are cooling, chop the cherry tomatoes, cucumber, and red onion. Combine them in a large bowl.
- Mix It Up: Add the cooled grains to the bowl with the veggies. Drizzle with olive oil and lemon juice. Toss everything together until well mixed.
- Season: Add salt and pepper to taste, then fold in the fresh parsley.
- Serve: Enjoy immediately or chill for an hour to let the flavors meld together. Pack it up for a lovely picnic!
**Dolma & Dip Platter**

Dolmas are a delightful and versatile vegetarian dish, perfect for a light picnic. These stuffed grape leaves are filled with a savory mixture of rice, herbs, and spices. They boast a wonderful tangy flavor that pairs beautifully with creamy dips. Making dolmas is relatively simple, and they can be prepared ahead of time, allowing for easy serving during your picnic.
For an added touch, serve your dolmas alongside a selection of dips such as tzatziki, hummus, or a simple yogurt sauce. This platter not only offers a burst of flavors but also a colorful presentation that is sure to impress your friends!
Tools and Supplies Needed
- Large mixing bowl
- Pot for cooking rice
- Large pot for steaming or boiling dolmas
- Serving platter
- Spoon for stuffing
Ingredients
- 1 jar of grape leaves (approximately 20-30 pieces)
- 1 cup rice (uncooked)
- 1 onion, finely chopped
- 2 tablespoons olive oil
- 1/4 cup fresh parsley, chopped
- 1/4 cup fresh dill, chopped
- 1 teaspoon salt
- 1/2 teaspoon black pepper
- Juice of 1 lemon
- 1 cup vegetable broth or water
Instructions
- Rinse the grape leaves in cold water and set aside.
- In a pot, heat olive oil over medium heat. Sauté the chopped onion until translucent.
- Add the rice and cook for another 2-3 minutes, stirring occasionally.
- Mix in parsley, dill, salt, pepper, and lemon juice. Stir well to combine, then add the broth or water. Bring to a simmer, cover, and reduce heat. Cook until rice is fluffy, about 15 minutes.
- Once the rice mixture has cooled slightly, prepare to stuff the grape leaves. Place a leaf on a flat surface, add a spoonful of the rice mixture, and roll tightly, folding in the sides.
- Place the stuffed grape leaves in a steamer basket or a pot. Add a bit of water to the pot, cover, and steam for about 30 minutes.
- Once cooked, let cool slightly before serving with your choice of dips.
**Herbed Feta & Cucumber Sandwiches**

Herbed feta and cucumber sandwiches are a delightful addition to any picnic spread. They offer a refreshing taste that balances creamy feta with crisp cucumber, making them a perfect light lunch option. Easy to prepare, these sandwiches are a crowd-pleaser, ideal for a sunny day outside.
The combination of fresh herbs with the tangy feta creates a burst of flavor, while the cucumbers add a satisfying crunch. These sandwiches are not only delicious but also pretty simple to whip up, making them great for both novice cooks and seasoned pros.
Ingredients
- 8 slices of whole-grain bread
- 1 cup crumbled feta cheese
- 1/4 cup cream cheese, softened
- 1/4 cup plain Greek yogurt
- 1 tablespoon fresh dill, chopped
- 1 tablespoon fresh mint, chopped
- 1 small cucumber, thinly sliced
- Salt and pepper to taste
Instructions
- In a bowl, combine the crumbled feta, cream cheese, Greek yogurt, dill, mint, salt, and pepper. Mix until smooth and creamy.
- Spread a generous amount of the herbed feta mixture on four slices of whole-grain bread.
- Layer the cucumber slices on top of the spread, then top with the remaining slices of bread to create sandwiches.
- Cut each sandwich into triangles for easy serving and enjoy!
Tools and Supplies Needed
- Mixing bowl
- Spatula or spoon
- Knife for slicing
- Cutting board
- Serving platter
**Toga Salad Cones**

Toga Salad Cones are a fun and fresh way to enjoy a light lunch. They bring together a burst of flavors with crisp greens, colorful tomatoes, and a hint of herbs, all wrapped in a soft tortilla cone. This recipe is easy to whip up, making it a perfect choice for a picnic or a casual gathering.
The combination of textures and tastes makes each bite delightful. With the crunchy vegetables and the soft wrap, these cones are as pleasing to the eyes as they are to the palate. Plus, they can be made ahead of time, which is always a win!
Tools and Supplies Needed
- Mixing bowl
- Sharp knife
- Cutting board
- Measuring cups
- Serving dish
Ingredients
- 4 large tortillas
- 2 cups mixed salad greens (arugula, spinach, or romaine)
- 1 cup cherry tomatoes, halved
- 1/2 cup black olives, pitted and sliced
- 1/4 cup fresh parsley, chopped
- 1/4 cup feta cheese, crumbled (optional)
- 2 tablespoons olive oil
- 1 tablespoon balsamic vinegar
- Salt and pepper to taste
Instructions
- Prepare the Filling: In a mixing bowl, combine the salad greens, cherry tomatoes, black olives, and parsley. If using, add the feta cheese.
- Dress the Salad: Drizzle olive oil and balsamic vinegar over the salad mixture. Season with salt and pepper. Toss gently to combine.
- Make the Cones: Take a tortilla and place a generous scoop of the salad mixture on one end. Roll the tortilla tightly to form a cone shape, tucking in the filling as you go.
- Secure the Cone: If needed, use a toothpick to hold the cone together. Repeat with the remaining tortillas and salad mixture.
- Serve: Arrange the salad cones on a serving dish and enjoy them fresh!
**Sun-Kissed Caprese Cups**
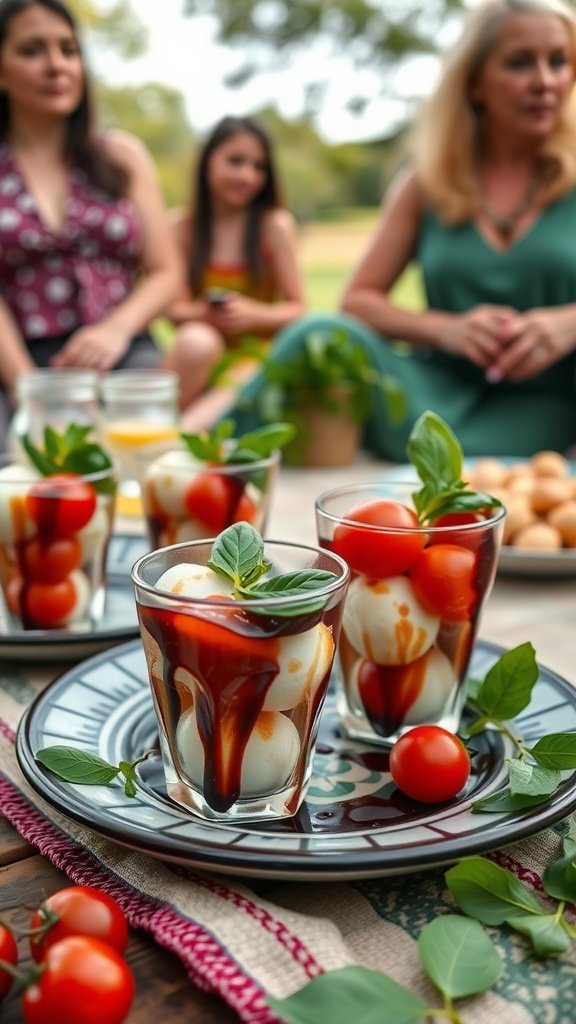
Sun-Kissed Caprese Cups are a delightful twist on the classic Caprese salad, perfect for a light lunch or picnic. Bursting with fresh flavors, these cups combine creamy mozzarella, sweet cherry tomatoes, and fragrant basil, all drizzled with balsamic glaze. They are not only delicious but also incredibly easy to prepare, making them a great option for any outdoor gathering.
Each bite offers a refreshing taste that captures the essence of summer. The combination of textures from the crunchy tomatoes and smooth cheese creates a satisfying experience. Plus, these stylish cups make it easy to serve and enjoy without the fuss of utensils!
Ingredients
- 1 pint cherry tomatoes
- 8 oz fresh mozzarella balls (bocconcini)
- Fresh basil leaves
- Balsamic glaze
- Salt and pepper to taste
Instructions
- Prepare the Cups: In small clear cups or shot glasses, layer cherry tomatoes and mozzarella balls. Start by placing a few cherry tomatoes at the bottom, followed by a mozzarella ball, and continue layering until the cup is filled.
- Add Fresh Basil: Tuck fresh basil leaves in between the layers for added flavor and visual appeal.
- Season: Drizzle balsamic glaze over the top of the cups and sprinkle with a pinch of salt and pepper to enhance the flavors.
- Serve: Arrange the cups on a platter and serve immediately, or chill until ready to enjoy.
**Stuffed Bell Pepper Halves**

Stuffed bell peppers are a colorful and satisfying dish that makes a perfect addition to any picnic spread. They are filled with a delightful mixture of grains, vegetables, and spices, offering a burst of flavor in every bite. Not only are they tasty, but they are also easy to prepare, making them an excellent choice for a light and lovely meal.
This recipe is all about versatility. You can customize the filling to suit your taste, whether you prefer quinoa, rice, or a mix of beans and veggies. The bell peppers act as a fun and edible bowl, making them not only delicious but also visually appealing for your picnic table.
Tools and Supplies Needed
- Oven-safe baking dish
- Large mixing bowl
- Knife
- Cutting board
- Measuring cups and spoons
Ingredients
- 4 medium bell peppers (any color)
- 1 cup cooked quinoa or rice
- 1 can (15 oz) black beans, drained and rinsed
- 1 cup corn (fresh or frozen)
- 1/2 cup diced tomatoes (canned or fresh)
- 1 teaspoon cumin
- 1 teaspoon paprika
- Salt and pepper to taste
- 1/2 cup crumbled feta cheese (optional)
- Fresh parsley or cilantro for garnish
Instructions
- Preheat your oven to 375°F (190°C).
- Cut the tops off the bell peppers and remove the seeds and membranes. Place them in the baking dish, cut side up.
- In a large mixing bowl, combine the cooked quinoa or rice, black beans, corn, diced tomatoes, cumin, paprika, salt, and pepper. Mix well.
- Spoon the filling into each bell pepper until they’re generously stuffed. If using, sprinkle crumbled feta cheese on top.
- Cover the baking dish with aluminum foil and bake for 30 minutes. Remove the foil and bake for an additional 10-15 minutes until the peppers are tender.
- Garnish with fresh parsley or cilantro before serving. Enjoy your stuffed bell pepper halves!
**Greek Yogurt Tabbouleh Jars**

Greek Yogurt Tabbouleh Jars are a refreshing and healthy option for a light lunch, perfect for a picnic. These portable jars are filled with layers of vibrant veggies, savory herbs, and creamy Greek yogurt, bringing together a balance of flavors and textures that are both satisfying and nutritious.
Not only are they easy to prepare, but they also offer a lovely presentation that makes any meal feel special. Ideal for anyone looking to enjoy a burst of freshness, these jars can be prepped in advance, making them a convenient choice for a busy day.
Tools and Supplies Needed
- Jars with lids or containers
- Cutting board
- Knife
- Measuring cups
- Mixing bowl
Ingredients
- 1 cup cooked bulgur wheat
- 1 cup Greek yogurt
- 1 cup cherry tomatoes, halved
- 1 cucumber, diced
- 1 bell pepper, diced (red or green)
- 1 cup parsley, chopped
- 1/4 cup olive oil
- 2 tablespoons lemon juice
- Salt and pepper to taste
Instructions
- Prepare the Base: In a mixing bowl, combine the cooked bulgur wheat with olive oil, lemon juice, salt, and pepper. Mix well to ensure the grains are evenly coated.
- Layer the Ingredients: In each jar, start by adding a layer of the bulgur mixture. Next, add layers of diced cucumber, bell peppers, and halved cherry tomatoes.
- Add the Yogurt: Spoon a layer of Greek yogurt on top of the veggies to create a creamy texture.
- Finish with Herbs: Top with chopped parsley for an extra burst of flavor. Repeat the layers until the jars are filled.
- Seal and Store: Close the jars with lids and refrigerate until you’re ready to enjoy. These jars can be stored for up to three days.
**Spinach & Feta Pastry Bites**

These Spinach & Feta Pastry Bites are a delightful addition to any picnic, offering a light and savory treat that’s sure to please everyone. The flaky pastry envelops a rich filling of creamy feta cheese and vibrant spinach, creating a perfect balance of flavors. They are simple to make, making them perfect for both novice and experienced cooks.
Whether you’re enjoying a sunny day outdoors or hosting a casual gathering, these bites are easy to prepare and can be served warm or at room temperature. They pair beautifully with olives or a refreshing salad, adding an extra layer of enjoyment to your meal.
Ingredients
- 1 package of puff pastry (thawed)
- 2 cups fresh spinach (washed and chopped)
- 1 cup feta cheese (crumbled)
- 1 small onion (finely chopped)
- 2 cloves garlic (minced)
- 1 egg (beaten for egg wash)
- Salt and pepper (to taste)
- Olive oil (for sautéing)
Instructions
- Preheat your oven to 400°F (200°C).
- In a skillet, heat a bit of olive oil over medium heat. Add the chopped onion and minced garlic, cooking until softened.
- Stir in the chopped spinach and cook until wilted. Season with salt and pepper, then remove from heat and let cool slightly.
- In a bowl, combine the cooked spinach mixture with crumbled feta cheese.
- Roll out the puff pastry on a floured surface and cut it into squares.
- Place a spoonful of the spinach and feta mixture in the center of each square. Fold the pastry over to create triangles and seal the edges with a fork.
- Brush the tops with the beaten egg wash for a golden finish.
- Bake for 15-20 minutes, or until the pastry is golden and puffed.
- Let cool slightly before serving. Enjoy your delicious Spinach & Feta Pastry Bites!
**Lentil & Olive Picnic Rolls**

Lentil and Olive Picnic Rolls are a delicious and wholesome option for a light lunch. These rolls are packed with protein and flavor, making them perfect for a picnic setting. The combination of lentils and olives gives a delightful savory taste, while the fresh herbs brighten the dish, making them a real crowd-pleaser.
This recipe is not only simple to make, but also incredibly versatile. You can customize the filling to include your favorite vegetables or herbs, making it a flexible choice for various tastes. Roll them up, slice them, and you’re ready for a lovely picnic!
Tools and Supplies Needed
- Large mixing bowl
- Cutting board
- Sharp knife
- Rolling pin
- Skillet
- Serving platter
Ingredients
- 1 cup cooked lentils
- 1/2 cup pitted olives, chopped
- 1/4 cup feta cheese, crumbled
- 1 small cucumber, finely diced
- 1 small red bell pepper, finely diced
- 1/4 cup fresh parsley, chopped
- 1 tablespoon olive oil
- Salt and pepper to taste
- 4 large tortillas or flatbreads
Instructions
- Mix the Filling: In a large bowl, combine the cooked lentils, chopped olives, feta cheese, cucumber, bell pepper, parsley, olive oil, salt, and pepper. Stir until well mixed.
- Assemble the Rolls: Lay a tortilla flat on a clean surface. Spread a generous amount of the lentil mixture evenly over the tortilla, leaving about an inch from the edges.
- Roll It Up: Starting from one end, tightly roll the tortilla. Once rolled, slice into bite-sized pieces.
- Serve: Arrange the rolls on a serving platter and enjoy with your favorite dipping sauce or on their own!
**Ambrosia Picnic Fruit Skewers**

These Ambrosia Picnic Fruit Skewers are a refreshing and colorful addition to any picnic. Layered with a delightful mix of fruits, they not only look beautiful but also offer a burst of sweet flavors in every bite. Simple to make, they are perfect for both kids and adults, ensuring everyone finds a favorite fruit on the skewers.
The combination of juicy strawberries, sweet pineapple, crisp grapes, and creamy melon creates a fun and tasty treat that’s easy to grab and eat. Plus, you can customize these skewers with your favorite fruits, making them versatile for any occasion.
Tools and Supplies Needed
- Wooden skewers
- Sharp knife
- Cutting board
- Mixing bowl
- Serving platter
Ingredients
- 1 cup strawberries, hulled
- 1 cup pineapple, cubed
- 1 cup cantaloupe, cubed
- 1 cup green grapes
- 1 cup red grapes
- 1 cup honeydew melon, cubed
- Honey or yogurt for drizzling (optional)
Instructions
- Prepare the Fruits: Wash and cut the strawberries, pineapple, cantaloupe, and honeydew into bite-sized pieces. Make sure to remove any stems or leaves from the grapes.
- Assemble the Skewers: Take a wooden skewer and start layering the fruits in a colorful pattern. Alternate between different fruits for a vibrant look. Continue until the skewer is filled, leaving a little space at each end for easy handling.
- Serve: Arrange the finished skewers on a serving platter. If desired, drizzle with honey or serve alongside yogurt for dipping. Enjoy!
**Chickpea Toga Toasts**

Chickpea Toga Toasts are a delightful vegetarian option that’s both light and satisfying. These toasts feature creamy hummus topped with tender chickpeas and a sprinkle of fresh herbs, creating a tasty bite that’s perfect for any picnic. They are simple to make and can be prepared in just a few minutes, making them an ideal choice for a quick lunch or snack during your outdoor gatherings.
The combination of chickpeas and hummus provides a protein-packed boost, while the herbs add a bright freshness. Serve these toasts on crusty bread for added texture and flavor. Not only are they delicious, but they also look beautiful on a picnic spread, inviting everyone to dig in!
Tools and Supplies Needed
- Mixing bowl
- Cutting board
- Knife
- Serving platter
- Spoon
Ingredients
- 1 can (15 oz) chickpeas, drained and rinsed
- 1 cup hummus
- 4 slices of crusty bread
- 1/4 cup fresh parsley, chopped
- 1 tablespoon olive oil
- Salt and pepper, to taste
- Lemon wedges, for serving
Instructions
- Prepare the Toasts: Toast the bread slices until golden and crispy.
- Top with Hummus: Spread a generous layer of hummus on each slice of toast.
- Add Chickpeas: Carefully place a handful of chickpeas on top of the hummus.
- Garnish: Drizzle with olive oil, and sprinkle with chopped parsley. Season with salt and pepper as desired.
- Serve: Arrange the toasts on a platter and serve with lemon wedges for a zesty kick.
**Elysian Eggplant Wraps**

Elysian Eggplant Wraps are a delicious and satisfying choice for a light picnic lunch. These wraps combine roasted eggplant, fresh tomatoes, and olives, all tucked inside a warm pita. The taste is a delightful mix of savory and slightly tangy, making each bite a treat. Plus, they’re incredibly simple to whip up, perfect for anyone looking for a quick meal on the go.
These wraps not only showcase the flavors of Mediterranean cuisine, but they’re also packed with nutrients, making them a healthy option. The eggplant is roasted to perfection, enhancing its natural sweetness while providing a satisfying texture. Serve them with a side of olives for a balanced meal that’s sure to impress friends and family.
Tools and Supplies Needed
- Oven or grill
- Baking sheet
- Knife
- Cutting board
- Mixing bowl
- Serving plates
- Spatula
Ingredients
- 2 medium eggplants, sliced
- 1 cup cherry tomatoes, halved
- 1/2 cup olives, pitted and sliced
- 2 tablespoons olive oil
- 1 teaspoon salt
- 1/2 teaspoon black pepper
- 1 teaspoon paprika
- 4 pita breads
- Fresh herbs (parsley or basil) for garnish
Instructions
- Preheat the oven to 400°F (200°C). Line a baking sheet with parchment paper.
- In a mixing bowl, toss the sliced eggplant with olive oil, salt, pepper, and paprika.
- Spread the eggplant slices on the prepared baking sheet in a single layer. Roast in the oven for 25-30 minutes, or until golden brown and tender.
- While the eggplant is roasting, prepare the pita breads by warming them in a pan or microwave.
- Once the eggplant is done, assemble the wraps by placing roasted eggplant, cherry tomatoes, and olives into each pita bread.
- Garnish with fresh herbs and serve warm.
**Orzo & Herb Picnic Boxes**

Orzo & Herb Picnic Boxes are a delightful and fresh option for your outdoor gathering. This dish combines tender orzo pasta with a variety of fresh herbs, colorful cherry tomatoes, and creamy feta cheese, creating a burst of flavors in each bite. It’s simple to prepare and can be made ahead of time, making it perfect for a picnic!
The lightness of the dish complements the outdoors wonderfully, with every element working together harmoniously. Each box is not only visually appealing but also provides a satisfying and nutritious meal. Grab your favorite ingredients and let’s get cooking!
Tools and Supplies Needed
- Large pot
- Colander
- Mixing bowl
- Chopping knife
- Cutting board
- Measuring cups
- Serving containers or picnic boxes
Ingredients
- 1 cup orzo pasta
- 2 cups water or vegetable broth
- 1 cup cherry tomatoes, halved
- 1/2 cup feta cheese, diced
- 1/4 cup fresh parsley, chopped
- 1/4 cup fresh basil, chopped
- 2 tablespoons olive oil
- Salt and pepper to taste
Instructions
- Cook the Orzo: In a large pot, bring water or vegetable broth to a boil. Add the orzo and cook according to package instructions until al dente. Drain in a colander and set aside to cool.
- Mix Ingredients: In a mixing bowl, combine the cooled orzo, cherry tomatoes, feta cheese, parsley, and basil. Drizzle with olive oil and season with salt and pepper. Toss gently to combine.
- Pack for the Picnic: Divide the orzo mixture into your picnic boxes or containers. You can garnish with extra herbs if desired.
- Chill and Serve: Refrigerate until you’re ready to head out for your picnic. Serve chilled or at room temperature.